
Introduction
  /$$$$$$
 /$$__  $$
| $$  \ $$  /$$$$$$   /$$$$$$  /$$    /$$ /$$$$$$
| $$$$$$$$ /$$__  $$ |____  $$|  $$  /$$//$$__  $$
| $$__  $$| $$  \ $$  /$$$$$$$ \  $$/$$/| $$$$$$$$
| $$  | $$| $$  | $$ /$$__  $$  \  $$$/ | $$_____/
| $$  | $$|  $$$$$$$|  $$$$$$$   \  $/  |  $$$$$$$
|__/  |__/ \____  $$ \_______/    \_/    \_______/
           /$$  \ $$
          |  $$$$$$/
           \______/
The Agave Platform (https://agaveplatform.org) is an open source, science-as-a-service API platform for powering your digital lab. Agave allows you to bring together your public, private, and shared high performance computing (HPC), high throughput computing (HTC), Cloud, and Big Data resources under a single, web-friendly REST API.
- Run code
- Manage data
- Collaborate meaningfully
- Integrate anywhere
The Agave documentation site contains documentation, guides, tutorials, and lots of examples to help you build your own digital lab.
Conventions
Throughout the documentation you will regularly encounter the following variables. These represent user-specific values that should be replaced when attempting any of the calls using your account. Once you log into this site, these values will be replaced with values appropriate for you to use when copying and pasting the examples on your own.
| Variable | Description | Example |
|---|---|---|
| ${API_HOST} | Base hostname of the API. | sandbox.agaveplatform.org |
| ${API_VERSION} | Version of the API endpoint. | v2 |
| ${API_USERNAME} | Username of the current user. | nryan |
| ${API_KEY} | Client key used to request an access token from the Agave Auth service. | hZ_z3f4Hf3CcgvGoMix0aksN4BOD6 |
| ${API_SECRET} | Client secret used to request an access token from the Agave Auth service. | gTgpCecqtOc6Ao3GmZ_FecVSSV8a |
| ${API_TOKEN} | de32225c235cf47b9965997270a1496c |
JSON Notation
{
    "active": true,
    "created": "2014-09-04T16:59:33.000-05:00",
    "frequency": 60,
    "id": "0001409867973952-5056a550b8-0001-014",
    "internalUsername": null,
    "lastCheck": [
      {
        "created": "2014-10-02T13:03:25.000-05:00",
        "id": "0001412273000497-5056a550b8-0001-015",
        "message": null,
        "result": "PASSED",
        "type": "STORAGE"
      },
      {
        "created": "2014-10-02T13:03:25.000-05:00",
        "id": "0001411825368981-5056a550b8-0001-015",
        "message": null,
        "result": "FAILED",
        "type": "LOGIN"
      }
    ],
    "lastSuccess": "2014-10-02T11:03:13.000-05:00",
    "lastUpdated": "2014-10-02T13:03:25.000-05:00",
    "nextUpdate": "2014-10-02T14:03:15.000-05:00",
    "owner": "systest",
    "target": "demo.storage.example.com",
    "updateSystemStatus": false,
    "_links": {
        "checks": {
            "href": "https://sandbox.agaveplatform.org/monitor/v2/0001409867973952-5056a550b8-0001-014/checks"
        },
        "notifications": {
            "href": "https://sandbox.agaveplatform.org/notifications/v2/?associatedUuid=0001409867973952-5056a550b8-0001-014"
        },
        "owner": {
            "href": "https://sandbox.agaveplatform.org/profiles/v2/systest"
        },
        "self": {
            "href": "https://sandbox.agaveplatform.org/monitor/v2/0001409867973952-5056a550b8-0001-014"
        },
        "system": {
            "href": "https://sandbox.agaveplatform.org/systems/v2/demo.storage.example.com"
        }
    }
}
When describing the JSON objects passed back and forth with the APIs, Javascript dot notation will be used to refer to individual properties. For example, consider the following JSON object.
activerefers to the top levelactiveattribute in the response object.lastCheck.[].resultgenerically refers to the result attribute contained within any of the objects contained in thelastCheckarray.lastCheck.[0].resultspecifically refers to the result attribute contained within the first object in thelastCheckarray._links.self.hrefrefers to the href attribute in the checks object within the_linksobject.
Versioning
The current major version of Agave is given in the URI immediately following the API resource name. For example, if the endpoint is https://sandbox.agaveplatform.org/jobs/v2/, the API version would be v2. The current major version of agave is v2.
Slugs
In certain situations, usually where file system paths and names are involved in some way, Agave will generate slugify object names to make them safe to use. Slugs will be created on the fly by applying the following rules:
- Lowercase the string
- Replace spaces with a dash
- Remove any special characters and punctuation that might require encoding in the URL. Allowed characters are alphanumeric characters, numbers, underscores, and periods.
Secure communication
Agave uses SSL to secure communication with the clients. If HTTPS is not specified in the request, the request will be redirected to a secure channel.
Rate limiting
To make the API fast for everybody, rate limits apply. Unsigned requests are processed at the lowest rate limit. Signed requests with a valid access token benefit from higher rate limits — this is true even if endpoint doesn’t require an access token to be passed in the call.
Requests
The Agave API is based on REST principles: data resources are accessed via standard HTTPS requests in UTF-8 format to an API endpoint. Where possible, the API strives to use appropriate HTTP verbs for each action
| Verb | Description |
|---|---|
| GET | Used for retrieving resources. |
| POST | Used for creating resources. |
| PUT | Used for manipulating resources or collections. |
| DELETE | Used for deleting resources. |
Standard query parameters
Several URL query parameters are common across all services. The following table lists them for reference
| Name | Values | Purpose |
|---|---|---|
| offset | integer (zero-based) | Skips the first offset results in the response. |
| limit | integer | Limits the number of responses to, at most, this number. |
| pretty | boolean | If true, pretty prints the response. Default false. |
| naked | boolean | If true, returns only the value of the result attribute in the standard response wrapper. |
| filter | string | A comma-delimited list of fields to return for each object in the response. Each field may be referenced using JSON notation. See the Response Customization for more info. |
Experimental query parameters
Starting with the 2.1.10 release, two new query parameters have been introduced into the jobs api as an experimental feature. The following table lists them for reference
| Name | Values | Purpose |
|---|---|---|
| sort | asc, desc | The sort order of the response. asc by default. |
| sortBy | string | The field by which to sort the response. Any field present in the full representation of the resource that you are querying is supported. Multiple values are not currently supported. |
Responses
All data is received and returned as a JSON object. The Live Docs provide a description of all the retrievable objects.
Response Details
{
    "status": "error",
    "message": "Permission denied. You do not have permission to view this system",
    "version": "2.1.27-r8228",
    "result": {}
}
Apart from the response code, all responses from Agave are in the form of a json object. The object takes the following form.
| Key | Value Type | Value Description |
|---|---|---|
| status | string | “success” if the call succeeded or “error” indicating that the call failed. |
| message | string | A short description of the cause of the error. |
| result | object, array | The JSON response object or array |
| version | string | The current full release version of Agave. Ex “2.2.0-r8228” |
Here, for example, is the response that occurs when trying to fetch information for system to which you do not have access:
Naked Responses
In situations where you do not care to parse the wrapper for the raw response data, you may request a naked response from the API by adding naked=true in to the request URL. This will return just the value of the result attribute in the response wrapper.
Formatting
By default, all responses are serialized JSON. To receive pre-formatted JSON, add pretty=true to any query string.
Pagination
Pagination using
limitandoffsetquery parameters.
curl -sk -H \
    "Authorization: Bearer ${API_KEY}" \
    "https://sandbox.agaveplatform.org/jobs/v2/?offset=50&limit=25"
jobs-list -o 50 -l 25
All resource collections support a way of paging the dataset, taking an offset and limit as query parameters:
Note that offset numbering is zero-based and that omitting the offset parameter will return the first X elements. By default, all search and listing responses from the Science APIs are paginated in groups of 250 objects. The lone exception being the Files API which will return all results by default.
Check the documentation for the specific endpoint to see specific information.
Timestamps
Timestamps are returned in ISO 8601 format offset for Central Standard Time (-05:00) YYYY-MM-DDTHH:MM:SSZ-05:00.
CORS
Many modern applications choose to implement client-server communication exclusively in Javascript. For this reason, Agave provides cross-origin resource sharing (CORS) support so AJAX requests from a web browser are not constrained by cross-origin requests and can safely make GET, PUT, POST, and DELETE requests to the API.
Hypermedia
{
    "associationIds": [],
    "created": "2013-11-16T11:25:38.900-06:00",
    "internalUsername": null,
    "lastUpdated": "2013-11-16T11:25:38.900-06:00",
    "name": "color",
    "owner": "nryan",
    "uuid": "0001384622738900-5056a550b8-0001-012",
    "value": "red",
    "_links": {
        "self": {
            "href": "https://sandbox.agaveplatform.org/meta/v2/data/0001384622738900-5056a550b8-0001-012"
        },
        "owner": {
            "href": "https://sandbox.agaveplatform.org/profiles/v2/nryan"
        }
    }
}
Agave strives to be a fully descriptive hypermedia API. Given any endpoint, you should be able to walk the API through the links provided in the _links object in each resource representation. The following user metadata object contains two referenced objects. The first, self is common to all objects, and contains the URL of that object. The second, owner contains the URL to the profile of the user who created the object.
Customizing Responses
Returns the user id, name, and email for the authenticated user
curl -sk -H \
    "Authorization: Bearer ${API_KEY}" \
    "https://sandbox.agaveplatform.org/profiles/v2/me?filter=username,email
profiles-list -v --filter=username,email me
The response would look something like the following:
{
  "username": "nryan",
  "email": "nryan@rangers.mlb.com"
}
Returns the name, status, app id, and the url to the archived job output for every user job
curl -sk -H \
    "Authorization: Bearer ${API_KEY}" \
    "https://sandbox.agaveplatform.org/jobs/v2/?limit=2&filter=name,status,appId,_links.archiveData.href
jobs-list -v --limit=2 --filter=name,status,appId,_links.archiveData
The response would look something like the following:
[
  {
    "name" : "demo-pyplot-demo-advanced test-1414139896",
    "status": "FINISHED",
    "appId" : "demo-pyplot-demo-advanced-0.1.0",
    "_links": {
      "archiveData": {
        "href": "https://agave.iplantc.org/jobs/v2/0001414144065563-5056a550b8-0001-007/outputs/listings"
      }
    }
  },
  {
    "name": "demo-pyplot-demo-advanced test-1414270831",
    "status": "FINISHED",
    "appId" : "demo-pyplot-demo-advanced-0.1.0",
    "_links": {
      "archiveData": {
        "href": "https://agave.iplantc.org/jobs/v2/3259859908028273126-242ac115-0001-007/outputs/listings"
      }
    }
  }
]
Returns the system id, type, whether it is your default system, and the hostname from the system’s storage config
/systems/v2/?filter=id,type,default,storage.host
systems-list -v --limit=2 --filter=id,type,default,storage.host
The response would look something like the following:
[
  {
    "id": "data.agaveplatform.org",
    "type": "STORAGE",
    "default": true,
    "storage": {
      "host": "dtn01.prod.agaveplatform.org"
    }
  },
  {
    "id": "docker.tacc.utexas.edu",
    "type": "EXECUTION",
    "default": true,
    "storage": {
      "host": "129.114.6.50"
    }
  }
]
In many situations, Agave may return back too much or too little information in the response to a query. For example, when searching jobs, the inputs and parameters fields are not included in the default summary response objects. You can customize the responses you receive from all the Science APIs using the filter query parameter.
The filter query parameter takes a comma-delimited list of fields to return for each object in the response. Each field may be referenced using JSON notation similar to the search syntax (minus the .[operation] suffix. The examples to the right show sample requests and responses.
Status Codes
The API uses the following response status codes, as defined in the RFC 2616 on successful and unsuccessful requests.
Success Codes
| Response Code | Meaning | Description |
|---|---|---|
| 200 | Success | The request succeeded. Life is good. |
| 201 | Created | The request succeeded and a new resource was created. Only applicable on PUT and POST actions. |
| 202 | Accepted | The request has been accepted for processing, but the processing has not been completed. Common for all async actions such as job submissions, file transfers, etc. |
| 206 | Partial Content | The server has fulfilled the partial GET request for the resource. This will always be the return status of a request using a Range header. |
| 301 | Moved Permanently | The requested resource has been assigned a new permanent URI. You should follow the Location header, repeating the request. |
| 304 | Not Modified | You requested an action that succeeded, but did not modify the resource. Sound, fury, that whole thing. |
Error Codes
| Response Code | Meaning | Description |
|---|---|---|
| 400 | Bad Request | Your request was invalid |
| 401 | Unauthorized | Authentication required, but not provided |
| 403 | Forbidden | You do not have permission to access the given resource |
| 404 | Not Found | No resource was found at the given URL |
| 405 | Method Not Allowed | You tried to access a resource with an invalid method |
| 406 | Not Acceptable | You requested a response format that isn’t supported |
| 410 | Gone | The resource you requested has been removed and/or deleted |
| 429 | Too Many Requests | Curb your enthusiasm. You’re going way to fast. |
| 500 | Internal Server Error | It’s not you, it’s us. We had a problem processing your request. Try again later. |
| 503 | Service Unavailable | The service is temporarially unavailable. Please try again later. |
| 504 | Gateway Timeout | The service, while acting as a gateway or proxy, did not receive a timely response from the upstream server. |
SDK
The Agave client SDK make it easy to add data management, code execution, collaborative features, and third-party integrations into your application. Officially supported SDK are available in Python, Javascript, Java, an PHP. Community provided and autogenerated libraries are available in several other languages
AngularJS
Install from bower, npm, or yarn
bower install agaveplatform/agave-angularjs-sdk
npm install agaveplatform/agave-angularjs-sdk
yarn install agaveplatform/agave-angularjs-sdk
Checkout the source code
git clone https://github.com/agaveplatform/agave-angularjs-sdk.git
The AngularJS SDK is a native Angularjs module with complete coverage of the Agave Science API. It features individual Angular services for each API and domain objects to assist with marshalling requests and responses.
Python
Install from pip
pip install agavepy
Checkout the source code
git clone https://github.com/tacc/agavepy.git
The Python SDK, agaveypy, is a simple Python binding for the Agave Platform. It provides both sync and async interfaces for long-running tasks as well as advanced token management.
Java (beta)
Checkout the source code
git clone https://github.com/agaveplatform/java-sdk.git
cd java-sdk
mvn clean install
Reference in your pom file
<dependency>
    <groupId>Agave</groupId>
    <artifactId>Agave</artifactId>
    <version>0.0.1-SNAPSHOT</version>
    <scope>compile</scope>
</dependency>
The Java SDK is a Java 7+ library to the Science APIs. It features a full domain model to interact with the Science APIs and support services. This is currently a preview version of the library and feedback is welcome to help improve the developer experience.
PHP (beta)
Install with composer
composer require agaveplatform/php-sdk
Checkout the source code
git clone https://github.com/agaveplatform/php-sdk.git
The PHP SDK is a PHP 5.5+ library to the Science APIs. It features full coverage of the Science APIs as well as a rich object model to simplify interactions. This is currently a preview version of the library and feedback is welcome to help improve the developer experience.
Web API
The Agave Science APIs power the Science-as-a-Service functionality of the Agave Platform. These web APIs allow you to manage all aspects of your code, collaborations, data, and your digital lab.
The Science APIs follow basic REST concepts and use JSON to exchange data. Formal documentation of all endpoints is available in Swagger 2.0 format. You may access the Swagger definitions directly in JSON and YAML formats.
Interactive API Explorer
Often it is easier to explore a new API using an interactive tool rather than writing code. We provide our Live Docs, an interactive API browser based on the Swagger UI project, to help you kick the tires on the API and get example requests and responses to help with your onboarding efforts.
Guides
The Agave REST APIs enable applications to create and manage digital laboratories that spans campuses, the cloud, and multiple data centers using a cohesive set of web-friendly interfaces.
Authorization
  /$$$$$$   /$$$$$$              /$$     /$$
 /$$__  $$ /$$__  $$            | $$    | $$
| $$  \ $$| $$  \ $$ /$$   /$$ /$$$$$$  | $$$$$$$
| $$  | $$| $$$$$$$$| $$  | $$|_  $$_/  | $$__  $$
| $$  | $$| $$__  $$| $$  | $$  | $$    | $$  \ $$
| $$  | $$| $$  | $$| $$  | $$  | $$ /$$| $$  | $$
|  $$$$$$/| $$  | $$|  $$$$$$/  |  $$$$/| $$  | $$
 \______/ |__/  |__/ \______/    \___/  |__/  |__/
Most requests to the Agave REST APIs require authorization; that is, the user must have granted permission for an application to access the requested data. To prove that the user has granted permission, the request header sent by the application must include a valid access token.
Before you can begin the authorization process, you will need to register your client application. That will give you a unique client key and secret key to use in the authorization flows.
Supported Authorization Flows
The Agave REST APIs currently supports four authorization flows:
- The Authorization Code flow first gets a code then exchanges it for an access token and a refresh token. Since the exchange uses your client secret key, you should make that request server-side to keep the integrity of the key. An advantage of this flow is that you can use refresh tokens to extend the validity of the access token.
- The Implicit Grant flow is carried out client-side and does not involve secret keys. The access tokens that are issued are short-lived and there are no refresh tokens to extend them when they expire.
- Resource Owner Password Credentials flow is suitable for native and mobile applications as well as web services, this flow allows client applications to obtain an access token for a user by directly providing the user credentials in an authentication request. This flow exposes the user’s credentials to the client application and is primarily used in situations where the client application is highly trusted such as the command line.
- The Client Credentials flow enables users to interact with their own protected resources directly without requiring browser interaction. This is a critical addition for use at the command line, in scripts, and in offline programs. This flow assumes the person registering the client application and the user on whose behalf requests are made be the same person.
| Flow | Can fetch a user’s data by requesting access? | Uses secret key? (key exchange must happen server-side!) | Access token can be refreshed? |
|---|---|---|---|
| Authorization Code | Yes | Yes | Yes |
| Implicit Grant | Yes | No | No |
| Resource Owner Password Credentials | Yes | Yes | Yes |
| Client Credentials | No | Yes | No |
| Unauthorized | No | No | No |
Authorization Code
The method is suitable for long-running applications in which the user logs in once and the access token can be refreshed. Since the token exchange involves sending your secret key, this should happen on a secure location, like a backend service, not from a client like a browser or mobile apps. This flow is described in RFC-6749. This flow is also the authorization flow used in our REST API Tutorial.
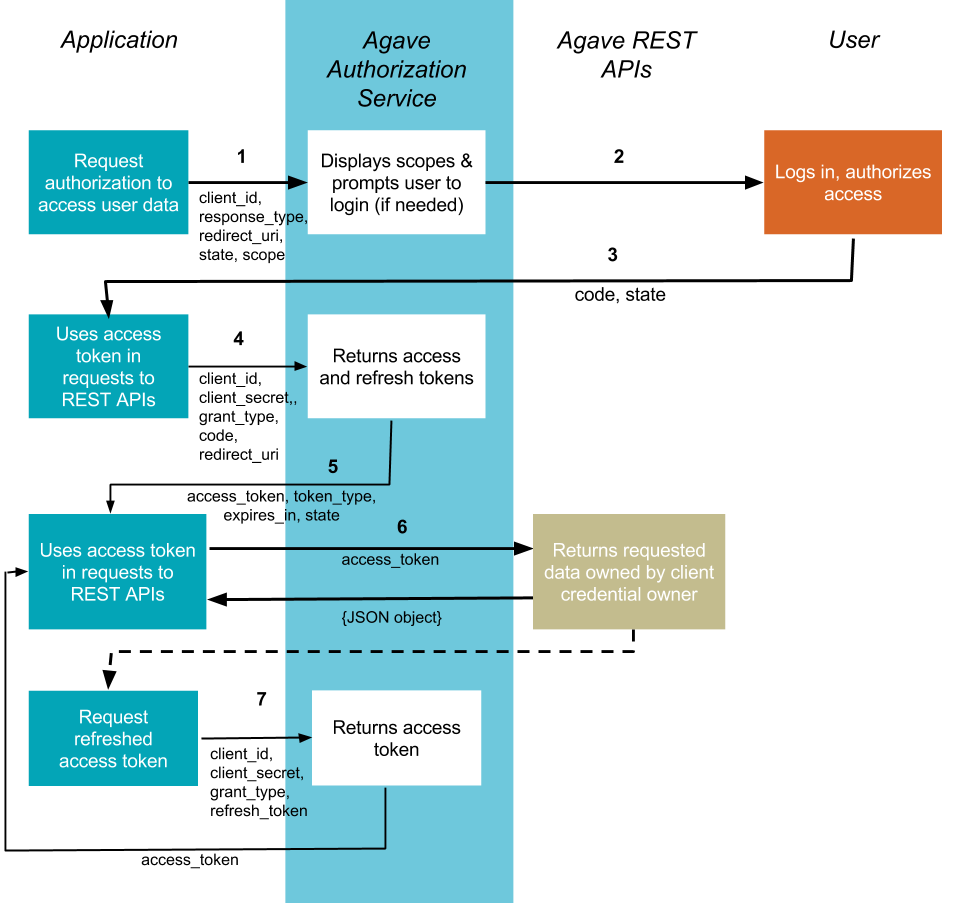
1. Your application requests authorization
A typical request will look something like this
https://sandbox.agaveplatform.org/authorize/?client_id=gTgp...SV8a&response_type=code&redirect_uri=https%3A%2F%2Fexample.com%2Fcallback&scope=PRODUCTION&state=866
The authorization process starts with your application sending a request to the Agave authorization service. (The reason your application sends this request can vary: it may be a step in the initialization of your application or in response to some user action, like a button click.) The request is sent to the /authorize endpoint of the Authorization service:
The request will include parameters in the query string:
| Request body parameter | Value |
|---|---|
| response_type | Required. As defined in the OAuth 2.0 specification, this field must contain the value “code”. |
| client_id | Required. The application’s client ID, obtained when the client application was registered with Agave (see Client Registration). |
| redirect_uri | Required. The URI to redirect to after the user grants/denies permission. This URI needs to have been entered in the Redirect URI whitelist that you specified when you registered your application. The value of redirect_uri here must exactly match one of the values you entered when you registered your application, including upper/lowercase, terminating slashes, etc. |
| scope | Optional. A space-separated list of scopes. Currently only PRODUCTION is supported. |
| state | Optional, but strongly recommended. The state can be useful for correlating requests and responses. Because your redirect_uri can be guessed, using a state value can increase your assurance that an incoming connection is the result of an authentication request. If you generate a random string or encode the hash of some client state (e.g., a cookie) in this state variable, you can validate the response to additionally ensure that the request and response originated in the same browser. This provides protection against attacks such as cross-site request forgery. See RFC-6749. |
2. The user is asked to authorize access within the scopes
The Agave Authorization service presents details of the scopes for which access is being sought. If the user is not logged in, they are prompted to do so using their API username and password.
When the user is logged in, they are asked to authorize access to the actions and services defined in the scopes.
3. The user is redirected back to your specified URI
Let’s assume you provided the following callback URL.
https://example.com/callback
After the user accepts (or denies) your request, the Agave Authorization service redirects back to the redirect_uri. If the user has accepted your request, the response query string contains a code parameter with the access code you will use in the next step to retrieve an access token.
Sample success redirect back from the server
https://example.com/callback?code=Pq3S..M4sY&state=866
| Query parameter | Value |
|---|---|
| access_token | An access token that can be provided in subsequent calls, for example to Agave Profiles API. |
| token_type | Value: “bearer” |
| expires_in | The time period (in seconds) for which the access token is valid. |
| state | The value of the state parameter supplied in the request. |
If the user has denied access, there will be no access token and the final URL will have a query string containing the following parameters:
# Sample denial redirect back from the server
https://example.com/callback?error=access_denied&state=867
| Query parameter | Value |
|---|---|
| error | The reason authorization failed, for example: “access_denied” |
| state | The value of the state parameter supplied in the request. |
4. Your application requests refresh and access tokens
POST https://sandbox.agaveplatform.org/token
When the authorization code has been received, you will need to exchange it with an access token by making a POST request to the Agave Authorization service, this time to its /token endpoint. The body of this POST request must contain the following parameters:
| Request body parameter | Value |
|---|---|
| grant_type | Required. As defined in the OAuth 2.0 specification, this field must contain the value “authorization_code”. |
| code | Required. The authorization code returned from the initial request to the Account’s /authorize endpoint. |
| redirect_uri | Required. This parameter is used for validation only (there is no actual redirection). The value of this parameter must exactly match the value of redirect_uri supplied when requesting the authorization code. |
| client_id | Required. The application’s client ID, obtained when the client application was registered with Agave (see Client Registration). |
| client_secret | Required. The application’s client secret key, obtained when the client application was registered with Agave (see Client Registration). |
5. The tokens are returned to your application
# An example cURL request
curl -X POST -d "grant_type= authorization_code"
    -d "code=Pq3S..M4sY"
    -d "client_id=gTgp...SV8a"
    -d "client_secret=hZ_z3f...BOD6"
    -d "redirect_uri=https%3A%2F%2Fwww.foo.com%2Fauth"
    https://sandbox.agaveplatform.org/token
The response would look something like this:
{
    "access_token": "a742...12d2",
    "expires_in": 14400,
    "refresh_token": "d77c...Sacf",
    "token_type": "bearer"
}
On success, the response from the Agave Authorization service has the status code 200 OK in the response header, and a JSON object with the fields in the following table in the response body:
| Key | Value type | Value description |
|---|---|---|
| access_token | string | An access token that can be provided in subsequent calls, for example to Agave REST APIs. |
| token_type | string | How the access token may be used: always “Bearer”. |
| expires_in | int | The time period (in seconds) for which the access token is valid. (Maximum 14400 seconds, or 4 hours.) |
| refresh_token | string | A token that can be sent to the Spotify Accounts service in place of an authorization code. (When the access code expires, send a POST request to the Accounts service /token endpoint, but use this code in place of an authorization code. A new access token will be returned. A new refresh token might be returned too.) |
6. Use the access token to access the Agave REST APIs
Make a call to the API
curl -H "Authorization: Bearer a742...12d2"
    https://sandbox.agaveplatform.org/profiles/v2/me?pretty=true&naked=true
The response would look something like this:
{
    "create_time": "20140905072223Z",
    "email": "rjohnson@mlb.com",
    "first_name": "Randy",
    "full_name": "Randy Johnson",
    "last_name": "Johnson",
    "mobile_phone": "(123) 456-7890",
    "phone": "(123) 456-7890",
    "status": "Active",
    "uid": 0,
    "username": "rjohnson"
}
Once you have a valid access token, you can include it in Authorization header for all subsequent requests to APIs in the Platform.
7. Requesting access token from refresh token
curl -sku "Authorization: Basic Qt3c...Rm1y="
    -d grant_type=refresh_token
    -d refresh_token=d77c...Sacf
    https://sandbox.agaveplatform.org/token
The response would look something like this.
{
    "access_token": "61e6...Mc96",
    "expires_in": 14400,
    "token_type": "bearer"
}
Access tokens are deliberately set to expire after a short time, usually 4 hours, after which new tokens may be granted by supplying the refresh token originally obtained during the authorization code exchange.
The request is sent to the token endpoint of the Agave Authorization service:
POST https://sandbox.agaveplatform.org/token
The body of this POST request must contain the following parameters:
| Request body parameter | Value |
|---|---|
| grant_type | Required. Set it to “refresh_token”. refresh_token |
| refresh_token | Required. The refresh token returned from the authorization code exchange. |
The header of this POST request must contain the following parameter:
| Header parameter | Value |
|---|---|
| Authorization | Required. Base 64 encoded string that contains the client ID and client secret key. The field must have the format: Authorization: Basic . (This can also be achieved with curl using the `-u` option and specifying the raw colon separated client_id and client_secret.) |
Implicit Grant
Implicit grant flow is for clients that are implemented entirely using JavaScript and running in resource owner’s browser. You do not need any server side code to use it. This flow is described in RFC-6749.
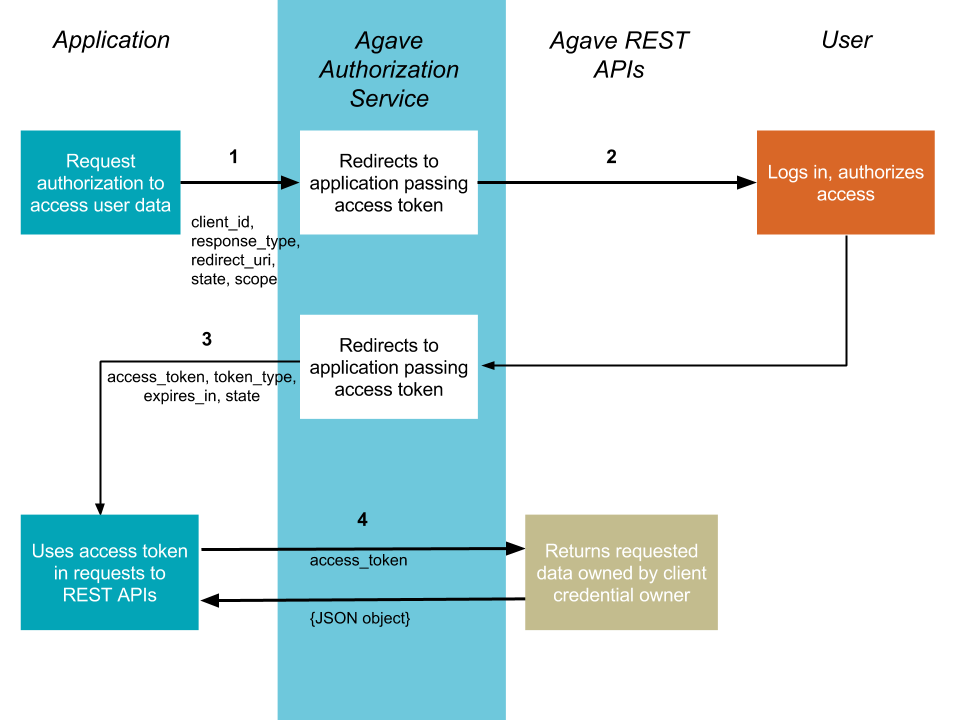
1. Your application requests authorization
https://sandbox.agaveplatform.org/authorize?client_id=gTgp...SV8a&redirect_uri=http:%2F%2Fexample.com%2Fcallback&scope=PRODUCTION&response_type=token&state=867
The flow starts off with your application redirecting the user to the /authorize endpoint of the Authorization service. The request will include parameters in the query string:
| Request body parameter | Value |
|---|---|
| response_type | Required. As defined in the OAuth 2.0 specification, this field must contain the value “token”. |
| client_id | Required. The application’s client ID, obtained when the client application was registered with Agave (see Client Registration). |
| redirect_uri | Required. This parameter is used for validation only (there is no actual redirection). The value of this parameter must exactly match the value of redirect_uri supplied when requesting the authorization code. |
| scope | Required. A space-separated list of scopes. Currently only PRODUCTION is supported. |
| state | Optional, but strongly recommended. The state can be useful for correlating requests and responses. Because your redirect_uri can be guessed, using a state value can increase your assurance that an incoming connection is the result of an authentication request. If you generate a random string or encode the hash of some client state (e.g., a cookie) in this state variable, you can validate the response to additionally ensure that the request and response originated in the same browser. This provides protection against attacks such as cross-site request forgery. See RFC-6749. |
| show_dialog | Optional. Whether or not to force the user to approve the app again if they’ve already done so. If false (default), a user who has already approved the application may be automatically redirected to the URI specified by redirect_uri. If true, the user will not be automatically redirected and will have to approve the app again. |
2. The user is asked to authorize access within the scopes
The Agave Authorization service presents details of the scopes for which access is being sought. If the user is not logged in, they are prompted to do so using their API username and password.
When the user is logged in, they are asked to authorize access to the services defined in the scopes. By default all of the Core Science APIs fall under a single scope called, PRODUCTION.
3. The user is redirected back to your specified URI
Let’s assume we specified the following callback address.
https://example.com/callback
A valid success response would be
https://example.com/callback#access_token=Vr17...amUa&token_type=bearer&expires_in=3600&state=867
After the user grants (or denies) access, the Agave Authorization service redirects the user to the redirect_uri. If the user has granted access, the final URL will contain the following data parameters in the query string.
| Query parameter | Value |
|---|---|
| access_token | An access token that can be provided in subsequent calls, for example to Agave Profiles API. |
| token_type | Value: “bearer” |
| expires_in | The time period (in seconds) for which the access token is valid. |
| state | The value of the state parameter supplied in the request. |
If the user has denied access, there will be no access token and the final URL will have a query string containing the following parameters:
A failed response would resemble something like
https://example.com/callback?error=access_denied&state=867
| Query parameter | Value |
|---|---|
| error | The reason authorization failed, for example: “access_denied” |
| state | The value of the state parameter supplied in the request. |
4. Use the access token to access the Agave REST APIs
A call to the profiles API to fetch the profile of the authenticated user would look like the following
curl -H "Authorization: Bearer 61e6...Mc96" https://sandbox.agaveplatform.org/profiles/v2/me?pretty=true
profiles-list -v me
The response would look something like this:
{
    "create_time": "20140905072223Z",
    "email": "nryan@mlb.com",
    "first_name": "Nolan",
    "full_name": "Nolan Ryan",
    "last_name": "Ryan",
    "mobile_phone": "(123) 456-7890",
    "phone": "(123) 456-7890",
    "status": "Active",
    "uid": 0,
    "username": "nryan"
}
The access token allows you to make requests to any of the Agave REST APIs on behalf of the authenticated user.
Resource Owner Password Credentials
The method is suitable for scenarios where there is a high degree of trust between the end-user and the client application. This could be a Desktop application, shell script, or server-to-server communication where user authorization is needed. This flow is described in RFC-6749.
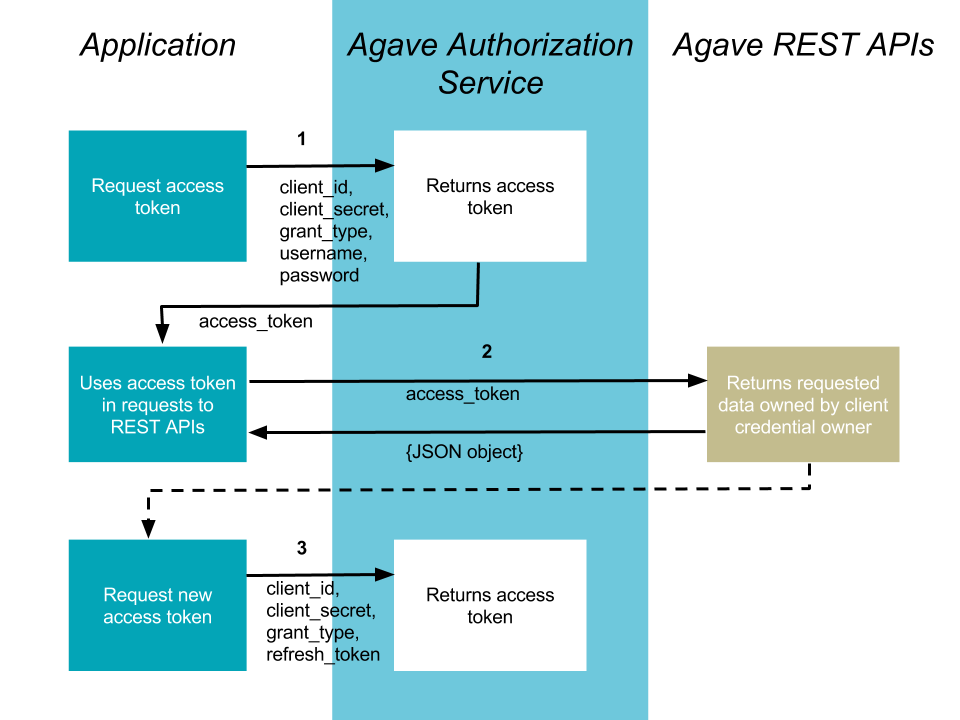
1. Your application requests authorization
curl -sku "Authorization: Basic Qt3c...Rm1y="
    -d grant_type=password
    -d username=rjohnson
    -d password=password
    -d scope=PRODUCTION
    https://sandbox.agaveplatform.org/token
auth-tokens-create -u rjohnson -p password
The response would look something like this:
{
    "access_token": "3Dsr...pv21",
    "expires_in": 14400,
    "refresh_token": "dyVa...MqR0",
    "token_type": "bearer"
}
The request is sent to the /token endpoint of the Agave Authentication service. The request will include the following parameters in the request body:
| Request body parameter | Value |
|---|---|
| grant_type | Required. Set it to “refresh_token”. |
| username | Required. The username of an active API user. |
| password | Required. The password of an active API user. |
| scope | Required. A space-separated list of scopes. Currently only PRODUCTION is supported. |
The header of this POST request must contain the following parameter:
| Header parameter | Value |
|---|---|
| Authorization | Required. Base 64 encoded string that contains the client ID and client secret key. The field must have the format: Authorization: Basic . (This can also be achieved with curl using the `-u` option and specifying the raw colon separated client_id and client_secret.) |
https://example.com/callback?error=access_denied
If the user has not accepted your request or an error has occurred, the response query string contains an error parameter indicating the error that occurred during login. For example:
2. Use the access token to access the Agave REST APIs
curl -H "Authorization: Bearer 3Dsr...pv21"
    https://sandbox.agaveplatform.org/profiles/v2/me?pretty=true
The response would look something like this:
{
    "create_time": "20140905072223Z",
    "email": "rjohnson@mlb.com",
    "first_name": "Randy",
    "full_name": "Randy Johnson",
    "last_name": "Johnson",
    "mobile_phone": "(123) 456-7890",
    "phone": "(123) 456-7890",
    "status": "Active",
    "uid": 0,
    "username": "rjohnson"
}
The access token allows you to make requests to any of the Agave REST APIs on behalf of the authenticated user.
3. Requesting access token from refresh token
curl -sku "Authorization: Basic Qt3c...Rm1y="
    -d grant_type=refresh_token
    -d refresh_token=dyVa...MqR0
    -d scope=PRODUCTION
    https://sandbox.agaveplatform.org/token
The response would look something like this:
{
    "access_token": "8erF...NGly",
    "expires_in": 14400,
    "token_type": "bearer"
}
Access tokens are deliberately set to expire after a short time, usually 4 hours, after which new tokens may be granted by supplying the refresh token obtained during original request.
The request is sent to the token endpoint of the Agave Authorization service. The body of this POST request must contain the following parameters:
| Request body parameter | Value |
|---|---|
| grant_type | Required. Set it to “refresh_token”. refresh_token |
| refresh_token | Required. The refresh token returned from the authorization code exchange. |
| scope | Required. A space-separated list of scopes. Required. Currently only PRODUCTION is supported. |
The header of this POST request must contain the following parameter:
| Header parameter | Value |
|---|---|
| Authorization | Required. Base 64 encoded string that contains the client ID and client secret key. The field must have the format: Authorization: Basic . (This can also be achieved with curl using the `-u` option and specifying the raw colon separated client_id and client_secret.) |
Client Credentials
The method is suitable for authenticating your requests to the Agave REST API. This flow is described in RFC-6749.
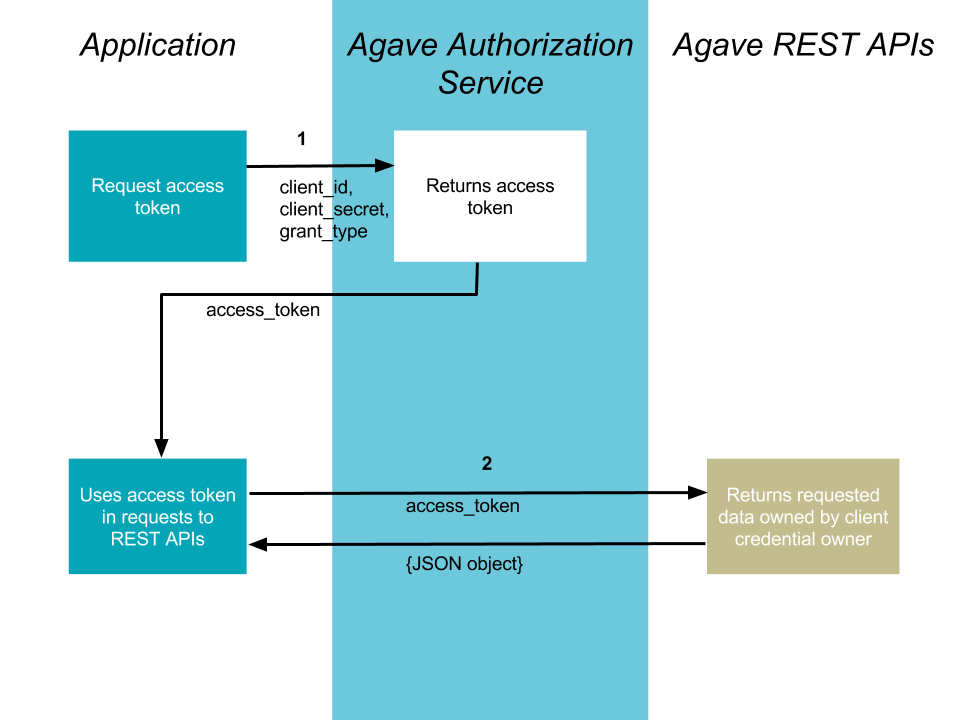
1. Your application requests authorization
curl -sku "Authorization: Basic Qt3c...Rm1y="
    -d grant_type=client_credentials
    -d scope=PRODUCTION
    https://sandbox.agaveplatform.org/token
The response would look something like this:
{
    "access_token": "61e6...Mc96",
    "expires_in": 14400,
    "token_type": "bearer"
}
The request is sent to the /token endpoint of the Agave Authentication service. The request must include the following parameters in the request body:
| Request body parameter | Value |
|---|---|
| grant_type | Required. Set it to “client_credentials”. |
| scope | Optional. A space-separated list of scopes. Currently on PRODUCTION is supported. |
The header of this POST request must contain the following parameter:
| Header parameter | Value |
|---|---|
| Authorization | Required. Base 64 encoded string that contains the client ID and client secret key. The field must have the format: Authorization: Basic . (This can also be achieved with curl using the `-u` option and specifying the raw colon separated client_id and client_secret.) |
2. Use the access token to access the Agave REST APIs
curl -H "Authorization: Bearer 61e6...Mc96"
     https://sandbox.agaveplatform.org/profiles/v2/me
The response would look something like this:
{
    "email": "nryan@mlb.com",
    "firstName" : "Nolan",
    "lastName" : "Ryan",
    "position" : "null",
    "institution" : "Houston Astros",
    "phone": "(123) 456-7890",
    "fax" : null,
    "researchArea" : null,
    "department" : null,
    "city" : "Houston",
    "state" : "TX",
    "country" : "USA",
    "gender" : "M",
    "_links" : {
      "self" : {
        "href" : "https://sandbox.agaveplatform.org/profiles/v2/nryan"
      },
      "users" : {
        "href" : "https://sandbox.agaveplatform.org/profiles/v2/nryan/users"
      }
    }
}
The access token allows you to make requests to any of the Agave REST APIs on behalf of the authenticated user.
Token lifetimes
There are two kinds of tokens you will obtained: access and refresh. Access token lifetimes are configured by the organization operating each tenant and vary based on the flow used to obtain them. By default, access tokens are valid for 4 hours.
| Authorization Flow | Access Token Lifetime | Refresh Token Lifetime |
|---|---|---|
| Authorization | 4 hours | infinite |
| Implicit | 1 hour | n/a |
| User Credential Password | 4 hours | infinite |
| Client Credentials | 4 hours | n/a |
Token management
Agave will return a unique access token for each Client Application used to authenticate a user with a specific OAuth flow.
This means that a client application authenticating a user using an Implicit flow will receive a different access token than if it authenticated the same user using a Client Credentials flow.
It also means that a client application repeatedly authenticating a user with the same OAuth flow will receive the same access token (an refresh, if applicable for the flow) in the response until the token expires or is manually revoked.
One implication of this behavior is that, if you have a distributed application that requires different parts to interact with Agave on behalf of a user, then it is important that you abstract out management of user tokens to a separate service to avoid refreshing the token in one of your services and simultaneously invaliding it all the others.
Revoking Tokens
curl -sku "$API_KEY:$API_SECRET" -XPOST -d "token=61e6...Mc96" https://sandbox.agaveplatform.org/revoke
auth-tokens-revoke
An empty response will be returned.
Access tokens will automatically expire after a predetermined amount of time. You may also manually revoke a token by making a POST request to the token revocation service using the same client key and secret used to obtain the token. After revocation, both the access and refresh token (if applicable) are instantly invalidated. All attempts to use them from that moment on will return a 401 response.
Clients and API Keys
  /$$$$$$  /$$ /$$                       /$$
 /$$__  $$| $$|__/                      | $$
| $$  \__/| $$ /$$  /$$$$$$  /$$$$$$$  /$$$$$$   /$$$$$$$
| $$      | $$| $$ /$$__  $$| $$__  $$|_  $$_/  /$$_____/
| $$      | $$| $$| $$$$$$$$| $$  \ $$  | $$   |  $$$$$$
| $$    $$| $$| $$| $$_____/| $$  | $$  | $$ /$$\____  $$
|  $$$$$$/| $$| $$|  $$$$$$$| $$  | $$  |  $$$$//$$$$$$$/
 \______/ |__/|__/ \_______/|__/  |__/   \___/ |_______/
By now you already have a user account. Your user account identifies you to the web applications you interact with. A username and password is sufficient for interacting with an application because the application has a user interface, so it knows that the authenticated user is the same one interacting with it. The Agave API does not have a user interface, so simply providing it a username and password is not sufficient. Agave needs to know both the user on whose behalf it is acting as well as the client application that is making the call. Whereas every person has a single user account, they may leverage multiple services to do their daily work. They may start out using Agave ToGo to kick of an analysis, then switch to MyPlant to discuss some results, then receive an Slack notice that new data has been shared with them, click a PostIt link that allows them to download the data directly to their desktop, edit the file locally, and save it in a local folder that syncs with their iPlant cloud storage in the background.
In each of the above interactions, the user is the same, but the context with which they interact with the Agave is different. Further, the above interactions all involved client applications developed by the same organization. The situation is further complicated when one or more 3rd party client applications are used to leverage the infrastructure. Agave needs to track both the users and client applications with whom it interacts. It does this through the issuance of API keys.
Agave uses OAuth2 to authenticate users and make authorization decisions about what APIs client applications have permission to access. A discussion of OAuth2 is out of the context of this tutorial. You can read more about it on the OAuth2 website or from the websites of any of the many other service providers using it today. In this section, we will walk you through getting your API keys so we can stay focused on learning how to interact with the Agave’s APIs.
Creating a new client application
In order to interact with any of the Agave APIs, you will need to first get a set of API keys. You can get your API keys from the Clients service. The example below shows how to get your API keys using both curl and the Agave CLI.
curl -sku "$API_USERNAME:$API_PASSWORD" -X POST -d "client_name=my_cli_app" -d "description=Client app used for scripting up cool stuff" https://sandbox.agaveplatform.org/clients/v2
clients-create -S -v -N my_cli_app -D "Client app used for scripting up cool stuff"
Note: the -S option will store the new API keys for future use so you don’t need to manually enter then when you authenticate later.
The response to this call will look something like:
{
   "callbackUrl":"",
   "key":"gTgp...SV8a",
   "secret":"hZ_z3f...BOD6",
   "description":"Client app used for scripting up cool stuff",
   "name":"my_cli_app",
   "tier":"Unlimited",
   "_links":{
      "self":{
         "href":"https://sandbox.agaveplatform.org/clients/v2/my_cli_app"
      },
      "subscriber":{
         "href":"https://sandbox.agaveplatform.orgprofiles/v2/nryan"
      },
      "subscriptions":{
         "href":"https://sandbox.agaveplatform.org/clients/v2/my_cli_app/subscriptions/"
      }
   }
}
Your API keys should be kept in a secure place and not shared with others. This will prevent other, unauthorized client applications from impersonating your application. If you are developing a web application, you should also provide a valid callbackUrl when creating your keys. This will reduce the risk of your keys being reused even if they are compromised. You should also create a unique set of API keys for each client application you develop. This will allow you to better monitor your usage on a client application-to-application basis and reduce the possibility of inadvertently hitting usage quotas due to cumulative usage across client applications.
Listing your existing client applications
curl -sku "$API_USERNAME:$API_PASSWORD" https://sandbox.agaveplatform.org/clients/v2
clients-list -v
The response to this call will look something like:
[
   {
      "callbackUrl":"",
      "key":"xn8b...0y3d",
      "description":"",
      "name":"DefaultApplication",
      "tier":"Unlimited",
      "_links":{
         "self":{
            "href":"https://sandbox.agaveplatform.org/clients/v2/DefaultApplication"
         },
         "subscriber":{
            "href":"https://sandbox.agaveplatform.orgprofiles/v2/nryan"
         },
         "subscriptions":{
            "href":"https://sandbox.agaveplatform.org/clients/v2/DefaultApplication/subscriptions/"
         }
      }
   },
   {
      "callbackUrl":"",
      "key":"gTgp...SV8a",
      "description":"Client app used for scripting up cool stuff",
      "name":"my_cli_app",
      "tier":"Unlimited",
      "_links":{
         "self":{
            "href":"https://sandbox.agaveplatform.org/clients/v2/my_cli_app"
         },
         "subscriber":{
            "href":"https://sandbox.agaveplatform.orgprofiles/v2/nryan"
         },
         "subscriptions":{
            "href":"https://sandbox.agaveplatform.org/clients/v2/my_cli_app/subscriptions/"
         }
      }
   }
]
Over time you may develop several client applications. Managing several sets of API keys can become tricky. You can see which applications you have created by querying the Clients service.
Deleting client registrations
curl -sku "$API_USERNAME:$API_PASSWORD" -X DELETE https://sandbox.agaveplatform.org/clients/v2/my_cli_app
clients-delete -v my_cli_app
The response to this call is simply a null result object.
At some point you may need to delete a client. You can do this by requesting a DELETE on your client in the Clients service.
Listing current subscriptions
curl -sku "$API_USERNAME:$API_PASSWORD" https://sandbox.agaveplatform.org/clients/v2/my_cli_app/subscriptions
clients-subscriptions-list -v my_cli_app
The response to this call will look something like:
[
  {
     "context":"/apps",
     "name":"Apps",
     "provider":"admin",
     "status":"PUBLISHED",
     "version":"v2",
     "tier":"Unlimited",
     "_links":{
        "api":{
           "href":"https://sandbox.agaveplatform.org/apps/v2/"
        },
        "client":{
           "href":"https://sandbox.agaveplatform.org/clients/v2/systest_test_client"
        },
        "self":{
           "href":"https://sandbox.agaveplatform.org/clients/v2/systest_test_client/subscriptions/"
        }
     }
  },
  {
     "context":"/files",
     "name":"Files",
     "provider":"admin",
     "status":"PUBLISHED",
     "version":"v2",
     "tier":"Unlimited"
     "_links":{
        "api":{
           "href":"https://sandbox.agaveplatform.org/files/v2/"
        },
        "client":{
           "href":"https://sandbox.agaveplatform.org/clients/v2/systest_test_client"
        },
        "self":{
           "href":"https://sandbox.agaveplatform.org/clients/v2/systest_test_client/subscriptions/"
        }
     }
  },
  ...
]
When you register a new client application and get your API keys, you are given access to all the Agave APIs by default. You can see the APIs you have access to by querying the subscriptions collection of your client.
Updating client subscriptions
curl -sku "$API_USERNAME:$API_PASSWORD" -X POST \
    -d "apiName=transforms" \
    -d "apiVersion=v2" \
    -d "apiProvider=admin" \
    -d "tier=UNLIMITED" \
    https://sandbox.agaveplatform.org/clients/v2/my_cli_app/subscriptions
clients-subscriptions-update -v -N uuids -R v2 -P admin -T UNLIMITED my_cli_app
You can also use a wildcard to resubscribe to all the default science APIs to which all new clients are subscribed.
curl -sku "$API_USERNAME:$API_PASSWORD" -X POST \
    -d "apiName=*" \
    https://sandbox.agaveplatform.org/clients/v2/my_cli_app/subscriptions
clients-subscriptions-update -v -N * my_cli_app
The response to this call will be a JSON array identical to the one returned when listing your subscriptions.
Over time, new APIs will be deployed. When this happens you will need to subscribe to the new APIs. You can do this by POSTing a request to the subscription collection with the information about the new API.
Systems
  /$$$$$$                     /$$
 /$$__  $$                   | $$
| $$  \__//$$   /$$ /$$$$$$$/$$$$$$   /$$$$$$ /$$$$$$/$$$$
|  $$$$$$| $$  | $$/$$_____|_  $$_/  /$$__  $| $$_  $$_  $$
 \____  $| $$  | $|  $$$$$$  | $$   | $$$$$$$| $$ \ $$ \ $$
 /$$  \ $| $$  | $$\____  $$ | $$ /$| $$_____| $$ | $$ | $$
|  $$$$$$|  $$$$$$$/$$$$$$$/ |  $$$$|  $$$$$$| $$ | $$ | $$
 \______/ \____  $|_______/   \___/  \_______|__/ |__/ |__/
          /$$  | $$
         |  $$$$$$/
          \______/
A system in Agave represents a server or collection of servers. A server can be physical, virtual, or a collection of servers exposed through a single hostname or ip address. Systems are identified and referenced in Agave by a unique ID unrelated to their ip address or hostname. Because of this, a single physical system may be registered multiple times. This allows different users to configure and use a system in whatever way they need to for their specific needs.
Systems come in two flavors: storage and execution. Storage systems are only used for storing and interacting with data. Execution systems are used for running apps (aka jobs or batch jobs) as well as storing and interacting with data.
The Systems service gives you the ability to add and discover storage and compute resources for use in the rest of the API. You may add as many or as few storage systems as you need to power your digital lab. When you register a system, it is private to you and you alone. Systems can also be published into the public space for all users to use. Depending on who is administering Agave for your organization, this may have already happened and you may already have one or more storage systems available to you by default.
In this tutorial we walk you through how to discovery, manage, share, and configure systems for your specific needs. This tutorial is best done in a hands-on manner, so if you do not have a compute or storage system of your own to use, you can grab a VM from our sandbox.
Discovering systems
curl -sk -H "Authorization: Bearer $ACCESS_TOKEN" https://sandbox.agaveplatform.org/systems/v2/
systems-list -v
The response will be something like this:
[
  {
    "id" : "data.agaveplatform.org",
    "name" : "iPlant Data Store",
    "type" : "STORAGE",
    "description" : "The iPlant Data Store is where your data are stored. The Data Store is cloud-based and is the central repository from which data is accessed by all of iPlant's technologies.",
    "status" : "UP",
    "public" : true,
    "default" : true,
    "_links" : {
      "self" : {
        "href" : "https://sandbox.agaveplatform.org/systems/v2/data.agaveplatform.org"
      }
    }
  },
  {
    "id" : "docker.iplantcollaborative.org",
    "name" : "Demo Docker VM",
    "type" : "EXECUTION",
    "description" : "Atmosphere VM used for Docker demonstrations and tutorials.",
    "status" : "UP",
    "public" : true,
    "default" : false,
    "_links" : {
      "self" : {
        "href" : "https://sandbox.agaveplatform.org/systems/v2/docker.iplantcollaborative.org"
      }
    }
  }
]
The Systems service allows you to list and search for systems you have registered and systems that have been shared with you. To get a list of all your systems, make a GET request on the Systems collection.
System description can get rather verbose, so a summary object is returned when listing a resource collection. The summary object contains the most critical fields in order to reduce response size when retrieving a user’s systems. You can customize this behavior using the filter query parameter.
Filtering results
List all systems (up to the page limit)
curl -sk -H "Authorization: Bearer $ACCESS_TOKEN" https://sandbox.agaveplatform.org/systems/v2/?type=storage
systems-list -v -S
Only execution systems
curl -sk -H "Authorization: Bearer $ACCESS_TOKEN" https://sandbox.agaveplatform.org/systems/v2/?type=execution
systems-list -v -E
Only public systems
curl -sk -H "Authorization: Bearer $ACCESS_TOKEN" https://sandbox.agaveplatform.org/systems/v2/?publicOnly=true
systems-list -v -P
Only private systems
curl -sk -H "Authorization: Bearer $ACCESS_TOKEN" https://sandbox.agaveplatform.org/systems/v2/?privateOnly=true
systems-list -v -Q
Only return default systems
curl -sk -H "Authorization: Bearer $ACCESS_TOKEN" https://sandbox.agaveplatform.org/systems/v2/?default=true
systems-list -v -D
You can further filter the results by type, scope, and default status. See the search section for further filtering options.
System details
curl -sk -H "Authorization: Bearer $ACCESS_TOKEN" https://sandbox.agaveplatform.org/systems/v2/data.agaveplatform.org
systems-list -v data.agaveplatform.org
The response will be something like this:
{
  "site": "agaveplatform.org",
  "id": "data.agaveplatform.org",
  "revision": 4,
  "default": true,
  "lastModified": "2016-09-30T21:43:11.000-05:00",
  "status": "UP",
  "description": "Cloud storage system for the Agave Public tenant",
  "name": "Agave Cloud Storage",
  "owner": "dooley",
  "_links": {
    "roles": {
      "href": "https://sandbox.agaveplatform.org/systems/v2/data.agaveplatform.org/roles"
    },
    "credentials": {
      "href": "https://sandbox.agaveplatform.org/systems/v2/data.agaveplatform.org/credentials"
    },
    "self": {
      "href": "https://sandbox.agaveplatform.org/systems/v2/data.agaveplatform.org"
    },
    "metadata": {
      "href": "https://sandbox.agaveplatform.org/meta/v2/data/?q=%7B%22associationIds%22%3A%224602981590618992154-242ac116-0001-006%22%7D"
    }
  },
  "globalDefault": true,
  "available": true,
  "uuid": "4602981590618992154-242ac116-0001-006",
  "public": true,
  "type": "STORAGE",
  "storage": {
    "mirror": false,
    "port": 22,
    "homeDir": "/home",
    "protocol": "SFTP",
    "host": "corral.tacc.utexas.edu",
    "publicAppsDir": "/apps",
    "proxy": null,
    "rootDir": "/gpfs/corral3/repl/projects/agave/root",
    "auth": {
      "type": "SSHKEYS"
    }
  }
}
To query for detailed information about a specific system, add the system id to the url and make another GET request.
This time, the response will be a JSON object with a full system description. The following is the description of a storage system. In the next section we talk more about storage systems and how to register one of your own.
Storage systems
A storage systems can be thought of as an individual data repository that you want to access through Agave. The following JSON object shows how a basic storage systems is described.
{
   "id":"sftp.storage.example.com",
   "name":"Example SFTP Storage System",
   "type":"STORAGE",
   "description":"My example storage system using SFTP to store data for testing",
   "storage":{
      "host":"storage.example.com",
      "port":22,
      "protocol":"SFTP",
      "rootDir":"/",
      "homeDir":"/home/systest",
      "auth":{
         "username":"systest",
         "password":"changeit",
         "type":"PASSWORD"
      }
   }
}
The first four attribute are common to both storage and execution systems. The storage attribute describes the connectivity and authentication information needed to connect to the remote system. Here we describe a SFTP server accessible on port 22 at host storage.example.com. We specify that we want the rootDir, or virtual system root exposed through Agave, to be the system’s physical root directory, and we want the authenticated user’s home directory to be the homeDir, or virtual home directory and base of all relative paths given to Agave. Finally, we tell Agave to use password based authentication and provided the necessary credentials.
The full list of storage system attributes is described in the following table.
| Attribute | Type | Description |
|---|---|---|
| available | boolean | Whether the system is currently available for use in the API. Unavailable systems will not be visible to anyone but the owner. This differs from the status attribute in that a system may be UP, but not available for use in Agave. Defaults to true |
| description | string | Verbose description of this system. |
| id | string | Required: A unique identifier you assign to the system. A system id must be globally unique across a tenant and cannot be reused once deleted. |
| name | string | Required: Common display name for this system. |
| site | string | The site associated with this system. Primarily for logical grouping. |
| status | UP, DOWN, MAINTENANCE, UNKNOWN | The functional status of the system. Systems must be in UP status to be used. |
| storage | JSON Object | Required: Storage configuration describing the storage config defining how to connect to this system for data staging. |
| type | STORAGE, EXECUTION | Required: Must be STORAGE. |
Supported data and authentication protocols
The example above described a system accessible by SFTP. Agave supports many different data and authentication protocols for interacting with your data. Sample configurations for many protocol combinations are given below.
Sample storage system definition with each supported data protocol and authentication configuration.
{
   "id":"sftp.storage.example.com",
   "name":"Example SFTP Storage System",
   "status":"UP",
   "type":"STORAGE",
   "description":"My example storage system using SFTP to store data for testing",
   "site":"example.com",
   "storage":{
      "host":"storage.example.com",
      "port":22,
      "protocol":"SFTP",
      "rootDir":"/",
      "homeDir":"/home/systest",
      "auth":{
         "username":"systest",
         "password":"changeit",
         "type":"PASSWORD"
      }
   }
}
In each of the examples above, the storage objects were slightly different, each unique to the protocol used. Descriptions of every attribute in the storage> object and its children are given in the following tables.
storage attributes give basic connectivity information describing things like how to connect to the system and on what port.
| Attribute | Type | Description |
|---|---|---|
| auth | JSON object | Required: A JSON object describing the default authentication credential for this system. |
| container | string | The container to use when interacting with an object store. Specifying a container provides isolation when exposing your cloud storage accounts so users do not have access to your entire storage account. This should be used in combination with delegated cloud credentials such as an AWS IAM user credential. |
| homeDir | string | The path on the remote system, relative to rootDir to use as the virtual home directory for all API requests. This will be the base of any requested paths that do not being with a ’/’. Defaults to ’/’, thus being equivalent to rootDir. |
| host | string | Required: The hostname or ip address of the storage server |
| port | int | Required: The port number of the storage server. |
| mirror | boolean | Whether the permissions set on the server should be pushed to the storage system itself. Currently, this only applies to IRODS systems. |
| protocol | FTP, GRIDFTP, IRODS, IRODS4, LOCAL, S3, SFTP | Required: The protocol used to authenticate to the storage server. |
| publicAppsDir | string | The path on the remote system where apps will be stored if this system is used as the default public storage system. |
| proxy | JSON Object | The proxy server through with Agave will tunnel when submitting jobs. Currently proxy servers will use the same authentication mechanism as the target server. |
| resource | string | The name of the default resource to use when defining an IRODS system. |
| rootDir | string | The path on the remote system to use as the virtual root directory for all API requests. Defaults to ’/’. |
| zone | string | The name of the default zone to use when defining an IRODS system. |
storage.auth attributes give authentication information describing how to authenticate to the system specified in the storage config above.
| Attribute | Type | Description |
|---|---|---|
| credential | string | The credential used to authenticate to the remote system. Depending on the authentication protocol of the remote system, this could be an OAuth Token, X.509 certificate. |
| internalUsername | string | The username of the internal user associated with this credential. |
| password | string | The password on the remote system used to authenticate. |
| privateKey | string | The private ssh key used to authenticate to the remote system. |
| publicKey | string | The public ssh key used to authenticate to the remote system. |
| server | JSON object | A JSON object describing the authentication server from which a valid credential may be obtained. Currently only auth type X509 supports this attribute. |
| type | APIKEYS, LOCAL, PAM, PASSWORD, SSHKEYS, or X509 | Required: The path on the remote system where apps will be stored if this system is used as the default public storage system. |
| username | string | The remote username used to authenticate. |
storage.auth.server attributes give information about how to obtain a credential that can be used in the authentication process. Currently only systems using the X509 authentication can leverage this feature to communicate with MyProxy and MyProxy Gateway servers.
| Attribute | Type | Description |
|---|---|---|
| name | string | A descriptive name given to the credential server |
| endpoint | string | Required: The endpoint of the authentication server. |
| port | integer | Required: The port on which to connect to the server. |
| protocol | MPG, MYPROXY | Required: The protocol with which to obtain an authentication credential. |
system.proxy configuration attributes give information about how to connect to a remote system through a proxy server. This often happens when the target system is behind a firewall or resides on a NAT. Currently proxy servers can only reuse the authentication configuration provided by the target system.
| Attribute | Type | Description |
|---|---|---|
| name | string | Required: A descriptive name given to the proxy server. |
| host | string | Required: The hostname of the proxy server. |
| port | integer | Required: The port on which to connect to the proxy server. If null, the port in the parent storage config is used. |
Creating a new storage system
curl -sk -H "Authorization: Bearer $ACCESS_TOKEN" -F "fileToUpload=@sftp-password.json" https://sandbox.agaveplatform.org/systems/v2
systems-addupdate -v -F sftp-password.json
The response from the service will be similar to the following:
{
  "site": null,
  "id": "sftp.storage.example.com",
  "revision": 1,
  "default": false,
  "lastModified": "2016-09-06T17:46:42.621-05:00",
  "status": "UP",
  "description": "My example storage system using SFTP to store data for testing",
  "name": "Example SFTP Storage System",
  "owner": "nryan",
  "globalDefault": false,
  "available": true,
  "uuid": "4036169328045649434-242ac117-0001-006",
  "public": false,
  "type": "STORAGE",
  "storage": {
    "mirror": false,
    "port": 22,
    "homeDir": "/home/systest",
    "protocol": "SFTP",
    "host": "storage.example.com",
    "publicAppsDir": null,
    "proxy": null,
    "rootDir": "/",
    "auth": {
      "type": "PASSWORD"
    }
  },
  "_links": {
    "roles": {
      "href": "https://sandbox.agaveplatform.org/systems/v2/sftp.storage.example.com/roles"
    },
    "owner": {
      "href": "https://sandbox.agaveplatform.org/profiles/v2/nryan"
    },
    "credentials": {
      "href": "https://sandbox.agaveplatform.org/systems/v2/sftp.storage.example.com/credentials"
    },
    "self": {
      "href": "https://sandbox.agaveplatform.org/systems/v2/sftp.storage.example.com"
    },
    "metadata": {
      "href": "https://sandbox.agaveplatform.org/meta/v2/data/?q=%7B%22associationIds%22%3A%224036169328045649434-242ac117-0001-006%22%7D"
    }
  }
}
Congratulations, you just added your first system. This storage system can now be used by the Files service to manage data, the Transfer service as a source or destination of data movement, the Apps service as a application repository, and the Jobs Service as both a staging and archiving destination.
Notice that the JSON returned from the Systems service is different than what was submitted. Several fields have been added, and several other have been removed. On line 3, the UUID of the system has been added. This is the same UUID that is used in notifications and metadata references. On line 5, the status value was added in and assigned a default value since we did not specify it. Ditto for the site attribute on line 8.
Three new fields were added on lines 9-11. revision is the number of times this system has been updated. This being our first time registering the system, it is set to 1. public tells whether this system is published as a shared resource for all users. We will cover this more in the section on System scope. lastModified is a timestamp of the last time the system was updated.
In the storage object, the publicAppsDir and mirror fields were both added and set to their default values. In this example we are not using a proxy server, so it was defaulted to null. Last, and most important, all authentication information has been omitted from the response object. Regardless of the authentication type, no user credential information will ever be returned once they are stored.
Execution Systems
In contrast to storage systems, execution systems specify compute resources where application binaries can be run. In addition to the storage attribute found in storage systems, execution systems also have a login attribute describing how to connect to the remote system to submit jobs as well as several other attributes that allow Agave to determine how to stage data and run software on the system. The full list of execution system attributes is given in the following tables.
| Name | Type | Description |
|---|---|---|
| available | boolean | Whether the system is currently available for use in the API. Unavailable systems will not be visible to anyone but the owner. This differs from the status attribute in that a system may be UP, but not available for use in Agave. Defaults to true |
| description | string | Verbose description of this system. |
| environment | String | List of key-value pairs that will be added to the environment prior to execution of any command. |
| executionType | HPC, Condor, CLI | Required: Specifies how jobs should go into the system. HPC and Condor will leverage a batch scheduler. CLI will fork processes. |
| id | string | Required: A unique identifier you assign to the system. A system id must be globally unique across a tenant and cannot be reused once deleted. |
| maxSystemJobs | integer | Maximum number of jobs that can be queued or running on a system across all queues at a given time. Defaults to unlimited. |
| maxSystemJobsPerUser | integer | Maximum number of jobs that can be queued or running on a system for an individual user across all queues at a given time. Defaults to unlimited. |
| name | string | Required: Common display name for this system. |
| queues | JSON Array | An array of batch queue definitions providing descriptive and quota information about the queues you want to expose on your system. If not specified, no other system queues will be available to jobs submitted using this system. |
| scheduler | LSF, LOADLEVELER, PBS, SGE, CONDOR, FORK, COBALT, TORQUE, MOAB, SLURM, CUSTOM_LSF, CUSTOM_LOADLEVELER, CUSTOM_PBS, CUSTOM_GRIDENGINE, CUSTOM_CONDOR, FORK, CUSTOM_COBALT, CUSTOM_TORQUE, CUSTOM_MOAB, CUSTOM_SLURM, UNKNOWN | Required: The type of batch scheduler available on the system. This only applies to systems with executionType HPC and CONDOR. The *_CUSTOM version of each scheduler provides a mechanism for you to override the default scheduler directives added by Agave and explicitly add your own through the customDirectives field in each of the batchQueue definitions for your system. |
| scratchDir | string | Path to use for a job scratch directory. This value is the first choice for creating a job`s working directory at runtime. The path will be resolved relative to the rootDir value in the storage config if it begins with a “/”, and relative to the system homeDir otherwise. |
| site | string | The site associated with this system. Primarily for logical grouping. |
| startupScript | String | Path to a script that will be run prior to execution of any command on this system. The path will be a standard path on the remote system. A limited set of system macros are supported in this field. They are rootDir, homeDir, systemId, workDir, and homeDir. The standard set of runtime job attributes are also supported. Between the two set of macros, you should be able to construct distinct paths per job, user, and app. Any environment variables defined in the system description will be added after this script is sourced. If this script fails, output will be logged to the .agave.log file in your job directory. Job submission will still continue regardless of the exit code of the script. |
| status | UP, DOWN, MAINTENANCE, UNKNOWN | The functional status of the system. Systems must be in UP status to be used. |
| storage | JSON Object | Required: Storage configuration describing the storage config defining how to connect to this system for data staging. |
| type | STORAGE, EXECUTION | Required: Must be EXECUTION. |
| workDir | string | Path to use for a job working directory. This value will be used if no scratchDir is given. The path will be resolved relative to the rootDir value in the storage config if it begins with a “/”, and relative to the system homeDir otherwise. |
Startup startupScript
Every time Agave establishes a connection to an execution system, local or remote, it will attempt to source the startupScript provided in your system definition. The value of startupScript may be an absolute path on the system (ie. “/usr/local/bin/common_aliases.sh”, “/home/nryan/.bashrc”, etc.) or a path relative to physical home directory of the account used to authenticate to the system (“.bashrc”, “.profile”, “agave/scripts/startup.sh”, etc).
The startupScript field supports the use of template variables which Agave will resolve at runtime before establishing a connection. If you would prefer to specify the startup script as a virtualized path on the system, prepend ${SYSTEM_ROOT_DIR} to the path. If the system will be made public, you can specify a file relative to the home directory of the calling user by prefixing your startupScript value with ${SYSTEM_ROOT_DIR}/${SYSTEM_HOME_DIR}/${USERNAME} A full list of the variables available is given in the following table.
| Variable | Description |
|---|---|
| SYSTEM_ID | ID of the system (ex. ssh.execute.example.com) |
| SYSTEM_UUID | fThe UUID of the system |
| SYSTEM_STORAGE_PROTOCOL | The protocol used to move data to and from this system |
| SYSTEM_STORAGE_HOST | The storage host for this sytem |
| SYSTEM_STORAGE_PORT | The storage port for this system |
| SYSTEM_STORAGE_RESOURCE | The system resource for iRODS systems |
| SYSTEM_STORAGE_ZONE | The system zone for iRODS systems |
| SYSTEM_STORAGE_ROOTDIR | The virtual root directory exposed on this system |
| SYSTEM_STORAGE_HOMEDIR | The home directory on this system relative to the STORAGE_ROOT_DIR |
| SYSTEM_STORAGE_AUTH_TYPE | The storage authentication method for this system |
| SYSTEM_STORAGE_CONTAINER | The the object store bucket in which the rootDir resides. |
| SYSTEM_LOGIN_PROTOCOL | The protocol used to establish a session with this system (eg SSH, GSISSH, etc) |
| SYSTEM_LOGIN_HOST | The login host for this system |
| SYSTEM_LOGIN_PORT | The login port for this system |
| SYSTEM_LOGIN_AUTH_TYPE | The login authentication method for this system |
| SYSTEM_OWNER | The username of the user who created the system. |
| AGAVE_JOB_NAME | The slugified version of the name of the job. See the section on Conventions for more information about slugs. |
| AGAVE_JOB_ID | The unique identifier of the job. |
| AGAVE_JOB_APP_ID | The appId for which the job was requested. |
| AGAVE_JOB_BATCH_QUEUE | The batch queue on the AGAVE_JOB_EXECUTION_SYSTEM to which the job was submitted. |
| AGAVE_JOB_EXECUTION_SYSTEM | The Agave execution system id where this job is running. |
| AGAVE_JOB_ARCHIVE_PATH | The path on the archiveSystem where the job output will be copied if archiving is enabled. |
| AGAVE_JOB_OWNER | The username of the job owner. |
| AGAVE_JOB_TENANT | The id of the tenant to which the job was submitted. |
| MONITOR_ID | The ID of the monitor. |
| MONITOR_CHECK_ID | The ID of the monitor check making the request. |
| MONITOR_OWNER | The username of the user who created the monitor. |
Schedulers and system execution types
Agave supports job execution both interactively and through batch queueing systems (aka schedulers). We cover the mechanics of job submission in the Job Management tutorial. Here we just point out that regardless of how your job is actually run on the underlying system, the process of submitting, monitoring, sharing, and otherwise interacting with your job through Agave is identical. Describing the scheduler and execution types for your system is really just a matter of picking the most efficient and/or available mechanism for running jobs on your system.
As you saw in the table above, executionType refers to the classification of jobs going into the system and scheduler refers to the type of batch scheduler used on a system. These two fields help limit the range of job submission options used on a specific system. For example, it is not uncommon for a HPC system to accept jobs from both a Condor scheduler and a batch scheduler. It is also possible, though generally discouraged, to fork jobs directly on the command line. With so many options, how would users publishing apps on such a system know what mechanism to use? Specifying the execution type and scheduler help narrow down the options to a single execution mechanism.
Thankfully, picking the right combination is pretty simple. The following table illustrates the available combinations.
executionType |
scheduler |
Description |
|---|---|---|
| HPC | LSF, LOADLEVELER, PBS, SGE, TORQUE, MOAB, SLURM, CUSTOM_LSF, CUSTOM_LOADLEVELER, CUSTOM_PBS, CUSTOM_GRIDENGINE, CUSTOM_SLURM | Jobs will be submitted to the local scheduler using the appropriate scheduler commands. Systems with this execution type will not allow forked jobs. |
| CONDOR, CUSTOM_CONDOR | CONDOR | Jobs will be submitted to the condor scheduler running locally on the remote system. Agave will not do any installation for you, so the setup and administration of the Condor server is up to you. |
| CLI | FORK | Jobs will be started as a forked process and monitored using the system process id. |
Defining system queues
Agave supports the notion of multiple submit queues. On HPC systems, queues should map to actual batch scheduler queues on the target server. Additionally, queues are used by Agave as a mechanism for implementing quotas on job throughput in a given queue or across an entire system. Queues are defined as a JSON array of objects assigned to the queues attribute. The following table summarizes all supported queue parameters.
| Name | Type | Description |
|---|---|---|
| name | string | Arbitrary name for the queue. This will be used in the job submission process, so it should line up with the name of an actual queue on the execution system. |
| maxJobs | integer | Maximum number of jobs that can be queued or running within this queue at a given time. Defaults to 10. -1 for no limit |
| maxUserJobs | integer | Maximum number of jobs that can be queued or running by any single user within this queue at a given time. Defaults to 10. -1 for no limit |
| maxNodes | integer | Maximum number of nodes that can be requested for any job in this queue. -1 for no limit |
| maxProcessorsPerNode | integer | Maximum number of processors per node that can be requested for any job in this queue. -1 for no limit |
| maxMemoryPerNode | string | Maximum memory per node for jobs submitted to this queue in ###.#[E|P|T|G]B format. |
| maxRequestedTime | string | Maximum run time for any job in this queue given in hh:mm:ss format. |
| customDirectives | string | Arbitrary text that will be appended to the end of the scheduler directives in a batch submit script. This could include a project number, system-specific directives, etc. |
| default | boolean | True if this is the default queue for the system, false otherwise. |
Configuring quotas
Sample batch queue definitions specifying various use cases.
{
    "name":"short_job",
    "mappedName": null,
    "maxJobs":100,
    "maxUserJobs":10,
    "maxNodes":32,
    "maxMemoryPerNode":"64GB",
    "maxProcessorsPerNode":12,
    "maxRequestedTime":"00:15:00",
    "customDirectives":null,
    "default":true
}
In the batch queues table above, several attributes exist to specify limits on the number of total jobs and user jobs in a given queue. Corresponding attributes exist in the execution system to specify limits on the number of total and user jobs across an entire system. These attributes, when used appropriately, can be used to tell Agave how to enforce limits on the concurrent activity of any given user. They can also ensure that Agave will not unfairly monopolize your systems as your application usage grows.
If you have ever used a shared HPC system before, you should be familiar with batch queue quotas. If not, the important thing to understand is that they are a critical tool to ensure fair usage of any shared resource. As the owner/administrator for your registered system, you can use the batch queues you define to enforce whatever usage policy you deem appropriate.
Consider one example where you are using a VM to run image analysis routines on demand through Agave, your server will become memory bound and experience performance degradation if too many processes are running at once. To avoid this, you can set a limit using a batch queue configuration that limits the number of simultaneous tasks that can run at once on your server.
Another example where quotas can be helpful is to help you properly partitioning your system resources. Consider a user analyzing unstructured data. The problem is computationally and memory intensive. To preserve resources, you could create one queue with a moderate value of `maxJobs` and conservative `maxMemoryPerNode`, `maxProcessorsPerNode`, and `maxNodes` values to allow good throughput of small job. You could then create another queue with large `maxMemoryPerNode`, `maxProcessorsPerNode`, and `maxNodes` values while only allowing a single job to run at a time. This gives you both high throughput and high capacity on a single system.
The following sample queue definitions illustrate some other interesting use cases.
Customizing custom scheduler directives
Pseudocode for generating scheduler directives for each scheduler type
#!/bin/bash
#BSUB -J <& Slug.slugify(job.name) &>
#BSUB -oo <& Slug.slugify(job.name) + "-" + job.uuid &>.out
#BSUB -e <& Slug.slugify(job.name) + "-" + job.uuid &>.err
#BSUB -W <& roundToMinute(job.maxRunTime) &>
#BSUB -q <& job.batchQueue.mappedName &>
#BSUB -L bash

<& if (job.app.parallelism == ParallelismType.PTHREAD) { &>
  <& "#BSUB -n " + job.nodeCount &>
  <& "#BSUB -R 'span[ptile=1]'" &>
<& } else if (job.app.parallelism == ParallelismType.SERIAL) { &>
  <& "#BSUB -n " + job.nodeCount &>
  <& "#BSUB -R 'span[ptile=1]'" &>
<& } else { &>
  <& "#BSUB -n " + (job.nodeCount * job.processorsPerNode) &>
  <& "#BSUB -R 'span[ptile=" + job.processorsPerNode + "]'" &>
<& } &>

#BSUB <& job.batchQueue.customDirectives &>
If your system definition is configured to use a scheduler, Agave will automatically inject the appropirate default scheduler directives into the header of your wrapper template prior to submission. Pseudocode for how the headers are generated for each scheduler type are defined below.
You may add additional scheduler directives on a queue-by-queue basis in your system definition. If you need a higher degree of customization, update your system definition prefixing your existing schedulerType value with “CUSTOM_”. This will tell Agave to use a minimal set of scheduler directives any time it finds a value defined for the queue’s customDirectives. To allow you the highest degree of customization, the customDirectives value will be filtered, resolving the following macros with the runtime values for the job.
| Variable | Description |
|---|---|
| JOB_APP_ID | The id of the app being run. |
| JOB_ARCHIVE | Whether Agave will attempt to archive the job. Values “true” or “false”. |
| JOB_ARCHIVE_PATH | The path on the archive system where the job output will be staged. |
| JOB_ARCHIVE_SYSTEM | The Agave storage system id to which the job output will be archived. This will be NULL if the the job is not archived. |
| JOB_ARCHIVE_URL | The Agave URL for the archived data. |
| JOB_BATCH_QUEUE | The batch queue of the JOB_EXECUTION_SYSTEM on which the job is assigned. |
| JOB_ID | The unique id used to reference the job within Agave. |
| JOB_EXECUTION_SYSTEM | The agave execution system id on which the job will run. |
| JOB_MAX_RUNTIME | The max job run from the job request in HH:MM:SS format. |
| JOB_MAX_RUNTIME_MILLISECONDS | The max job run time from the job request converted to milliseconds. |
| JOB_MAX_RUNTIME_SECONDS | The max job run time from the job request converted to seconds. |
| JOB_MEMORY_PER_NODE | The memory requested per node in the job request in GB. |
| JOB_NAME | The job name converted to a slug |
| JOB_NAME_RAW | The user-supplied name of the job |
| JOB_NODE_COUNT | The number of nodes from the job request. |
| JOB_OWNER | The username of the user who submitted the job request. |
| JOB_PARAMETERS | The serialized JSON object representing the job parameters. |
| JOB_PROCESSORS_PER_NODE | The processors per node from the job request. |
| JOB_SYSTEM | ID of the job execution system (ex. ssh.execute.example.com) |
| JOB_TENANT | The code of the tenant to which the job was submitted. |
Supported login protocols
> Sample execution system login configurations for supported authentication mechansims.
{
  "host": "execute.example.com",
  "port": 22,
  "protocol": "SSH",
  "auth": {
    "username": "systest",
    "password": "changeit",
    "type": "PASSWORD"
  }
}
As with storage systems, Agave supports several different protocols and mechanisms for job submission. We already covered scheduler and queue support. Here we illustrate the different login configurations possible. For brevity, only the value of the login JSON object is shown.
The full list of login configuration options is given in the following table. We omit the `login.auth` and `login.proxy` attributes as they are identical to those used in the storage config.
| Attribute | Type | Description |
|---|---|---|
| auth | JSON object | Required: A JSON object describing the default login authentication credential for this system. |
| host | string | Required: The hostname or ip address of the server where the job will be submitted. |
| port | int | The port number of the server where the job will be submitted. Defaults to the default port of the protocol used. |
| protocol | SSH, GSISSH, LOCAL | Required: The protocol used to submit jobs for execution. |
| proxy | JSON Object | The proxy server through with Agave will tunnel when submitting jobs. Currently proxy servers will use the same authentication mechanism as the target server. |
Scratch and work directories
In the Job Management tutorial we will dive into how Agave manages the end-to-end lifecycle of running a job. Here we point out two relevant attributes that control where data is staged and where your job will physically run. The `scratchDir` and `workDir` attributes control where the working directories for each job will be created on an execution system. The following table summarizes the decision making process Agave uses to determine where the working directories should be created.
rootDir value |
homeDir value |
scratchDir value |
Effective system path for job working directories |
|---|---|---|---|
| / | / | — | / |
| / | / | / | / |
| / | / | /scratch | /scratch |
| / | /home/nryan | — | /home/nryan |
| / | /home/nryan | / | / |
| / | /home/nryan | /scratch | /scratch |
| /home/nryan | / | — | /home/nryan |
| /home/nryan | / | / | /home/nryan |
| /home/nryan | / | /scratch | /home/nryan/scratch |
| /home/nryan | /home | — | /home/nryan/home |
| /home/nryan | /home | / | /home/nryan |
| /home/nryan | /home | /scratch | /home/nryan/scratch |
While it is not required, it is a best practice to always specify `scratchDir` and `workDir` values for your execution systems and, whenever possible, place them outside of the system `homeDir` to ensure data privacy. The reason for this is that the file system available on many servers is actually made up of a combination of physically attached storage, mounted volumes, and network mounts. Often times, your home directory will have a very conservative quota while the mounted storage will essentially be quota free. As the above table shows, when you do not specify a `scratchDir` or `workDir`, Agave will attempt to create your job work directories in your system `homeDir`. It is very likely that, in the course of running simulations, you will reach the quota on your home directory, thereby causing that job and all future jobs to fail on the system until you clear up more space. To avoid this, we recommend specifying a location with sufficient available space to handle the work you want to do.
Another common error that arises from not specifying thoughtful `scratchDir` and `workDir` values for your execution systems is jobs failing due to “permission denied” errors. This often happens when your `scratchDir` and/or `workDir` resolve to the actual system root. Usually the account you are using to access the system will not have permission to write to `/`, so all attempts to create a job working directory fail, accurately, due to a “permission denied” error.
Creating a new execution system
curl -sk -H "Authorization: Bearer $ACCESS_TOKEN" -F "fileToUpload=@ssh-password.json" https://sandbox.agaveplatform.org/systems/v2
systems-addupdate -v -F ssh-password.json
The response from the server will be similar to the following.
{
   "id":"demo.execute.example.com",
   "uuid":"0001323106792914-5056a550b8-0001-006",
   "name":"Example SSH Execution Host",
   "status":"UP",
   "type":"EXECUTION",
   "description":"My example system using ssh to submit jobs used for testing.",
   "site":"example.com",
   "revision":1,
   "public":false,
   "lastModified":"2013-07-02T10:16:11.000-05:00",
   "executionType":"HPC",
   "scheduler":"SGE",
   "environment":null,
   "startupScript":"./bashrc",
   "maxSystemJobs":100,
   "maxSystemJobsPerUser":10,
   "workDir":"/work",
   "scratchDir":"/scratch",
   "queues":[
      {
         "name":"normal",
         "maxJobs":100,
         "maxUserJobs":10,
         "maxNodes":32,
         "maxMemoryPerNode":"64GB",
         "maxProcessorsPerNode":12,
         "maxRequestedTime":"48:00:00",
         "customDirectives":null,
         "default":true
      },
      {
         "name":"largemem",
         "maxJobs":25,
         "maxUserJobs":5,
         "maxNodes":16,
         "maxMemoryPerNode":"2TB",
         "maxProcessorsPerNode":4,
         "maxRequestedTime":"96:00:00",
         "customDirectives":null,
         "default":false
      }
   ],
   "login":{
      "host":"texas.rangers.mlb.com",
      "port":22,
      "protocol":"SSH",
      "proxy":null,
      "auth":{
         "type":"PASSWORD"
      }
   },
   "storage":{
      "host":"texas.rangers.mlb.com",
      "port":22,
      "protocol":"SFTP",
      "rootDir":"/home/nryan",
      "homeDir":"",
      "proxy":null,
      "auth":{
         "type":"PASSWORD"
      }
   }
}
Disabling a system
Disable a system
curl -sk -H "Authorization: Bearer $AUTH_TOKEN"
    -H "Content-Type: application/json"
    -X PUT --data-binary '{"action": "disable"}'
    https://sandbox.agaveplatform.org/systems/v2/$SYSTEM_ID
systems-disable $SYSTEM_ID
The response will look something like the following:
{
  "site": null,
  "id": "sftp.storage.example.com",
  "revision": 1,
  "default": false,
  "lastModified": "2016-09-06T17:46:42.621-05:00",
  "status": "UP",
  "description": "My example storage system using SFTP to store data for testing",
  "name": "Example SFTP Storage System",
  "owner": "nryan",
  "globalDefault": false,
  "available": false,
  "uuid": "4036169328045649434-242ac117-0001-006",
  "public": false,
  "type": "STORAGE",
  "storage": {
    "mirror": false,
    "port": 22,
    "homeDir": "/home/systest",
    "protocol": "SFTP",
    "host": "storage.example.com",
    "publicAppsDir": null,
    "proxy": null,
    "rootDir": "/",
    "auth": {
      "type": "PASSWORD"
    }
  },
  "_links": {
    "roles": {
      "href": "https://sandbox.agaveplatform.org/systems/v2/sftp.storage.example.com/roles"
    },
    "owner": {
      "href": "https://sandbox.agaveplatform.org/profiles/v2/nryan"
    },
    "credentials": {
      "href": "https://sandbox.agaveplatform.org/systems/v2/sftp.storage.example.com/credentials"
    },
    "self": {
      "href": "https://sandbox.agaveplatform.org/systems/v2/sftp.storage.example.com"
    },
    "metadata": {
      "href": "https://sandbox.agaveplatform.org/meta/v2/data/?q=%7B%22associationIds%22%3A%224036169328045649434-242ac117-0001-006%22%7D"
    }
  }
}
There may be times when you need to disable a system. If your system has scheduled maintenance periods, you may want to disable the system until the maintenance period ends. You can do this by making a PUT request on a monitor with the a field name action set to “disabled”, or simply updating the status to “MAINTENANCE”. While disabled, all apps and jobs will be disabled. All file operations will be rejected during system downtimes as well. Once restored, all operations will pick back up.
Enabling a system
Enable a system
curl -sk -H "Authorization: Bearer $AUTH_TOKEN"
    -H "Content-Type: application/json"
    -X PUT --data-binary '{"action": "enable"}'
    https://sandbox.agaveplatform.org/systems/v2/$SYSTEM_ID
systems-enable $SYSTEM_ID
The response will look something like the following:
{
  "site": null,
  "id": "sftp.storage.example.com",
  "revision": 1,
  "default": false,
  "lastModified": "2016-09-06T17:46:42.621-05:00",
  "status": "UP",
  "description": "My example storage system using SFTP to store data for testing",
  "name": "Example SFTP Storage System",
  "owner": "nryan",
  "globalDefault": false,
  "available": true,
  "uuid": "4036169328045649434-242ac117-0001-006",
  "public": false,
  "type": "STORAGE",
  "storage": {
    "mirror": false,
    "port": 22,
    "homeDir": "/home/systest",
    "protocol": "SFTP",
    "host": "storage.example.com",
    "publicAppsDir": null,
    "proxy": null,
    "rootDir": "/",
    "auth": {
      "type": "PASSWORD"
    }
  },
  "_links": {
    "roles": {
      "href": "https://sandbox.agaveplatform.org/systems/v2/sftp.storage.example.com/roles"
    },
    "owner": {
      "href": "https://sandbox.agaveplatform.org/profiles/v2/nryan"
    },
    "credentials": {
      "href": "https://sandbox.agaveplatform.org/systems/v2/sftp.storage.example.com/credentials"
    },
    "self": {
      "href": "https://sandbox.agaveplatform.org/systems/v2/sftp.storage.example.com"
    },
    "metadata": {
      "href": "https://sandbox.agaveplatform.org/meta/v2/data/?q=%7B%22associationIds%22%3A%224036169328045649434-242ac117-0001-006%22%7D"
    }
  }
}
Similarly, to enable a monitor, make a PUT request with the a field name action set to “enabled”. Once reenabled, the monitor will resume its previous check schedule as specified in the nextUpdate field, or immediately if that time has already expired.
Deleting systems
curl -sk -H "Authorization: Bearer $ACCESS_TOKEN" -X DELETE https://sandbox.agaveplatform.org/systems/v2/$SYSTEM_ID
systems-delete $SYSTEM_ID
The call will return an empty result.
In the event you wish to delete a system, you can make a DELETE request on the system URL. Deleting a system will disable the system and all applications published on that system from use. Any running jobs will be continue to run, but all pending, archiving, paused, and staged jobs will be killed, and any data archived on that system will no longer be available. Restoring a deleted system requires intervention from your tenant admin. Once deleted, the system id cannot be reused at a later time. Use this operation with care.
Multi-user environments
If your application supports a multi-user environment and those users do not have API accounts, then you may run into a situation where you are juggling multiple user credentials for a single system. Agave has a solution for this problem in the for of its Internal User feature. You can map your application users into a private user store Agave provides you and assign those users credentials on your systems. This allows you to move seamlessly from community users to private users and back without having to alter your application code. For a deep discussion on the mechanics and implications of credential management with internal users, see the Internal User Credential Management guide.
System roles
Systems you register are private to you and you alone. You can, however, allow other Agave clients to utilize the system you define by granting them a role on the system using the systems roles services. The available roles are given in the table below.
| Role | Description |
|---|---|
| GUEST | Gives any authenticated user readonly access to the system. No file operations or job executions are allowed for users with GUEST access. |
| USER | Gives a user the ability to run jobs and access data on the system. |
| PUBLISHER | All the rights of USER as well as the ability to publish applications listing the system as an execution host. |
| ADMIN | All the rights of PUBLISHER as well as the ability to edit and grant roles on the system details. Admins may use the system to access data and run jobs using the default credential assigned to the system, but they may not view or update any of the credentials stored by the system owner. It is not possible for anyone but the system owner to assign or leverage internal user credentials on a system. |
| OWNER | Reserved for the user that originally created the system. This role is non-revokable. |
System scope
Throughout these tutorials and Beginner’s Guides, we have referred to both public and private systems. In addition to roles, systems have a concept of scope associated with them. Not to be confused with OAuth scope mentioned in the Authentication Guide, system scope refers to the availability of a system to the general user community. The following table lists the available scopes and their meanings.
| Scope | Required role | Description |
|---|---|---|
| private | Admin | System is visible and available for use to the owner and to anyone whom they grant a role. |
| read only | Tenant admin | Storage system is visible and available for data browsing and download by any API user. Write access is restricted unless explicitly granted to a specific user. |
| public | Tenant admin | System is visible and available to all users for reading and writing. Virtual user home directories are enforced and write access outside of a user’s home directory is restricted unless explicitly granted by a system admin. |
Private systems
All systems are private by default. This means that no one can use a system you register without you or another user with “admin” permissions granting them a role on that system. Most of the time, unless you are configuring a tenant for your organization, all the systems you register will stay private. Do not mistake the term private for isolated. Private simply means not public. Another way to think of private systems is as “invitation only.” You are free to share your system as many or as few people as you want and it will still remain a private system.
Readonly systems
Readonly systems are systems who have granted a GUEST role to the world group. Once this grant is made, any user will be able to browse the system’s entire file system regardless of individual permissions. Be careful when making a system readonly. Usually, the only reason you would do this is because you have configured the system rootDir to point to a dataset or volume that you want to publish for others to use. Carelessly making systems readonly can expose personal data stored on the system to every other API user. While your intentions may be pure, theirs may not be, so think through the implications of this action before you take it.
Public systems
Public systems are available for use by every API user within your tenant. Once public, systems inherit specific behavior unique to their type. We will cover each system type in turn.
Public Storage Systems
Public storage systems enforce a virtual user home directory with implied user permissions. The following table gives a brief summary of the permission implications. You can read more about data permissions in the Data Permissions tutorial.
rootDir |
homeDir |
URL path | User permission |
|---|---|---|---|
| / | /home | — | READ |
| / | /home | / | READ |
| / | /home | /var | READ |
| / | /home | systest | ALL |
| / | /home | systest/some/subdir | ALL |
| / | /home | rjohnson | NONE |
Notice in the above example that on public systems, users will have implied ownership of a folder matching their username in the system’s homeDir. In the table, this means that user “systest” will have ownership of the physical home directory /home/systest on the system after it’s public. It is important that, before publishing a system, you make sure that the account used to access the system can actually write to these folders. Otherwise, users will not be able to access their data on the system you make public.
Public Execution Systems
Public execution systems do not share the same behavior as public storage systems. Unless explicit permission has been given, public execution systems are not accessible for data access by non-privileged users. This is because public systems allow all users to run applications on them and granting public access to the file system would expose user job data to all users. If you do need to expose the data on a public execution system, either register it again as a storage system (using an appropriate rootDir outside of the system scratchDir and workDir paths), or grant specific users a role on the system.
Publishing a system
To publish a system and make it public, you make a PUT request on the system’s url.
curl -sk -H "Authorization: Bearer $ACCESS_TOKEN"
     -H "Content-Type: application/json"
     -X PUT
     --data-binary '{"action":"publish"}'
     https://sandbox.agaveplatform.org/systems/v2/$SYSTEM_ID
systems-publish -v $SYSTEM_ID
The response from the service will be the same system description we saw before, this time with the public attribute set to true.
Unpublishing a system
curl -sk -H "Authorization: Bearer $ACCESS_TOKEN"
     -H "Content-Type: application/json"
     -X PUT
     --data-binary '{"action":"unpublish"}'
     https://sandbox.agaveplatform.org/systems/v2/$SYSTEM_ID
systems-unpublish -v $SYSTEM_ID
The response from the service will be the same system description we saw before, this time with the public attribute set to false.
To unpublish a system, make the same request with the action attribute set to unpublish.
Default systems
As you continue to use Agave over time, it will not be uncommon for you to accumulate additional storage and execution systems through both self-registration and other people sharing their systems with you. It may even be the case that you have multiple public systems available to you. In this situation, it is helpful for both you and your users to specify what the default systems should be.
Default systems are the systems that are used when the user does not specify a system to use when performing a remote action in Agave. For example, specifying an archivePath in a job request, but no archiveSystem, or specifying a deploymentPath in an app description, but no deploymentSystem. In these situations, Agave will use the user’s default storage system.
Four types of default systems are possible. The following table describes them.
| Type | Scope | Role needed to set | Description |
|---|---|---|---|
| storage | user default | USER | Default storage system for an individual user. This takes priority over any global defaults and will be used in all data operations in leu of a system being specified for this user. |
| storage | global default | Tenant admin | Default storage system for an entire tenant. This will be used as the default storage system whenever a user has not explicitly specified another. Only public systems may be made the global default. |
| execution | user default | USER | Default execution system for an individual user. This takes priority over any global defaults and will be used in all app and job operations in leu of an execution system being specified for this user. In the case of app registration, normal user role requirements apply. |
| execution | global default | Tenant admin | Default execution system for an entire tenant. This will be used as the default execution system whenever a user has not explicitly specified another. Only public systems may be made the global default. |
Setting user default system
To set a system as the user’s default, you make a PUT request on the system’s url. Only systems the user has access to may be used as their default.
curl -sk -H "Authorization: Bearer $ACCESS_TOKEN"
     -H "Content-Type: application/json"
     -X PUT
     --data-binary '{"action":"setDefault"}'
     https://sandbox.agaveplatform.org/systems/v2/$SYSTEM_ID
systems-setdefault -v $SYSTEM_ID
The response from the service will be the same system description we saw before, this time with the
defaultattribute set to true.
Unsetting user default system
curl -sk -H "Authorization: Bearer $ACCESS_TOKEN"
     -H "Content-Type: application/json"
     -X PUT
     --data-binary '{"action":"unsetDefault"}'
     https://sandbox.agaveplatform.org/systems/v2/$SYSTEM_ID
systems-unsetdefault -v $SYSTEM_ID
The response from the service will be the same system description we saw before, this time with the
defaultattribute set to false.
To remove a system as the user’s default, make the same request with the action attribute set to unsetDefault. Keep in mind that you cannot remove the global default system from being the user’s default. You can only set a different one to replace it.
Setting global default system
Tenant administrators may wish to set default storage and execution systems for an entire tenant. These are called global default systems. There may be at most one system of each type set as a global default. To set a global default system, first make sure that the system is public. Only public systems may be set as a global default. Next, make sure you have administrator permissions for your tenant. Only tenant admins may publish systems and manage the global defaults. Lastly, make a PUT request on the system’s url with an action attribute in the body set to unsetGlobalDefault.
curl -sk -H "Authorization: Bearer $ACCESS_TOKEN"
     -H "Content-Type: application/json"
     -X PUT
     --data-binary '{"action":"setGlobalDefault"}'
     https://sandbox.agaveplatform.org/systems/v2/$SYSTEM_ID
systems-setdefault -v -G $SYSTEM_ID
The response from the service will be the same system description we saw before, this time with both the
defaultandpublicattributes set to true.
To remove a system from being the global default, make the same request with the action attribute set to unsetGlobalDefault.
curl -sk -H "Authorization: Bearer $ACCESS_TOKEN"
     -H "Content-Type: application/json"
     -X PUT
     --data-binary '{"action":"unsetGlobalDefault"}'
     https://sandbox.agaveplatform.org/systems/v2/$SYSTEM_ID
systems-unsetdefault -v -G $SYSTEM_ID
This time the response from the service will have
defaultset to false andpublicset to true.
Files
 /$$$$$$$$ /$$ /$$
| $$_____/|__/| $$
| $$       /$$| $$  /$$$$$$   /$$$$$$$
| $$$$$   | $$| $$ /$$__  $$ /$$_____/
| $$__/   | $$| $$| $$$$$$$$|  $$$$$$
| $$      | $$| $$| $$_____/ \____  $$
| $$      | $$| $$|  $$$$$$$ /$$$$$$$/
|__/      |__/|__/ \_______/|_______/
The Agave Files service allows you to manage data across multiple storage systems using multiple protocols. It supports traditional file operations such as directory listing, renaming, copying, deleting, and upload/download that are traditional to most file services. It also supports file importing from arbitrary locations, metadata assignment, and a full access control layer allowing you to keep your data private, share it with your colleagues, or make it publicly available.
Files service URL structure
Canonical URL for all file items accessible in the Platform
https://sandbox.agaveplatform.org/files/v2/media/system/$SYSTEM_ID/$PATH
Every file and directory referenced through the Files service has a canonical URL show in the first example. The following table defines each component:
| Token | Description |
|---|---|
| $SYSTEM_ID | The id of the system where the file or directory lives. The correspond to the ids returned from the Systems service. |
| $PATH | (Optional:) The path on the remote system. By default, all paths are relative to the home directory defined in the system description. To specify an absolute path, prefix the path with a `/`. For more on path resolution, see the next section. |
Agave also supports the concept of default systems. Excluding the /system/$SYSTEM_ID segments from the above URL, the Files service will automatically assume you are referencing your default storage system. Thus, if your default system was data.agaveplatform.org, the following two examples would be identical.
If
data.agaveplatform.orgis your default storage system then
https://sandbox.agaveplatform.org/files/v2/media/shared
is equivalent to this:
https://sandbox.agaveplatform.org/files/v2/media/system/data.agaveplatform.org/shared
This comes in especially handy when referencing your default system paths in other contexts such as job requests and when interacting with the Agave CLI. A good example of this situation is when you have a global default storage system accessible to all your users. In this case, most users will use that for all of their data staging and archiving needs. These users may find it easier not to even think about the system they are using. The default system support in the Files service allows them to do just that.
Understanding file paths
One powerful, but potentially confusing feature of Agave is its support for virtualizing systems paths. Every registered system specifies both a root directory, rootDir, and a home directory, homeDir attribute in its storage configuration. rootDir tells Agave the absolute path on the remote system that it should treat as /. Similar to the Linux chroot command; no requests made to Agave will ever be resolved to locations outside of rootDir.
| Type of storage system | Examples of rootDir values |
|---|---|
| Linux |
|
| Cloud |
|
| iRODS |
|
homeDir specifies the path, relative to rootDir, that Agave should use for relative paths. Since Agave is stateless, there is no concept of a current working directory. Thus, when you specify a path to Agave that does not begin with a /, Agave will always prefix the path with the value of homeDir. The following table gives several examples of how different combinations of rootDir, homeDir, and URL paths will be resolved by Agave. For a deeper dive into this subject, please see the Understanding Agave File Paths section.
| “rootDir” value | “homeDir” value | Agave URL path | Resolved path on system |
|---|---|---|---|
| / | / | – | / |
| / | / | .. | / |
| / | / | home | /home |
| / | / | /home | /home |
| / | /home/nryan | – | /home/nryan |
| / | /home/nryan | / | / |
| / | /home/nryan | .. | /home |
| / | /home/nryan | nryan | /home/nryan/nryan |
| / | /home/nryan | /nryan | /nryan |
| /home/nryan | / | – | /home/nryan |
| /home/nryan | / | .. | /home/nryan |
| /home/nryan | /home | / | /home/nryan |
| /home/nryan | /home | .. | /home/nryan |
| /home/nryan | /home | home | /home/nryan/home/home |
| /home/nryan | /home | /bgibson | /home/nryan/bgibson |
Transfering data
Before we talk about how to do basic operations on your data, let’s first talk about how you can move your data around. You already have a storage system available to you, so we will start with the “hello world” of data movement, uploading a file.
Uploading data
Uploading a file
curl -sk -H "Authorization: Bearer $ACCESS_TOKEN" \
    -X POST \
    -F "fileToUpload=@files/picksumipsum.txt" \
    https://sandbox.agaveplatform.org/files/v2/media/data.agaveplatform.org/nryan
files-upload -v -F files/picksumipsum.txt -S data.agaveplatform.org nryan
The response will look something like this:
{
    "internalUsername": null,
    "lastModified": "2014-09-03T10:28:09.943-05:00",
    "name": "picksumipsum.txt",
    "nativeFormat": "raw",
    "owner": "nryan",
    "path": "/home/nryan/picksumipsum.txt",
    "source": "http://127.0.0.1/picksumipsum.txt",
    "status": "STAGING_QUEUED",
    "systemId": "data.agaveplatform.org",
    "uuid": "0001409758089943-5056a550b8-0001-002",
    "_links": {
        "history": {
            "href": "https://sandbox.agaveplatform.org/files/v2/history/system/data.agaveplatform.org/nryan/picksumipsum.txt"
        },
        "self": {
            "href": "https://sandbox.agaveplatform.org/files/v2/media/system/data.agaveplatform.org/nryan/picksumipsum.txt"
        },
        "system": {
            "href": "https://sandbox.agaveplatform.org/systems/v2/data.agaveplatform.org"
        }
    }
}
You may upload data to a remote systems by performing a multipart POST on the FILES service. If you are using the Agave CLI, you can perform recursive directory uploads. If you are manually calling curl or building an app with the Agave SDK, you will need to implement the recursion yourself. You can take a look in the files-upload script to see how this is done. The following is an example of how to upload a file that we will use in the remainder of this tutorial.
You will see a progress bar while the file uploads, followed by a response from the server with a description of the uploaded file. Agave does not block during data movement operations, so it may be just a moment before the file physically shows up on the remote system.
Importing data
You can also have Agave download data from an external URL. Rather than making a multipart file upload request, you can pass in a JSON object with the URL and an optional target file name, type, and array of notifications subscriptions. Agave supports several protocols for ingestion listed in the next table.
| Schema | Details |
|---|---|
| http | Supported with and without user info |
| https | Supported with and without user info |
| ftp | Anonymous FTP only |
| sftp | User info required in URL |
| agave | No user info supported. |
To demonstrate how this works, we will import a README.md file from the Agave Samples git repository in Bitbucket.
Download a file from a web accessible URL
curl -sk -H "Authorization: Bearer $ACCESS_TOKEN" -X POST
    -- data '{ "url":"https://github.com/agavetraining/science-api-samples/raw/master/README.md"}'
    https://sandbox.agaveplatform.org/files/v2/media/data.agaveplatform.org/nryan
files-import -v -U "https://github.com/agavetraining/science-api-samples/raw/master/README.md"
    -S data.agaveplatform.org nryan
The response will look something like this:
{
    "name" : "README.md",
    "uuid" : "0001409758713912-5056a550b8-0001-002",
    "owner" : "nryan",
    "internalUsername" : null,
    "lastModified" : "2014-09-10T20:00:55.266-05:00",
    "source" : "https://github.com/agavetraining/science-api-samples/raw/master/README.md",
    "path" : "/home/nryan/README.md",
    "status" : "STAGING_QUEUED",
    "systemId" : "data.agaveplatform.org",
    "nativeFormat" : "raw",
    "_links" : {
      "self" : {
        "href" : "https://sandbox.agaveplatform.org/files/v2/media/system/data.agaveplatform.org/nryan/README.md"
      },
      "system" : {
        "href" : "https://sandbox.agaveplatform.org/systems/v2/data.agaveplatform.org"
      },
      "history" : {
        "href" : "https://sandbox.agaveplatform.org/files/v2/history/system/data.agaveplatform.org/nryan/README.md"
      }
    }
}
Downloading data from a third party is done offline as an asynchronous activity, so the response from the server will come right away. One thing worth noting is that the file length given in the response will always be -1. This is because, generally speaking, Agave does not know what the actual source file size is until after the repsonse is send back. The file size will be updated as the download progresses. You can track the progress by querying the destination file item’s history. An entry will be present showing the progress of the download.
For this exercise, the file we just downloaded is just a few KB, so you should see it appear in your home folder on data.agaveplatform.org almost immediately. If you were importing larger datasets, the transfer could take significantly longer depending on the network quality between Agave and the source location. In this case, you would see the file size continue to increase until it completed. In the event of a failed transfer, Agave will retry several times before canceling the transfer.
Transferring data
Transferring data between systems
curl -sk -H "Authorization: Bearer $ACCESS_TOKEN" \
    -H "Content-Type: application/json" \
    -X POST \
    --data-binary '{"url":"agave://stampede.tacc.utexas.edu//etc/motd"}' \
    https://sandbox.agaveplatform.org/files/v2/media/data.agaveplatform.org/nryan
files-import -v -U "agave://stampede.tacc.utexas.edu//etc/motd" -S data.agaveplatform.org nryan
The response from the service will be the same as the one we received importing a file.
Much like downloading data, Agave can manage the transfer of data between registered systems. This is, in fact, how data is staged prior to running a simulation. Data transfers are carried out asynchronously, so you can simply start a transfer and go about your business. Agave will ensure it completes. If you would like a notification when the transfer completes or reaches a certain stage, you can subscribe for one or more emails, webhooks, and/or realtime notifications, and Agave will alert them when as the transfer progresses. The following table lists the available file events. For more information about the events and notifications systems, please see the Notifications Guide and Event Reference.
In the example below, we will transfer a file from stampede.tacc.utexas.edu to data.agaveplatform.org. While the request looks pretty basic, there is a lot going on behind the scenes. Agave will authenticate to both systems, check permissions, stream data out of Stampede using GridFTP and proxy it into data.agaveplatform.org using the SFTP protocol, adjusting the transfer buffer size along the way to optimize throughput. Doing this by hand is both painful and error prone. Doing it with Agave is nearly identical to copying a file from one directory to another on your local system.
One of the benefits of the Files service is that it frees you up to work in parallel and scale with your application demands. In the next example we will use the Files service to create redundant archives of a shared project directory.
curl -sk -H "Authorization: Bearer $ACCESS_TOKEN" \
    -H "Content-Type: application/json" \
    -X POST \
    --data-binary '{"url":"agave://data.agaveplatform.org/nryan/foo_project"}' \
    https://sandbox.agaveplatform.org/files/v2/media/system/nryan.storage1/

curl -sk -H "Authorization: Bearer $ACCESS_TOKEN" \
    -H "Content-Type: application/json" \
    -X POST \
    --data-binary '{"url":"agave://data.agaveplatform.org/nryan/foo_project"}' \
    https://sandbox.agaveplatform.org/files/v2/media/system/nryan.storage2/
files-import -v -U "agave://data.agaveplatform.org/nryan/foo_project" -S nryan.storage1

files-import -v -U "agave://data.agaveplatform.org/nryan/foo_project" -S nryan.storage2
Basic data operations
Now that we understand how to move data into, out of, and between systems, we will look at how to perform file operations on the data. Again, remember that the Files service gives you a common REST interface to all your storage and execution systems regardless of the authentication mechanism or protocol they use. The examples below will use your default public storage system, but they would work identically with any storage system you have access to.
Directory listing
Listing a file or directory
curl -sk -H "Authorization: Bearer $ACCESS_TOKEN" \
    https://sandbox.agaveplatform.org/files/v2/listings/data.agaveplatform.org/nryan
files-list -v -S data.agaveplatform.org nryan
The response would look something like this:
[
    {
        "format": "folder",
        "lastModified": "2012-08-03T06:30:12.000-05:00",
        "length": 0,
        "mimeType": "text/directory",
        "name": ".",
        "path": "nryan",
        "permisssions": "ALL",
        "system": "data.agaveplatform.org",
        "type": "dir",
        "_links": {
            "self": {
                "href": "https://sandbox.agaveplatform.org/files/v2/media/system/data.agaveplatform.org/nryan"
            },
            "system": {
                "href": "https://sandbox.agaveplatform.org/systems/v2/data.agaveplatform.org"
            }
        }
    },
    {
    "format": "raw",
    "lastModified": "2014-09-10T19:47:44.000-05:00",
    "length": 3235,
    "mimeType": "text/plain",
    "name": "picksumipsum.txt",
    "path": "nryan/picksumipsum.txt",
    "permissions": "ALL",
    "system": "data.agaveplatform.org",
    "type": "file",
    "_links": {
            "self": {
                "href": "https://sandbox.agaveplatform.org/files/v2/media/system/data.agaveplatform.org/nryan/picksumipsum.txt"
        },
        "system": {
            "href": "https://sandbox.agaveplatform.org/systems/v2/data.agaveplatform.org"
        }
    }
    }
]
Obtaining a directory listing, or information about a specific file is done by making a GET request on the /files/v2/listings/ resource.
The response to this contains a summary listing of the contents of your home directory on data.agaveplatform.org. Appending a file path to your commands above would give information on a specific file.
Move, copy, rename, delete
Basic file operations are available by sending a POST request the the /files/v2/media/ collection with the following parameters.
| Attribute | Description |
|---|---|
| action | The action you want to perform. Select one of “move”, “copy”, “rename”, “mkdir”. |
| path | Full path to the destination file or folder. This may be the name of a new directory or renamed file, or an absolute or relative Agave path where the file or directory should be copied/moved. |
Copying files and directories
Copy a file item within the same system.
curl -sk -H "Authorization: Bearer $ACCESS_TOKEN" \
    -H "Content-Type: application/json" \
    -X POST \
    --data-binary '{"action":"copy","path":"$DESTPATH"}' \
    https://sandbox.agaveplatform.org/files/v2/media/system/data.agaveplatform.org/$PATH
files-copy -D $DESTPATH -S data.agaveplatform.org $PATH
The response from a copy operation will be a JSON object describing the new file or folder.
Copying can be performed on any remote system. Unlike the Unix cp command, all copy invocations in Agave will overwrite the destination target if it exists. In the event of a directory collision, the contents of the two directory trees will be merged with the source overwriting the destination. Any overwritten files will maintain their provenance records and have an additional entry added to record the copy operation.
Moving files and directories
curl -sk -H "Authorization: Bearer $ACCESS_TOKEN" \
    -H "Content-Type: application/json" \
    -X POST \
    --data-binary '{"action":"move","path":"$DESTPATH"}' \
    https://sandbox.agaveplatform.org/files/v2/media/system/data.agaveplatform.org/$PATH
files-move -D $DESTPATH -S data.agaveplatform.org $PATH
The response will reflect the new file item
Moving can be performed on any remote system. Moving a file or directory will overwrite the destination target if it exists. Unlike copy operations, the destination will be completely replaced by the source in the event of a collision. No merge will take place. Further, the provenance of the source will replace that of the target.
Renaming files and directories
Renaming a file item
curl -sk -H "Authorization: Bearer $ACCESS_TOKEN" \
   -H "Content-Type: application/json" \
   -X POST \
   --data-binary '{"action":"rename","path":"$NEWNAME"}' \
    https://sandbox.agaveplatform.org/files/v2/media/system/$SYSTEM_ID/$PATH
files-rename -N $NEWNAME -S $SYSTEM_ID $PATH
The response will reflect the renamed file item
Renaming, like copying and moving, is only applicable within the context of a single system. Unlike on Unix systems, renaming and moving are not synonymous. When specifying a new name for a file or directory, the new name is relative to the parent directory of the original file or directory. Also, If a file or directory already exists with that name, the operation will fail and an error message will be returned. All provenance information will follow the renamed file or directory.
Creating a new directory
Creating a new directory
curl -sk -H "Authorization: Bearer $ACCESS_TOKEN" \
    -H "Content-Type: application/json" \
    -X POST \
    --data-binary '{"action":"mkdir","path":"$NEWDIR"}' \
    https://sandbox.agaveplatform.org/files/v2/media/system/data.agaveplatform.org/$PATH
files-mkdir -N $NEWDIR -S $SYSTEM_ID $PATH
The response will reflect the new directory
Creating a new directory is a recursive action in Agave. If the parent directories do not exist, they will be created on the fly. If a file or directory already exists with that name, the operation will fail and an error message will be returned.
Deleting a file item
Deleting a file item
curl -sk -H "Authorization: Bearer $ACCESS_TOKEN" \
    -X DELETE \
    https://sandbox.agaveplatform.org/files/v2/media/system/$SYSTEM_ID/$PATH
files-delete -S $SYSTEM_ID $PATH
A standard Agave response with an empty result value will be returned.
As with creating a directory, deleting a file or directory is a recursive action in Agave. No prompt or warning will be given once the request is sent. It is up to you to implement such checks in your application logic and/or user interface.
File history
A full history of changes, permissions changes, and access events made through the Files API is recorded for every file and folder on registered Agave systems. The recorded history events represent a subset of the events thrown by the Files API. Generally speaking, the events saved in a file item’s history represent mutations on the physical file item or its metadata.
Direct vs indirect events
Agave will record both direct and indirect events made on a file item. Examples of direct events are transferring a directory from one system to another or renaming a file. Examples of indirect events are a user manually deleting a file from the command line. The table below contains a list of all the provenance actions recorded.
| Event | Description |
|---|---|
| CREATED | File or directory was created |
| DELETED | The file was deleted |
| RENAME | The file was renamed |
| MOVED | The file was moved to another path |
| OVERWRITTEN | The file was overwritten |
| PERMISSION_GRANT | A user permission was added |
| PERMISSION_REVOKE | A user permission was deleted |
| STAGING_QUEUED | File/folder queued for staging |
| STAGING | File or directory is currently in flight |
| STAGING_FAILED | Staging failed |
| STAGING_COMPLETED | Staging completed successfully |
| PREPROCESSING | Prepairing file for processing |
| TRANSFORMING_QUEUED | File/folder queued for transform |
| TRANSFORMING | Transforming file/folder |
| TRANSFORMING_FAILED | Transform failed |
| TRANSFORMING_COMPLETED | Transform completed successfully |
| UPLOADED | New content was uploaded to the file. |
| CONTENT_CHANGED | Content changed within this file/folder. If a folder, this event will be thrown whenever content changes in any file within this folder at most one level deep. |
Out of band file system changes
Agave does not own the storage and execution systems you access through the Science APIs, so it cannot guarantee that everything that every possible change made to the file system is recorded. Thus, Agave takes a best-effort approach to provenance allowing you to choose, through your own use of best practices, how thorough you want the provenance trail of your data to be.
Listing file history
List the history of a file item
curl -sk -H "Authorization: Bearer $ACCESS_TOKEN" \
    https://sandbox.agaveplatform.org/files/v2/history/nryan/picksumipsum.txt
files-history -v nryan/picksumipsum.txt
The response to this contains a summary listing all permissions on the
$ files-history -v nryan/picksumipsum.txt
[
  {
    "status": "DOWNLOAD",
    "created": "2016-09-20T19:47:56.000-05:00",
    "createdBy": "public",
    "description": "File was downloaded"
  },
  {
    "status": "STAGING_QUEUED",
    "created": "2016-09-20T19:48:12.000-05:00",
    "createdBy": "nryan",
    "description": "File/folder queued for staging"
  },
  {
    "status": "STAGING_COMPLETED",
    "created": "2016-09-20T19:48:16.000-05:00",
    "createdBy": "nryan",
    "description": "Staging completed successfully"
  },
  {
    "status": "TRANSFORMING_COMPLETED",
    "created": "2016-09-20T19:48:17.000-05:00",
    "createdBy": "nryan",
    "description": "Your scheduled transfer of http://129.114.97.92/picksumipsum.txt completed staging. You can access the raw file on iPlant Data Store at /home/nryan/picksumipsum.txt or via the API at https://sandbox.agaveplatform.org/files/v2/media/system/data.agaveplatform.org//nryan/picksumipsum.txt."
  }
]
Basic paginated listing of file item history events is available as shown in the example. Currently, the file history service is readonly. The only way to erase the history on a file item is to delete the file item through the API.
Searching file history
Search a file item’s history
curl -sk -H "Authorization: Bearer $ACCESS_TOKEN" \
    https://sandbox.agaveplatform.org/files/v2/history/nryan/picksumipsum.txt?limit=2&offset=1&createdBy.like=*ryan
files-history-search -v -l 2 -o 1 -S data.agaveplatform.org nryan/picksumipsum.txt createdBy.like=*ryan
The response is a JSON array of every action performed on the file by users with a username ending in
ryan.
[
  {
    "status": "STAGING_QUEUED",
    "created": "2016-09-20T19:48:12.000-05:00",
    "createdBy": "nryan",
    "description": "File/folder queued for staging"
  },
  {
    "status": "STAGING_COMPLETED",
    "created": "2016-09-20T19:48:16.000-05:00",
    "createdBy": "nryan",
    "description": "Staging completed successfully"
  }
]
File histories can get rather lengthy over time. Full text search is available on the file history service using the standard search syntax.
File metadata management
In many systems, the concept of metadata is directly tied to the notion of a file system. Agave takes a broader view of metadata and supports it as its own first class resource in the REST API. For more information on how to leverage metadata in Agave, please consult the Metadata Guide. In there we cover all aspects of how to manage, search, validate, and associate metadata across your entire digital lab.
File permissions
Agave has a fine-grained permission model supporting use cases from creating and exposing readonly storage systems to sharing individual files and folders with one or more users. The permissions available for files items are listed in the following table. Please note that a user must have WRITE permissions to grant or revoke permissions on a file item.
| Name | Description |
|---|---|
| READ | User can view, but not edit or execute the resource |
| WRITE | User can edit, but not view or execute the resource |
| EXECUTE | User can execute, but not view or edit the resource |
| READ_WRITE | User can view and write the resource, but not execute |
| READ_EXECUTE | User can view and execute the resource, but not edit it |
| WRITE_EXECUTE | User can edit and execute the resource, but not view it |
| ALL | User has full control over the resource |
| NONE | User has all permissions revoked on the given resource |
Listing all permissions
List the permissions on a file item
curl -sk -H "Authorization: Bearer $ACCESS_TOKEN" \
    'https://sandbox.agaveplatform.org/files/v2/pems/system/data.agaveplatform.org/nryan/picksumipsum.txt?pretty=true''
files-pems-list \
    -S data.agaveplatform.org \
    nryan/picksumipsum.txt
The response will look something like the following:
[
  {
    "username": "nryan",
    "internalUsername": null,
    "permission": {
      "read": true,
      "write": true,
      "execute": true
    },
    "recursive": true,
    "_links": {
      "self": {
        "href": "https://sandbox.agaveplatform.org/files/v2/pems/system/data.agaveplatform.org/nryan/picksumipsum.txt?username.eq=nryan"
      },
      "file": {
        "href": "https://sandbox.agaveplatform.org/files/v2/media/system/data.agaveplatform.org/nryan/picksumipsum.txt"
      },
      "profile": {
        "href": "https://sandbox.agaveplatform.org/profiles/v2/nryan"
      }
    }
  }
]
To list all permissions for a file item, make a GET request on the file item’s permission collection
List permissions for a specific user
List the permissions on a file item for a given user
curl -sk -H "Authorization: Bearer $ACCESS_TOKEN"
    https://sandbox.agaveplatform.org/files/v2/pems/system/data.agaveplatform.org/nryan/picksumipsum.txt?username=rclemens
files-pems-list \
    -u rclemens \
    -S data.agaveplatform.org \
    nryan/picksumipsum.txt
The response will look something like the following:
{
  "username":"rclemens",
  "permission":{
    "read":true,
    "write":true
  },
  "_links":{
    "self":{
      "href":"https://sandbox.agaveplatform.org/files/v2/pems/system/data.agaveplatform.org/nryan/picksumipsum.txt?username=rclemens"
    },
    "parent":{
      "href":"https://sandbox.agaveplatform.org/files/v2/pems/system/data.agaveplatform.org/nryan/picksumipsum.txt"
    },
    "profile":{
      "href":"https://sandbox.agaveplatform.org/profiles/v2/rclemens"
    }
  }
}
Checking permissions for a single user is done using agave URL query search syntax.
Grant permissions
Grant read access to a file item
curl -sk -H "Authorization: Bearer $ACCESS_TOKEN" \
    -H "Content-Type: application/json" \
    -X POST \
    --data '{"username":"rclemens", "permission":"READ"}' \
    https://sandbox.agaveplatform.org/files/v2/pems/system/data.agaveplatform.org/nryan/picksumipsum.txt
files-pems-update
    -u rclemens \
    -p READ \
    -S data.agaveplatform.org \
    nryan/picksumipsum.txt
Grant read and write access to a file item
curl -sk -H "Authorization: Bearer $ACCESS_TOKEN" \
    -H "Content-Type: application/json" \
    -X POST \
    --data '{"username","rclemens", "permission":"READ_WRITE"}' \
    https://sandbox.agaveplatform.org/files/v2/pems/system/data.agaveplatform.org/nryan/picksumipsum.txt
files-pems-addupdate
    -u rclemens \
    -p READ_WRITE \
    -S data.agaveplatform.org \
    nryan/picksumipsum.txt
The response will look something like the following
[
  {
    "username": "rclemens",
    "internalUsername": null,
    "permission": {
      "read": true,
      "write": true,
      "execute": false
    },
    "recursive": false,
    "_links": {
      "self": {
        "href": "https://sandbox.agaveplatform.org/files/v2/pems/system/data.agaveplatform.org/nryan/picksumipsum.txt?username.eq=rclemens"
      },
      "file": {
        "href": "https://sandbox.agaveplatform.org/files/v2/media/system/data.agaveplatform.org/nryan/picksumipsum.txt"
      },
      "profile": {
        "href": "https://sandbox.agaveplatform.org/profiles/v2/rclemens"
      }
    }
  }
]
To grant another user read access to your metadata item, assign them READ permission. To enable another user to update a file item, grant them READ_WRITE or ALL access.
Delete single user permissions
Delete permission for single user on a file item
curl -sk -H "Authorization: Bearer $ACCESS_TOKEN" \
     -H "Content-Type: application/json" \
     -X POST \
     --data '{"username","rclemens", "permission":"NONE"}' \
     https://sandbox.agaveplatform.org/files/v2/pems/system/data.agaveplatform.org/nryan/picksumipsum.txt
files-pems-update  \
    -u rclemens \
    -p 'NONE' \
    -S data.agaveplatform.org \
    nryan/picksumipsum.txt
A response similiar to the following will be returned
[
  {
    "username": "rclemens",
    "internalUsername": null,
    "permission": {
      "read": false,
      "write": false,
      "execute": false
    },
    "recursive": false,
    "_links": {
      "self": {
        "href": "https://sandbox.agaveplatform.org/files/v2/pems/system/data.agaveplatform.org/nryan/picksumipsum.txt?username.eq=rclemens"
      },
      "file": {
        "href": "https://sandbox.agaveplatform.org/files/v2/media/system/data.agaveplatform.org/nryan/picksumipsum.txt"
      },
      "profile": {
        "href": "https://sandbox.agaveplatform.org/profiles/v2/rclemens"
      }
    }
  }
]
Permissions may be deleted for a single user by making a DELETE request on the metadata user permission resource. This will immediately revoke all permissions to the file item for that user.
Deleting all permissions
Delete all permissions on a file item
curl -sk -H "Authorization: Bearer $ACCESS_TOKEN" \
     -H "Content-Type: application/json" \
     -X POST \
     --data '{"username","*", "permission":"NONE"}' \
     https://sandbox.agaveplatform.org/files/v2/pems/system/data.agaveplatform.org/nryan/picksumipsum.txt

curl -sk -H "Authorization: Bearer $ACCESS_TOKEN" \
     -X DELETE \
     https://sandbox.agaveplatform.org/files/v2/pems/system/data.agaveplatform.org/nryan/picksumipsum.txt
files-pems-delete \
    -S data.agaveplatform.org \
    nryan/picksumipsum.txt
An empty response will be returned from the service.
Permissions may be cleared for all users on a file item by making a DELETE request on the file item permission collection. In
Recursive operations
Recursively delete all permissions on a directory
curl -sk -H "Authorization: Bearer $ACCESS_TOKEN" \
     -H "Content-Type: application/json" \
     -X POST \
     --data '{"username","*", "permission":"READ_WRITE", "recursive": true}' \
     https://sandbox.agaveplatform.org/files/v2/pems/system/data.agaveplatform.org/nryan/picksumipsum.txt

curl -sk -H "Authorization: Bearer $ACCESS_TOKEN" \
     -X DELETE \
     https://sandbox.agaveplatform.org/files/v2/pems/system/data.agaveplatform.org/nryan/picksumipsum.txt?recursive=true
files-pems-delete \
    --recursive \
    -S data.agaveplatform.org \
    nryan/picksumipsum.txt
An empty response will be returned from the service on delete. Update will return something like the following.
[
  {
    "username": "nryan",
    "internalUsername": null,
    "permission": {
      "read": true,
      "write": true,
      "execute": true
    },
    "recursive": true,
    "_links": {
      "self": {
        "href": "https://sandbox.agaveplatform.org/files/v2/pems/system/data.agaveplatform.org/nryan/picksumipsum.txt?username.eq=nryan"
      },
      "file": {
        "href": "https://sandbox.agaveplatform.org/files/v2/media/system/data.agaveplatform.org/nryan/picksumipsum.txt"
      },
      "profile": {
        "href": "https://sandbox.agaveplatform.org/profiles/v2/nryan"
      }
    }
  }
]
When dealing with directories, the permission operations you perform will apply onto to the directory item itself. Permissions will not automatically propagate to the directory contents. In cases where you want to recursively apply permissions to the entire directory tree, you can do so by including the recursive attribute in your permission objects or to your URL query parameters when making a DELETE request.
Publishing data
Agave provides multiple ways to share your data with your colleagues and the general public. In addition to the standard permission model enabling you to share your data with one or more authenticated users within the Platform, you also have the ability to publish your data and make it available via an unauthenticated public URL. Unlike traditional web and cloud hosting, your data remains in its original location and is served in situ by Agave upon user request.
Publishing a file for folder is simply a matter of granting the special public user READ permission on a file or folder. Similar to the way listings and permissions are exposed through unique paths in the Files API, published data is served from a custom /files/v2/download path. The public data URLs have the following structure:
https://sandbox.agaveplatform.org/files/v2/download/<username>/system/<system_id>/<path>
Notice two things. First, a username is inserted after the download path element. This is needed because there is no authorized user for whom to validate system or file ownership on a public request. The username gives the context by which to verify the availability of the system and file item being requested. Second, the system_id is mandatory in public data requests. This ensures that the public URL remains the same even when the default storage system of the user who published it changes.
The following sections give examples of publishing files and folders in the Agave Platform.
Publishing individual files
Publish file item on your default storage system for public access
curl -sk -H "Authorization: Bearer $ACCESS_TOKEN" \
    -H "Content-Type: application/json" \
    -X POST \
    --data '{"username","public", "permission":"READ"}' \
    https://sandbox.agaveplatform.org/files/v2/pems/nryan/picksumipsum.txt
files-pems-addupdate \
    -u public \
    -p READ \
    nryan/picksumipsum.txt
Publish file item on a named system for public access
curl -sk -H "Authorization: Bearer $ACCESS_TOKEN" \
    -H "Content-Type: application/json" \
    -X POST \
    --data '{"username","public", "permission":"READ"}' \
    https://sandbox.agaveplatform.org/files/v2/pems/system/data.agaveplatform.org/nryan/picksumipsum.txt
files-pems-addupdate \
    -u public \
    -p READ \
    -S data.agaveplatform.org \
    nryan/picksumipsum.txt
The response will look something like the following:
{
  "username": "public",
  "permission": {
    "read": true,
    "write": false,
    "execute": false
  },
  "recursive": false,
  "_links": {
    "self": {
      "href": "https://sandbox.agaveplatform.org/files/v2/pems/system/data.agaveplatform.org/nryan/picksumipsum.txt?username.eq=public"
    },
    "file": {
      "href": "https://sandbox.agaveplatform.org/files/v2/pems/system/data.agaveplatform.org/nryan/picksumipsum.txt"
    },
    "profile": {
      "href": "https://sandbox.agaveplatform.org/profiles/v2/public"
    }
  }
}
Publishing a file for folder is simply a matter of giving the special public user READ permission on the file. Once published, the file will be available at the following URL:
https://sandbox.agaveplatform.org/files/v2/download/nryan/system/data.agaveplatform.org/nryan/picksumipsum.txt
Publishing directories
Publish directory on your default storage system for public access
curl -sk -H "Authorization: Bearer $ACCESS_TOKEN" \
    -H "Content-Type: application/json" \
    -X POST \
    --data '{"username","public", "permission":"READ", "recursive": true}' \
    https://sandbox.agaveplatform.org/files/v2/pems/nryan/public
files-pems-addupdate \
    --recursive \
    -u public \
    -p READ \
    nryan/public
Publish directory on a named system for public access
curl -sk -H "Authorization: Bearer $ACCESS_TOKEN" \
    -H "Content-Type: application/json" \
    -X POST \
    --data '{"username","public", "permission":"READ", "recursive": true}' \
    https://sandbox.agaveplatform.org/files/v2/pems/system/data.agaveplatform.org/nryan/public
files-pems-addupdate \
    --recursive \
    -u public \
    -p READ \
    -S data.agaveplatform.org \
    nryan/public
The response will look something like the following:
{
  "username": "public",
  "permission": {
    "read": true,
    "write": false,
    "execute": false
  },
  "recursive": true,
  "_links": {
    "self": {
      "href": "https://sandbox.agaveplatform.org/files/v2/pems/system/data.agaveplatform.org/nryan/public?username.eq=public"
    },
    "file": {
      "href": "https://sandbox.agaveplatform.org/files/v2/pems/system/data.agaveplatform.org/nryan/public"
    },
    "profile": {
      "href": "https://sandbox.agaveplatform.org/profiles/v2/public"
    }
  }
}
Publishing an entire directory is identical to publishing a single file item. To make all the contents of the directory public as well, include a recursive field to your request with a value of true. Once published, the directory and all its contents will be avaialble for download. The above example will make every file and folder in the “nryan/public” directory of “data.agaveplatform.org” available for download at the following URL:
https://sandbox.agaveplatform.org/files/v2/download/nryan/system/data.agaveplatform.org/nryan/public
Publishing considerations
Publishing data through Agave can be a great way to share and access data. There are situations in which it may not be an ideal choice. We list several of the pitfalls user run into when publishing their data.
Large file publishing
Before publishing your large datasets, take a step back and consider how you might leverage the Files or Transfers API to reliable serve up your data. HTTP is not the fastest way to serve up the data, and it may not be the best usage pattern for applications hoping to consume it. Thinking through your use case is well worth the time, even if publishing ends up being the best approach.
Static website hosting
Website hosting is a fairly common use case for data publishing. The challenge is that your assets are still hosted remotely from our API servers and fetched on demand. This can create some heavy latency when serving up lots of assets. Depending on the nature of your backend storage solution, it may not easily handle access patterns common to the web. In those situations, you may see some files fail to load from time to time. If your site has many files, even a small failure rate can keep your site from reliably loading.
If you are going to use the file publishing service for web hosting, the following tips can help improve your overall experience.
- Whenever possible, reference versions of your css, fonts, and javascript dependencies hosted on public CDN. CloudFlare, Google, and Amazon all host public mirrors of the most popular javascript libraries and frameworks. Linking to those can greatly speed up your load time.
- Use a technology like
Webpackto reduce the number of files needed to serve your application. - Lazy load your assets with
oclazyload,requirejsor includingasyncattributes on your<script>elements. - Store your assets on a storage system with as little connection and protocol overhead as possible. That means avoiding tape archives, gridftp, overprovisioned shared resources, and systems only accessible through a proxied connection. While the service will still work in all of these situations, it is common for the overhead involved in establishing a connection and authenticating to take longer than the actual file transfer when the file is small. Simply avoiding slower storage protocols can greating speed up your application’s load time.
Apps
  /$$$$$$
 /$$__  $$
| $$  \ $$ /$$$$$$  /$$$$$$  /$$$$$$$
| $$$$$$$$/$$__  $$/$$__  $$/$$_____/
| $$__  $| $$  \ $| $$  \ $|  $$$$$$
| $$  | $| $$  | $| $$  | $$\____  $$
| $$  | $| $$$$$$$| $$$$$$$//$$$$$$$/
|__/  |__| $$____/| $$____/|_______/
         | $$     | $$
         | $$     | $$
         |__/     |__/
An app, in the context of Agave, is an executable code available for invocation through the Agave Jobs service on a specific execution system. Put another way, an app is a piece of code that you can run on a specific system. If a single code needs to be run on multiple systems, each combination of app and system needs to be defined as an app.
Apps are language agnostic and may or may not carry with them their own dependencies. (More on bundling your app in a moment.) Any code that can be forked at the command line or submitted to a batch scheduler can be registered as an Agave app and run through the Jobs service.
The Apps service is the central registry for all Agave apps. The Apps service provides permissions, validation, archiving, and revision information about each app in addition to the usual discovery capability. The rest of this tutorial explains in detail how to register an app to the Apps service, how to manage and share apps, and what the different application scopes mean.
Discovering apps
curl -sk -H "Authorization: Bearer $ACCESS_TOKEN" https://sandbox.agaveplatform.org/apps/v2/
apps-list -v
The response will be something like this:
[
  {
      "id": "demo-pyplot-demo-0.1.0u3",
      "name": "demo-pyplot-demo",
      "version": "0.1.0",
      "revision": 3,
      "executionSystem": "docker.tacc.utexas.edu",
      "shortDescription": "Advanced demo plotting app",
      "isPublic": true,
      "label": "PyPlot Demo Advanced",
      "lastModified": "2017-11-03T18:05:33.000-05:00",
      "_links": {
        "self": {
          "href": "https://sandbox.agaveplatform.org/apps/v2/demo-pyplot-demo-0.1.0u3"
        }
      }
    }, {
      "id": "cloud-runner-0.1.0u1",
      "name": "cloud-runner",
      "version": "0.1.0",
      "revision": 1,
      "executionSystem": "docker.tacc.utexas.edu",
      "shortDescription": "Generic template for running arbitrary code in Agave's Dockerized cloud.",
      "isPublic": true,
      "label": "Run your code in the cloud",
      "lastModified": "2016-11-01T02:07:22.000-05:00",
      "_links": {
        "self": {
          "href": "https://sandbox.agaveplatform.org/apps/v2/cloud-runner-0.1.0u1"
        }
      }
    }
]
The Apps service allows you to list and search for apps you have registered and apps that have been shared with you. To get a list of all your apps, make a GET request on the Apps collection.
Filtering apps
List apps returning only the app id
curl -sk -H "Authorization: Bearer $ACCESS_TOKEN" https://sandbox.agaveplatform.org/apps/v2/?filter=id,shortDescription,executionType
apps-list -v
The response will be something like this:
[
  {
    "id": "demo-pyplot-demo-0.1.0u3",
    "executionType": "CLI",
    "shortDescription": "Advanced demo plotting app"
  }, {
    "id": "cloud-runner-0.1.0u1",
    "executionType": "CLI",
    "shortDescription": "Generic template for running arbitrary code in Agave's Dockerized cloud."
  }
]
App description can get rather verbose, so a summary object is returned when listing the apps collection. The summary object contains the most critical fields in order to reduce response size when retrieving a user’s apps. You can customize this behavior using the filter query parameter.
Searching apps
Only public apps
curl -sk -H "Authorization: Bearer $ACCESS_TOKEN" https://sandbox.agaveplatform.org/apps/v2/?public=true
apps-search -v public=true
Only private apps
curl -sk -H "Authorization: Bearer $ACCESS_TOKEN" https://sandbox.agaveplatform.org/apps/v2/?public=false
apps-search -v public=false
Only apps with “plot” in the name
curl -sk -H "Authorization: Bearer $ACCESS_TOKEN" https://sandbox.agaveplatform.org/apps/v2/?name.like=*plot*
apps-search -v name.like=*plot*
Only apps that run on execution system “docker.tacc.utexas.edu”
curl -sk -H "Authorization: Bearer $ACCESS_TOKEN" https://sandbox.agaveplatform.org/apps/v2/?executionSystem.eq=docker.tacc.utexas.edu
apps-search -v executionSystem.eq=docker.tacc.utexas.edu
You can directly search the app collection by any field in the app description using Agave’s search syntax. Multiple fields can be included to further refine the query. See the section on Search for more details.
App details
curl -sk -H "Authorization: Bearer $ACCESS_TOKEN" https://sandbox.agaveplatform.org/apps/v2/cloud-runner-0.1.0u1
apps-list -v cloud-runner-0.1.0u1
The response will be something like this:
{
  "id": "cloud-runner-0.1.0u1",
  "name": "cloud-runner",
  "icon": null,
  "uuid": "3058779360820391450-242ac115-0001-005",
  "parallelism": "SERIAL",
  "defaultProcessorsPerNode": 1,
  "defaultMemoryPerNode": 1,
  "defaultNodeCount": 1,
  "defaultMaxRunTime": null,
  "defaultQueue": null,
  "version": "0.1.0",
  "revision": 1,
  "isPublic": true,
  "helpURI": "https://agaveplatform.org/contact-us",
  "label": "Run your code in the cloud",
  "owner": "dooley",
  "shortDescription": "Generic template for running arbitrary code in Agave's Dockerized cloud.",
  "longDescription": "Generic template for running an arbitrary application in Agave's hosted Docker cloud. Apps should be a gzipped archive.",
  "tags": [
    "docker",
    "demo",
    "awesome"
  ],
  "ontology": [],
  "executionType": "CLI",
  "executionSystem": "docker.tacc.utexas.edu",
  "deploymentPath": "/apps/cloud-runner-0.1.0u1.zip",
  "deploymentSystem": "data.agaveplatform.org",
  "templatePath": "wrapper.sh",
  "testPath": "test/test.sh",
  "checkpointable": false,
  "lastModified": "2016-11-01T02:07:22.000-05:00",
  "modules": [],
  "available": true,
  "inputs": [
    {
      "id": "dockerFile",
      "value": {
        "validator": null,
        "visible": true,
        "required": false,
        "order": 0,
        "enquote": false,
        "default": null
      },
      "details": {
        "label": "Dockerfile",
        "description": "Dockerfile to build the container that will be run as the executable. This is optional. Only include if you need to build a new container that is not present in the Docker central index and your app bundle does not already have a Dockerfile in it.",
        "argument": null,
        "showArgument": false,
        "repeatArgument": false
      },
      "semantics": {
        "minCardinality": 0,
        "maxCardinality": 1,
        "ontology": [],
        "fileTypes": []
      }
    },
    {
      "id": "appBundle",
      "value": {
        "validator": "([^\s]+(\.(?i)(zip|gz|tgz|tar.gz|bz2|rar))$)",
        "visible": true,
        "required": false,
        "order": 0,
        "enquote": false,
        "default": null
      },
      "details": {
        "label": "Application bundle",
        "description": "Compressed work folder containing application and binaries to be run in the Docker container. zip, gz.",
        "argument": null,
        "showArgument": false,
        "repeatArgument": false
      },
      "semantics": {
        "minCardinality": 0,
        "maxCardinality": 1,
        "ontology": [],
        "fileTypes": []
      }
    }
  ],
  "parameters": [
    {
      "id": "command",
      "value": {
        "visible": true,
        "required": false,
        "type": "string",
        "order": 0,
        "enquote": false,
        "default": "python",
        "validator": null
      },
      "details": {
        "label": "Command to run",
        "description": "This is the actual executable needed to run your program in the Docker container. ex. Rscript, python, java, mvn, php, sh",
        "argument": null,
        "showArgument": false,
        "repeatArgument": false
      },
      "semantics": {
        "minCardinality": 0,
        "maxCardinality": 1,
        "ontology": []
      }
    },
    {
      "id": "unpackInputs",
      "value": {
        "visible": true,
        "required": false,
        "type": "flag",
        "order": 0,
        "enquote": false,
        "default": true,
        "validator": null
      },
      "details": {
        "label": "Unpack input files",
        "description": "If true, any compressed input files will be expanded prior to execution on the remote system.",
        "argument": "1",
        "showArgument": true,
        "repeatArgument": false
      },
      "semantics": {
        "minCardinality": 0,
        "maxCardinality": 1,
        "ontology": []
      }
    },
    {
      "id": "commandArgs",
      "value": {
        "visible": true,
        "required": false,
        "type": "string",
        "order": 0,
        "enquote": false,
        "default": "main.py",
        "validator": null
      },
      "details": {
        "label": "Command arguments",
        "description": "This is a string reprsenting the command line needed to run your code. ex. main.r, main.py, -cp $CLASSPATH:lib, exec:java, -f main.php, -c main.sh ",
        "argument": null,
        "showArgument": false,
        "repeatArgument": false
      },
      "semantics": {
        "minCardinality": 0,
        "maxCardinality": 1,
        "ontology": []
      }
    },
    {
      "id": "dockerImage",
      "value": {
        "visible": true,
        "required": true,
        "type": "string",
        "order": 0,
        "enquote": false,
        "default": "agaveplatform/scipy-matplot-2.7",
        "validator": null
      },
      "details": {
        "label": "Image name",
        "description": "Container image from the Docker central repo or name of the image created by building the dockerFile",
        "argument": null,
        "showArgument": false,
        "repeatArgument": false
      },
      "semantics": {
        "minCardinality": 1,
        "maxCardinality": 1,
        "ontology": []
      }
    }
  ],
  "outputs": [],
  "_links": {
    "self": {
      "href": "https://sandbox.agaveplatform.org/apps/v2/cloud-runner-0.1.0u1"
    },
    "executionSystem": {
      "href": "https://sandbox.agaveplatform.org/systems/v2/docker.tacc.utexas.edu"
    },
    "storageSystem": {
      "href": "https://sandbox.agaveplatform.org/systems/v2/data.agaveplatform.org"
    },
    "history": {
      "href": "https://sandbox.agaveplatform.org/apps/v2/cloud-runner-0.1.0u1/history"
    },
    "metadata": {
      "href": "https://sandbox.agaveplatform.org/meta/v2/data/?q=%7B%22associationIds%22%3A%223058779360820391450-242ac115-0001-005%22%7D"
    },
    "owner": {
      "href": "https://sandbox.agaveplatform.org/profiles/v2/dooley"
    },
    "permissions": {
      "href": "https://sandbox.agaveplatform.org/apps/v2/cloud-runner-0.1.0u1/pems"
    }
  }
}
To query for detailed information about a specific app, add the app id to the base collection url and make another GET request.
This time, the response will be a JSON object with a full app description. The following is the description of the public cloud-runner-0.1.0u1 app. In the next section we talk more about the different parts of an app definition and how to register one of your own.
Defining apps
In this section we take a detailed look at the inputs and parameters sections of your app descriptions. Each of these sections takes an array of JSON objects. Each JSON object represents either a data source that needs staging in prior to job execution or a primary value passed into your app as a parameter. In either case, the JSON object only requires an id by which to reference the object in a job request, and a type field indicating primary type if the object represents a parameter.
In practice, you will want to add some descriptive information, constraints, and runtime validation checks to reduce the amount of error users can run into when attempting to run your app. The full lists of app input and parameter attributes are provided in their respective sections below. However, before we dive deeper into the next section on app inputs, let’s first get a big picture view of what we are doing when we define our app’s input and parameters.
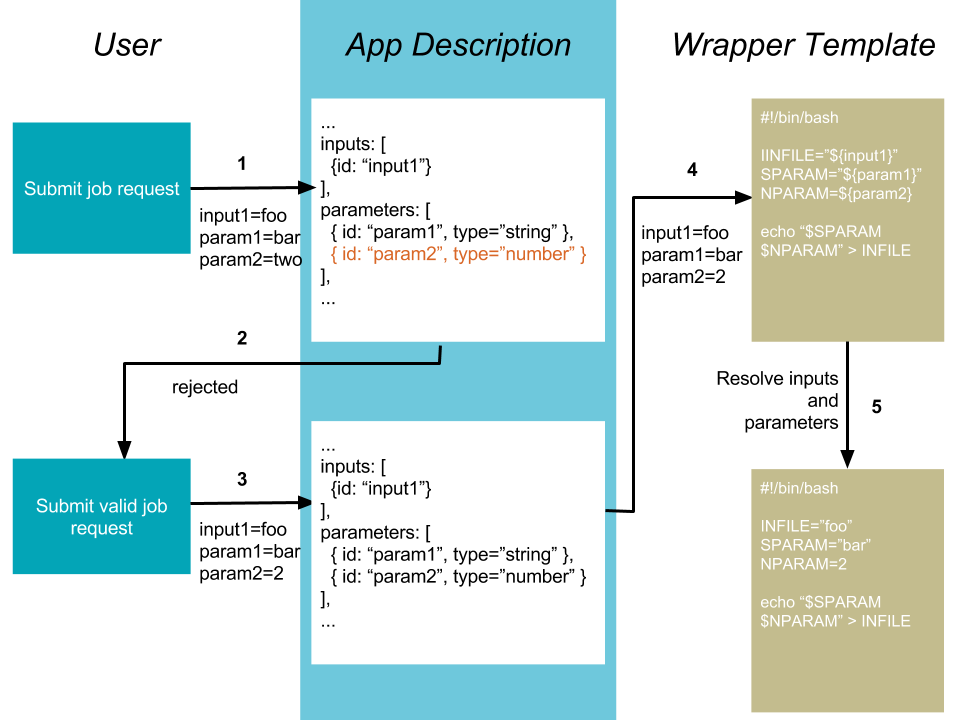
When a user submits a job request in step 1, they specify the inputs and parameters needed to run that job. Those attributes are defined in your app description. The Jobs service will use your app description to validate the values in the job request and either reject it with a descriptive error message as in step 2, or accept it as in step 4. Once the job request is accepted, the values provided for the inputs and parameters given in the job request are used to replace their corresponding template placeholder values in the wrapper script. For example, the job request assigned a value of foo for the input with id equal to input1. Before submitting the job request to the remote system, the Jobs service will replace all occurrences of ${input1} in the app wrapper script with foo. The same will happen with param1 and param2. All occurrences of ${param1} will be replaced with bar and all occurrences of ${param2} will be replaced with 2, just as specified in the job request.
As we look at how to define inputs and parameters for your app, keep this big picture in mind. The purpose of inputs is to specify data that need to be staged prior to your job running and to tell your wrapper script about them. The purpose of parameters is to specify variables that need to be passed to your wrapper script. To do this, we only need a simple id by which to reference the values in a job request. The rest of what we will discuss in this tutorial is the mechanism that Agave provides for you to validate, describe, discover, and restrict application inputs and parameters to provider better user and developer experiences using your app.
App inputs
Minimal app input definition
{
  "id": "input1"
}
The inputs attribute of your app description contains a JSON array of input objects. An input represents one or more pieces of data that your app will use at runtime. That data can be a single file, a directory, or a response from a web service. It can reside on a system that Agave knows about, or at a publicly accessible URL. Regardless of where it lives and what it is, Agave will grab the data (recursively if need be) and copy it to your job’s working directory just before execution.
A minimal input object contains a single inputs.[].id attribute that uniquely identifies it within the context of your app. Any alphanumeric value under 64 characters can be an identifier, but it must be unique among all the inputs and parameters in that app.
Most of the time, such a minimal definition is not helpful. At the very least, you would want some descriptive information, a restriction on the cardinality, and potentially a default value. This can be achieved with the details, semantics, and value objects. The full list of input attributes is shown in the following table. We cover each attribute in the corresponding section below.
| Name | Type | Description |
|---|---|---|
| id | String | Required: The textual id of this input. This value must be unique within all inputs and inputs for an app description. |
| details | JSON object | |
| details.argument | string | A command line argument or flag to be prepended before the input value. |
| details.description | string | Human-readable description of the input. Often used to create contextual help in automatically generated UI. |
| details.label | string | Human-readable label for the input. Often implemented as text label next to the field in automatically generated UI. |
| details.showArgument | boolean | Whether to include the argument value for this input when performing the template variable replacement during job submission. If true, the details.argument value will be prepended, without spaces, to the actual input value(s). |
| details.repeatArgument | boolean | When multiple values are provided for this input, this attribute determines whether to include the argument value before each user-supplied value when performing the template variable replacement during job submission. The details.showArgument value must be true for this value to be applied. |
| semantics | JSON object | Describes the semantic definition of this inputs and the filetypes it represents. Multiple ontologies and values are supported. |
| semantics.fileTypes | JSON array | Array of string values describing the file types represented by this input. The types correspond to values from the Transforms service. Use “raw-0” for the time being |
| semantics.minCardinality | integer | Minimum number of values this input must have. |
| semantics.maxCardinality | integer | Maximum number of values this input can have. A null value or value of -1 indicates no limit. |
| semantics.ontology | JSON array | List of ontology terms (or URIs pointing to ontology terms) applicable to the input. We recommend at least specifying an XSL Schema Simple Type. |
| value | JSON object | A description of the anticipated value and the situations when it is required. |
| value.default | string, JSON array | The default value for this input. This value is optional except when value.required is true and value.visible is false. Values may be absolute or relative paths on the user’s default storage sytem, an agave URI, or any valid URL with a supported schema. |
| value.order | integer | The order in which this input should appear when auto-generating a command line invocation. |
| value.required | boolean | Required: Is specification of this input mandatory to run a job? |
| value.validator | string | Perl-formatted regular expression to restrict valid values. |
| value.visible | boolean | When automatically generated a UI, should this field be visible to end users? If false, users will not be able to set this value in their job request. |
| value.enquote | boolean | Should the value be surrounded in quotation marks prior to injecting into the wrapper template at job runtime. |
Input details section
The inputs.[].details object contains information specifying how to describe an input in different contexts. The description and label values provide human readable information appropriate for a tool tip and form label respectively. Neither of these attributes are required, however they dramatically improve the readability of your app description if you include them.
Often times you will need to translate your input value into actual command line arguments. By default, Agave will replace all occurrences of your attribute inputs.[].id in your wrapper script with the value of that attribute in your job description. That means that you are responsible for inserting any command line flags or arguments into the wrapper script yourself. This is a pretty straightforward process, however in situations where an input is optional, the resulting command line could be broken if the user does not specify an input value in their job request. One way to work around this is to add a conditional check to the variable assignment and exclude the command line flag or argument if it does not have a value set. Another is to use the inputs.[].details.argument attribute.
The inputs.[].details.argument value describes the command line argument that corresponds to this input, and the inputs.[].details.showArgument attribute specifies whether the inputs.[].details.argument value should be injected into the wrapper template in front of the actual runtime value. The following table illustrates the result of these attributes in different scenarios.
argument |
showArgument |
Input value from job request | Value injected into wrapper template |
|---|---|---|---|
| true | /etc/motd | /etc/motd | |
| -f | true | /etc/motd | -f/etc/motd |
| -f (trailing space) | true | /etc/motd | -f /etc/motd |
| -f | false | /etc/motd | /etc/motd |
| –filename | true | /etc/motd | –filename/etc/motd |
| –filename= | true | /etc/motd | –filename=/etc/motd |
| –filename | false | /etc/motd | /etc/motd |
Input semantics section
The inputs.[].semantics object contains semantic information about the input. The minCardinality attribute specifies the minimum number of data sources that can be specified for the input. This attribute is used to validate the value(s) provided for the input in a job request. The ontology attribute specifies a JSON array of URLs pointing to the ontology definitions of this file type. (We recommend at least specifying an XSL Schema Simple Type.) Finally, the fileTypes attribute contains a JSON array of file type strings as specified in the transforms service. (In most situations you will leave the fileTypes attribute null or specify RAW-0 as the single file type in the array.)
Input value section
The inputs.[].value object contains the information needed to validate user-supplied input values in a job request. The validator attribute accepts a Perl regular expression which will be applied to the input value(s). Any submissions that do not match the validator expression will be rejected.
The default attribute allows you to specify a default value for the input. This will be used in leu of a user-supplied value if the input is required, but not visible. All default values must match the validator expression, if provided.
The required attribute specifies whether the input must be specified during a job submission.
The visible attribute takes a boolean value specifying whether the input should be accepted as as a user-supplied value in a job requests. If false, the value will be ignored at job submission and the default value will be used instead. Whenever visible is set to false, required must be true.
The order attribute is used to specify the order in which inputs should be listed in the response from the API and in command-line generation. By default, order is set to zero. Thus, providing a value greater than zero is sufficient to force any single input to be listed last.
Validating inputs
The previous section covered different ways you can specify for Agave to validate and restrict the data inputs to your app. When a user submits an job request, the order in which they are applied is as follows.
- visible
- required
- minCardinality
- maxCardinality
- validator
Once an input passes these tests, Agave will check that it exists and that the user has permission to access the data. Assuming everything passes, the input is accepted and scheduled for staging.
App parameters
Minimal app parameter definition
{
  "id": "parameter1",
  "value": {
    "type": "string"
  }
}
The parameters attribute of your app description contains a JSON array of parameter objects. A parameter represents one or more arguments that your app will use at runtime. Those arguments can be more or less anything you want them to be. If, for some reason, your app handles data staging on its own and you do not want Agave to move the data on your behalf, but you do need a data reference passed in, you can define it as a parameter rather than an input.
A minimal parameter object contains a single id attribute that uniquely identifies it within the context of your app and a value.type attribute specifying the primary type of the parameter. Any alphanumeric value under 64 characters can be an identifier, but it must be unique among all the inputs and parameters in that app. The parameter type is restricted to a handful of primary types listed in the table below.
In most situations you will want some descriptive information and validation of the user-supplied values for this parameter. As with your app inputs, app parameters have details, semantics, and value objects that allow you to do just that. The full list of parameter attributes is shown in the following table. We cover each attribute in the corresponding section below.
| Name | Type | Description |
|---|---|---|
| id | String | Required: The textual id of this parameter. This value must be unique within all parameters and parameters for an app description. |
| details | JSON object | |
| details.argument | string | A command line argument or flag to be prepended before the parameter value. |
| details.description | string | Human-readable description of the parameter. Often used to create contextual help in automatically generated UI. |
| details.label | string | Human-readable label for the parameter. Often implemented as text label next to the field in automatically generated UI. |
| details.showArgument | boolean | Whether to include the argument value for this parameter when performing the template variable replacement during job submission. If true, the details.argument value will be prepended, without spaces, to the actual parameter value(s). |
| details.repeatArgument | boolean | When multiple values are provided for this input, this attribute determines whether to include the argument value before each user-supplied value when performing the template variable replacement during job submission. The details.showArgument value must be true for this value to be applied. |
| semantics | JSON object | Describes the semantic definition of this parameters and the filetypes it represents. Multiple ontologies and values are supported. |
| semantics.minCardinality | integer | Minimum number of values this parameter must have. |
| semantics.maxCardinality | integer | Maximum number of values this parameter can have. A null value or value of -1 indicates no limit. |
| semantics.ontology | JSON array | List of ontology terms (or URIs pointing to ontology terms) applicable to the parameter. We recommend at least specifying an XSL Schema Simple Type. |
| value | JSON object | A description of the anticipated value and the situations when it is required. |
| value.default | string, JSON array | The default value for this parameter. This value is optional except when value.required is true and value.visible is false. If the value.type is of this parameter is enumeration, this value must be one of the specified value.enumValues. If the value.type is of this parameter is bool or flag, then only boolean values are accepted here. |
| value.enumValues | JSON array | An array of values specifying the possible values this parameter may have when value.type is enumeration. Both JSON Objects and strings are supported in the array. If a JSON Object is given, the object must be a single value attribute. The key will be the value passed into the wrapper template. The value will be the display value shown when auto-generating the option element in the select box representing this input. |
| value.order | integer | The order in which this parameter should appear when auto-generating a command line invocation. |
| value.required | boolean | Required: Is specification of this parameter mandatory to run a job? |
| value.type | string, number, enumeration, bool, flag | JSON type for this parameter (used to generate and validate UI). |
| value.validator | string | Perl-formatted regular expression to restrict valid values. |
| value.visible | boolean | When automatically generated a UI, should this field be visible to end users? If false, users will not be able to set this value in their job request. |
| value.enquote | boolean | Should the value be surrounded in quotation marks prior to injecting into the wrapper template at job runtime. |
Parameter details section
The parameters.[].details object contains information specifying how to describe a parameter in different contexts and is identical to the inputs.[].details object.
Parameter semantics section
The parameters.[].semantics object contains semantic information about the parameter. Unlike the inputs.[].semantics object, it only has a single attribute, ontology. The ontology attribute specifies a JSON array of URLs pointing to the ontology definitions of this parameter type. (We recommend at least specifying an XSL Schema Simple Type.)
Parameter value section
Example enumValue definition specifying just values for the enumeration.
[
  "red",
  "white",
  "green",
  "black"
]
Example enumValue definition specifying both a value and label for enumerated parameter.
[
  { "red": "Deep Cherry Red" },
  { "white": "Bright White" },
  { "green": "Black Forest Green" },
  { "black": "Brilliant Black Crystal Pearl" }
]
The parameters.[].value object contains the information needed to validate user-supplied parameter values in a job request. The type attribute defines the primary type of this parameter’s values. The available types are:
- number: any real number
- string: any json-escaped alphanumeric string.
- bool: true or false
- flag: true or false. Identical to boolean, but only the `argument` value will be inserted into the wrapper template.
- enumeration: a JSON array of strings values or JSON objects representing the acceptable values for this parameter. If an array of JSON objects is given, each object should have a single attribute with the key being a desired enumeration value, and the value being a human readable descriptive name for the enumerated value. The value of using objects vs strings is that object values provide a way to create more descriptive user interfaces by customizing both the content and value of a HTML select box’s option elements. An example of both is given below.
The validator attribute accepts a Perl regular expression which will be applied to the input value(s). Any submissions that do not match the validator expression will be rejected. This attribute is available both to parameters of type number and string. It is not available to bool or flag parameter types, or to enumeration parameters as they require the enumValues attribute instead.
The default attribute allows you to specify a default value for the parameter. This will be used in leu of a user-supplied value if the parameter is required, but not visible. All default values must match the appropriate validator if type is number or string, or be one of the values in the enumValues array if type is enumeration.
The enumValues attribute is a JSON array of alphanumeric values specifying the acceptable values for this input. This attribute only exists for enumeration parameter types.
The required attribute specifies whether the parameter must be specified during a job submission.
The visible attribute takes a boolean value specifying whether the parameter should be accepted as as a user-supplied value in a job requests. If false, the value will be ignored at job submission and the default value will be used instead. Whenever visible is set to false, required must be true.
The order attribute is used to specify the order in which parameters should be listed in the response from the API and in command-line generation. By default, order is set to 0. Thus, providing a value greater than zero is sufficient to force any single parameter to be listed last.
Validating inputs
The previous section covered different ways you can tell for Agave to validate and restrict the parameters to your app. When a user submits an job request, the order in which they are applied is as follows.
- visible
- required
- type
- validator / enumValues
App outputs
App outputs are not currently supported as first class objects in the app or job lifecycle. Their primary purpose is as metadata for use in client-side workflows and post-processing tasks. While not required, it is considered a best practice to define a list of the outputs expected when running the app. In doing so, an app can “advertise” to its consumers what it expect as the result of a run, thereby allowing apps to be chained together in a machine-readable fashion.
Outputs are defined similarly to inputs. The full list of output attributes is shown in the following table.
| Name | Type | Description |
|---|---|---|
| id | String | Required: The textual id of this output. |
| details | JSON object | |
| details.argument | string | A command line argument or flag to be prepended before the output value. |
| details.description | string | Human-readable description of the output. Often used to create contextual help in automatically generated UI. |
| details.label | string | Human-readable label for the output. Often implemented as text label next to the field in automatically generated UI. |
| details.showArgument | boolean | Whether to include the argument value for this input when performing the template variable replacement during job submission. If true, the details.argument value will be prepended, without spaces, to the actual output value(s). |
| details.repeatArgument | boolean | When multiple values are provided for this output, this attribute determines whether to include the argument value before each user-supplied value when performing the template variable replacement during job submission. The details.showArgument value must be true for this value to be applied. |
| semantics | JSON object | Describes the semantic definition of this output and the filetypes it represents. Multiple ontologies and values are supported. |
| semantics.fileTypes | JSON array | Array of string values describing the file types represented by this output. The types correspond to values from the Transforms service. Use "raw-0” for the time being |
| semantics.minCardinality | integer | Minimum number of values this output must have. |
| semantics.maxCardinality | integer | Maximum number of values this output can have. A null value or value of -1 indicates no limit. |
| semantics.ontology | JSON array | List of ontology terms (or URIs pointing to ontology terms) applicable to the output. We recommend at least specifying an XSL Schema Simple Type. |
| value | JSON object | A description of the anticipated value and the situations when it is required. |
| value.default | string, JSON array | The default value for this output. This value is optional except when value.required is true and value.visible is false. Values may be absolute or relative paths on the user’s default storage sytem, an agave URI, or any valid URL with a supported schema. |
| value.order | integer | The order in which this output should appear when auto-generating a command line invocation. |
| value.required | boolean | Required: Is specification of this output mandatory to run a job? |
| value.validator | string | Perl-formatted regular expression to restrict valid values. |
| value.visible | boolean | When automatically generated a UI, should this field be visible to end users? If false, users will not be able to set this value in their job request. |
| value.enquote | boolean | Should the value be surrounded in quotation marks prior to injecting into the wrapper template at job runtime. |
Defining app wrapper templates
Example wrapper script that prints out all of Agave’s available runtime job macros and runs a user-suppled string defined as the
commandargument in the app description.
date

echo "Printing Agave job template variables..."

echo 'IPLANT_JOB_NAME="${IPLANT_JOB_NAME}"'
echo 'AGAVE_JOB_NAME="${AGAVE_JOB_NAME}"'
echo 'AGAVE_JOB_ID="${AGAVE_JOB_ID}"'
echo 'AGAVE_JOB_APP_ID="${AGAVE_JOB_APP_ID}"'
echo 'AGAVE_JOB_EXECUTION_SYSTEM="${AGAVE_JOB_EXECUTION_SYSTEM}"'
echo 'AGAVE_JOB_BATCH_QUEUE="${AGAVE_JOB_BATCH_QUEUE}"'
echo 'AGAVE_JOB_SUBMIT_TIME="${AGAVE_JOB_SUBMIT_TIME}"'
echo 'AGAVE_JOB_ARCHIVE_SYSTEM="${AGAVE_JOB_ARCHIVE_SYSTEM}"'
echo 'AGAVE_JOB_ARCHIVE_PATH="${AGAVE_JOB_ARCHIVE_PATH}"'
echo 'AGAVE_JOB_NODE_COUNT="${AGAVE_JOB_NODE_COUNT}"'
echo 'IPLANT_CORES_REQUESTED="${IPLANT_CORES_REQUESTED}"'
echo 'AGAVE_JOB_PROCESSORS_PER_NODE="${AGAVE_JOB_PROCESSORS_PER_NODE}"'
echo 'AGAVE_JOB_MEMORY_PER_NODE="${AGAVE_JOB_MEMORY_PER_NODE}"'
echo 'AGAVE_JOB_ARCHIVE_URL="${AGAVE_JOB_ARCHIVE_URL}"'
echo 'AGAVE_JOB_OWNER="${AGAVE_JOB_OWNER}"'
echo 'AGAVE_JOB_TENANT="${AGAVE_JOB_TENANT}"'
echo 'AGAVE_JOB_ARCHIVE="${AGAVE_JOB_ARCHIVE}"'
echo 'AGAVE_JOB_MAX_RUNTIME="${AGAVE_JOB_MAX_RUNTIME}"'
echo 'AGAVE_JOB_MAX_RUNTIME_MILLISECONDS="${AGAVE_JOB_MAX_RUNTIME_MILLISECONDS}"'
echo "Printing runtime environment..."

env

CALLBACK=$(${command})

${AGAVE_JOB_CALLBACK_NOTIFICATION|CALLBACK}

sleep 3
In order to run your application, you will need to create a wrapper template that calls your executable code. The wrapper template is a simple script that Agave will filter and execute to start your app. The filtering Agave applies to your wrapper script is to inject runtime values from a job request into the script to replace the template variables representing the inputs and parameters of your app.
The order in which wrapper templates are processed in HPC and Condor apps is as follows.
environmentvariables injected.startupScriptrun.- Scheduler directives prepended to the wrapper template.
additionalDirectivesconcatenated after the scheduler directives.- Custom
modulesconcatenated after the additionalDirectives. inputsandparameterstemplate variables replaced with values from the job request.- Blacklist commands, if present, are disabled in the scripts.
- Resulting script is written to the remote job execution folder and executed.
The order in which wrapper templates are processed in CLI apps is as follows.
- Shell environment sourced
environmentvariables injectedstartupScriptrun- Custom
modulesprepended to the top of the wrapper inputsandparameterstemplate variables replaced with values from the job request- Blacklist commands, if present, are disabled in the scripts.
- Resulting script is forked into the background immediately.
Environment
Comes from the system definition. Handle in your script if you cannot change the system definition to suite your needs. Ship whatever you need with your app’s assets.
Using modules in wrapper templates
See more about Modules and Lmod. Can be used to customize your environment, locate your application, and improve portability between systems. Agave does not install or manage the module installation on a particular system, however it does know how to interact with it. Specifying the modules needed to run your app either in your wrapper template or in your system definition can greatly help you during the development process.
Available wrapper template runtime macros
Agave provides information about the job, system, and user as predefined macros you can use in your wrapper templates. The full list of runtime job macros are give in the following table.
| Variable | Description |
|---|---|
| AGAVE_JOB_APP_ID | The appId for which the job was requested. |
| AGAVE_JOB_ARCHIVE | Binary boolean value indicating whether the current job will be archived after the wrapper template exits. |
| AGAVE_JOB_ARCHIVE_SYSTEM | The system to which the job will be archived after the wrapper template exits. |
| AGAVE_JOB_ARCHIVE_URL | The fully qualified URL to the archive folder where the job output will be copied if archiving is enabled, or the URL of the output listing |
| AGAVE_JOB_ARCHIVE_PATH | The path on the archiveSystem where the job output will be copied if archiving is enabled. |
| AGAVE_JOB_BATCH_QUEUE | The batch queue on the AGAVE_JOB_EXECUTION_SYSTEM to which the job was submitted. |
| AGAVE_JOB_EXECUTION_SYSTEM | The Agave execution system id where this job is running. |
| AGAVE_JOB_ID | The unique identifier of the job. |
| JOB_MAX_RUNTIME | The max job run from the job request in HH:MM:SS format. |
| JOB_MAX_RUNTIME_MILLISECONDS | The max job run time from the job request converted to milliseconds. |
| AGAVE_JOB_MEMORY_PER_NODE | The amount of memory per node requested at submit time. |
| AGAVE_JOB_NAME | The slugified version of the name of the job. See the section on Conventions for more information about slugs. |
| AGAVE_JOB_NAME_RAW | The name of the job as given at submit time. |
| AGAVE_JOB_NODE_COUNT | The number of nodes requested at submit time. |
| AGAVE_JOB_OWNER | The username of the job owner. |
| AGAVE_JOB_PROCESSORS_PER_NODE | The number of cores requested at submit time. |
| AGAVE_JOB_SUBMIT_TIME | The time at which the job was submitted in ISO-8601 format. |
| AGAVE_JOB_TENANT | The id of the tenant to which the job was submitted. |
| AGAVE_JOB_ARCHIVE_URL | The Agave url to which the job will be archived after the job completes. |
| AGAVE_JOB_CALLBACK_RUNNING | Represents a call back to the API stating the job has started. |
| AGAVE_JOB_CALLBACK_CLEANING_UP | Represents a call back to the API stating the job is cleaning up. |
| AGAVE_JOB_CALLBACK_ALIVE | Represents a call back to the API stating the job is still alive. This will essentially update the timestamp on the job and add an entry to the job’s history record. |
| AGAVE_JOB_CALLBACK_NOTIFICATION | Represents a call back to the API telling it to forward a notification to the registered endpoint for that job. If no notification is registered, this will be ignored. |
| AGAVE_JOB_CALLBACK_FAILURE | Represents a call back to the API stating the job failed. Use this with caution as it will tell the API the job failed even if it has not yet completed. Upon receiving this callback, Agave will abandon the job and skip any archiving that may have been requested. Think of this as kill -9 for the job lifecycle. |
Handling app inputs
Agave will stage the files and folders you specify as inputs to your app. These will be available in the top level of your job directory at runtime. Additionally, the names of each of the inputs will be injected into your wrapper template for you to use in your application logic. Please be aware that Agave will not attempt to resolve namespace conflicts between your app inputs. That means that if a job specifies two inputs with the same name, one will overwrite the other during the input staging phase of the job and, though the variable names will be correctly injected to the wrapper script, your job will most likely fail due to missing data.
Handling app parameters
If you refer back to the app definition we used in the App Management Tutorial, you will see there are multiple inputs and parameters defined for that app. Each input and parameter object had an id attribute. That id value is the attribute name you use to associate runtime values with app inputs and parameters. When a job is submitted to Agave, prior to physically running the wrapper template, all instances of that id are replaced with the actual value from the job request. The example below shows our app description, a job request, and the resulting wrapper template at run time.
Variable type casting
During the jobs submission process, Agave will store your inputs and parameters as serialized JSON. At the point that variable injection occurs, Agave will replace all occurrences of your input and parameter with their value provided in the job request. In order for Agave to properly identify your input and parameter ids, wrap them in brackets and prepend a dollar sign. For example, if you have a parameter with id param1, you would include it in your wrapper script as ${param1}. Case sensitivity is honored at all times.
Handling boolean values
Boolean values are passed in as truthy values. true = 1, false is empty.
Using flag parameters
If your parameter was of type “flag”, Agave will replace all occurences of the template variable with the value you provided for the argument field.
App permissions
Apps have fine grained permissions similar to those found in the Jobs and Files services. Using these, you can share your app other Agave users. App permissions are private by default, so when you first POST your app to the Apps service, you are the only one who can see it. You may share your app with other users by granting them varying degrees of permissions. The full list of app permission values are listed in the following table.
| Permission | Description |
|---|---|
| READ | Gives the ability to view the app description. |
| WRITE | Gives the ability to update the app. |
| EXECUTE | Gives the ability to submit jobs using the app |
| ALL | Gives full READ and WRITE and EXECUTE permissions to the user. |
| READ_WRITE | Gives full READ and WRITE permissions to the user |
| READ_EXECUTE | Gives full READ and EXECUTE permissions to the user |
| WRITE_EXECUTE | Gives full WRITE and EXECUTE permissions to the user |
App permissions are distinct from all other roles and permissions and do not have implications outside the Apps service. This means that if you want to allow someone to run a job using your app, it is not sufficient to grant them READ_EXECUTE permissions on your app. They must also have an appropriate user role on the execution system on which the app will run. Similarly, if you do not have the right to publish on the executionSystem or access the deploymentPath on the deploymentSystem in your app description, you will not be able to publish your app.
Listing app permissions
App permissions are managed through a set of URLs consistent with the permission operations elsewhere in the API. To query for a user’s permission for an app, perform a GET on the user’s unique app permissions url.
curl -sk -H "Authorization: Bearer $ACCESS_TOKEN" \
     https://sandbox.agaveplatform.org/apps/v2/$APP_ID/pems/$USERNAME
apps-pems-list -v -u $USERNAME $APP_ID
The response from the service will be a JSON object representing the user permission. If the user does not have a permission for that app, the permission value will be NONE. By default, only you have permission to your private apps. Public apps will return a single permission for the public meta user rather than return a permissions for every user.
{
    "_links": {
        "app": {
            "href": "https://sandbox.agaveplatform.org/apps/v2/$APP_ID"
        },
        "profile": {
            "href": "https://sandbox.agaveplatform.org/profiles/v2/systest"
        },
        "self": {
            "href": "https://sandbox.agaveplatform.org/apps/v2/$APP_ID/pems/systest"
        }
    },
    "permission": {
        "execute": true,
        "read": true,
        "write": true
    },
    "username": "systest"
}
You can also query for all permissions granted on a specific app by making a GET request on the app’s permission collection.
curl -sk -H "Authorization: Bearer $ACCESS_TOKEN" https://sandbox.agaveplatform.org/apps/v2/$APP_ID/pems
apps-pems-list -v $APP_ID
This time the service will respond with a JSON array of permission objects.
[
   {
      "_links":{
         "app":{
            "href":"https://sandbox.agaveplatform.org/apps/v2/$APP_ID"
         },
         "profile":{
            "href":"https://sandbox.agaveplatform.org/profiles/v2/systest"
         },
         "self":{
            "href":"https://sandbox.agaveplatform.org/apps/v2/$APP_ID/pems/systest"
         }
      },
      "permission":{
         "execute":true,
         "read":true,
         "write":true
      },
      "username":"systest"
   }
]
Adding and updating app permissions
Setting permissions is done by posting a JSON object containing a permission and username. Alternatively, you can POST just the permission and append the username to the URL.
# Standard syntax to grant permissions to a specific user
curl -sk -H "Authorization: Bearer $ACCESS_TOKEN" -X POST -d "username=bgibson&permission=READ" https://sandbox.agaveplatform.org/apps/v2/$APP_ID/pems

# Abbreviated POST data to grant permission to a single user
curl -sk -H "Authorization: Bearer $ACCESS_TOKEN" -X POST -d "permission=READ" https://sandbox.agaveplatform.org/apps/v2/$APP_ID/pems/bgibson
apps-pems-update -v -u bgibson -p READ $APP_ID
The response will contain a JSON object representing the permission that was just created.
{
    "_links": {
        "app": {
            "href": "https://sandbox.agaveplatform.org/apps/v2/$APP_ID"
        },
        "profile": {
            "href": "https://sandbox.agaveplatform.org/profiles/v2/bgibson"
        },
        "self": {
            "href": "https://sandbox.agaveplatform.org/apps/v2/$APP_ID/pems/bgibson"
        }
    },
    "permission": {
        "execute": false,
        "read": true,
        "write": false
    },
    "username": "bgibson"
}
Deleting app permissions
Permissions can be deleted on a user-by-user basis, or all at once. To delete an individual user permission, make a DELETE request on the user’s app permission URL.
curl -sk -H "Authorization: Bearer $ACCESS_TOKEN" -X DELETE https://sandbox.agaveplatform.org/apps/v2/$APP_ID/bgibson
apps-pems-delete -u bgibson $APP_ID
The response will be an empty result object.
You can accomplish the same thing by updating the user permission to an empty value.
# Delete permission for a single user by updating with an empty permission value
curl -sk -H "Authorization: Bearer $ACCESS_TOKEN"  \
     -X POST -d "username=bgibson" -d "permission=NONE" \
     https://sandbox.agaveplatform.org/apps/v2/$APP_ID/pems

# Delete permission for a single user by updating with an empty permission value
curl -sk -H "Authorization: Bearer $ACCESS_TOKEN" \
     -X POST -d "permission=" \
     https://sandbox.agaveplatform.org/apps/v2/$APP_ID/pems/bgibson
apps-pems-update -v -u bgibson $APP_ID
Since this is an update operation, the resulting JSON permission object will be returned showing the user has no permissions to the app anymore.
{
    "_links": {
        "app": {
            "href": "https://sandbox.agaveplatform.org/apps/v2/$APP_ID"
        },
        "profile": {
            "href": "https://sandbox.agaveplatform.org/profiles/v2/bgibson"
        },
        "self": {
            "href": "https://sandbox.agaveplatform.org/apps/v2/$APP_ID/pems/bgibson"
        }
    },
    "permission": {
        "execute": false,
        "read": false,
        "write": false
    },
    "username": "bgibson"
}
To delete all permissions for an app, make a DELETE request on the app’s permissions collection.
curl -sk -H "Authorization: Bearer $ACCESS_TOKEN" \
     -X DELETE \
     https://sandbox.agaveplatform.org/apps/v2/$APP_ID
apps-pems-delete $APP_ID
The response will be an empty result object.
App scope
In addition to traditional permissions, apps also have a concept of scope. Unless otherwise configured, apps are private to the owner and the users they grant permission. Applications can, however move from the private space into the public space for use any anyone. Moving an app into the public space is called publishing. Publishing an app gives it much greater exposure and results in increased usage by the user community. It also comes with increased responsibilities for the original owner as well as the API administrators. Several of these are listed below:
- Public apps must run on public systems. This makes the app available to everyone.
- Public apps must be vetted for performance, reliability, and security by the API administrators.
- The original app author must remain available via email for ongoing support.
- Public apps must be copied into a public repository and checksummed.
- Updates to public apps must result in a snapshot of the original app being created and stored with its resulting checksum in a separate location.
- API administrators must maintain and support the app throughout its lifetime.
Publishing an app
Publishing an app.
curl -sk -H "Authorization: Bearer $ACCESS_TOKEN"
     -H "Content-Type: application/json"
     -X PUT
     --data-binary '{"action":"publish","executionSystem":"condor.opensciencegrid.org"}'
     https://sandbox.agaveplatform.org/apps/v2/wc-osg-1.00
apps-publish -e condor.opensciencegrid.org wc-osg-1.00
The response from the service will resemble the following:
{
  "id": "wc-osg-1.00u1",
  "name": "wc-osg",
  "icon": null,
  "uuid": "8734854070765284890-242ac116-0001-005",
  "parallelism": "SERIAL",
  "defaultProcessorsPerNode": 1,
  "defaultMemoryPerNode": 1,
  "defaultNodeCount": 1,
  "defaultMaxRunTime": null,
  "defaultQueue": null,
  "version": "1.00",
  "revision": 1,
  "isPublic": false,
  "helpURI": "http://www.gnu.org/s/coreutils/manual/html_node/wc-invocation.html",
  "label": "wc condor",
  "shortDescription": "Count words in a file",
  "longDescription": "",
  "tags": [
    "gnu",
    "textutils"
  ],
  "ontology": [
    "http://sswapmeet.sswap.info/algorithms/wc"
  ],
  "executionType": "CONDOR",
  "executionSystem": "condor.opensciencegrid.org",
  "deploymentPath": "/agave/apps/wc-1.00",
  "deploymentSystem": "public.storage.agave",
  "templatePath": "/wrapper.sh",
  "testPath": "/wrapper.sh",
  "checkpointable": true,
  "lastModified": "2016-09-15T04:48:17.000-05:00",
  "modules": [
    "load TACC",
    "purge"
  ],
  "available": true,
  "inputs": [
    {
      "id": "query1",
      "value": {
        "validator": "",
        "visible": true,
        "required": false,
        "order": 0,
        "enquote": false,
        "default": [
          "read1.fq"
        ]
      },
      "details": {
        "label": "File to count words in: ",
        "description": "",
        "argument": null,
        "showArgument": false,
        "repeatArgument": false
      },
      "semantics": {
        "minCardinality": 1,
        "maxCardinality": -1,
        "ontology": [
          "http://sswapmeet.sswap.info/util/TextDocument"
        ],
        "fileTypes": [
          "text-0"
        ]
      }
    }
  ],
  "parameters": [],
  "outputs": [
    {
      "id": "outputWC",
      "value": {
        "validator": "",
        "order": 0,
        "default": "wc_out.txt"
      },
      "details": {
        "label": "Text file",
        "description": "Results of WC"
      },
      "semantics": {
        "minCardinality": 1,
        "maxCardinality": 1,
        "ontology": [
          "http://sswapmeet.sswap.info/util/TextDocument"
        ],
        "fileTypes": []
      }
    }
  ],
  "_links": {
    "self": {
      "href": "https://sandbox.agaveplatform.org/apps/v2/wc-osg-1.00u1"
    },
    "executionSystem": {
      "href": "https://sandbox.agaveplatform.org/systems/v2/condor.opensciencegrid.org"
    },
    "storageSystem": {
      "href": "https://sandbox.agaveplatform.org/systems/v2/public.storage.agave"
    },
    "history": {
      "href": "https://sandbox.agaveplatform.org/apps/v2/wc-osg-1.00u1/history"
    },
    "metadata": {
      "href": "https://sandbox.agaveplatform.org/meta/v2/data/?q=%7B%22associationIds%22%3A%228734854070765284890-242ac116-0001-005%22%7D"
    },
    "owner": {
      "href": "https://sandbox.agaveplatform.org/profiles/v2/nryan"
    },
    "permissions": {
      "href": "https://sandbox.agaveplatform.org/apps/v2/wc-osg-1.00u1/pems"
    }
  }
}
To publish an app, make a PUT request on the app resource. In this example, we publish the wc-osg-1.00 app. Notice a few things about the response.
- Both the
executionSystemanddeploymentSystemhave changed. Public apps must run and store their assets on public systems. - We did not specify the
deploymentSystemwhere the public app assets should be stored, so Agave placed them on the default public storage system,public.storage.agave. - We did not specify the
deploymentPathwhere the public app assets should be stored, so Agave placed them in thepublicAppsDirof thedeploymentPath. - The
deploymentPathis now a zip archive rather than a folder. Agave does this because once, published, the app can no longer be updated, so the assets are frozen and stored in a separate location, removed from user access. - The
idof the app has changed. It now has au1appended to the original app id. This indicates that it is a public app and that it has been updated a single time. If we were to publish the app again, the resultingidwould bewc-osg-1.00u2. This differs from unpublished apps whose revision number increments without impacting the app id. Every time you publish an app, the id of the resulting public app will change.
Unpublishing an app
Unpublishing a public system is equivalent to disabling it.
curl -sk -H "Authorization: Bearer $ACCESS_TOKEN"
     -H "Content-Type: application/json"
     -X PUT
     --data-binary '{"action":"disable"}'
     https://sandbox.agaveplatform.org/apps/v2/wc-osg-1.00u1
apps-disable -v wc-osg-1.00u1
The response will look identical to before, but with
availableset to false
Unlike systems, it is not possible to unpublish an app. Once published, a deep copy of the app is store in an external location with its own provenance trail. If you would like to remove a published app from further use, simply disable it.
Cloning an app
curl -sk -H "Authorization: Bearer $ACCESS_TOKEN"\
     -X POST -d "action=clone" \
     -d "name=my-pyplot-demo" \
     -d "version=0.1.0" \
     -d "executionSystem=sftp.storage.example.com" \
     -d "deploymentSystem=2.2" \
     -d "deploymentPath=/apps/" \
     https://sandbox.agaveplatform.org/apps/v2/demo-pyplot-demo-advanced-0.1.0?pretty=true
apps-clone -N my-pyplot-demo -V 2.2 demo-pyplot-demo-advanced-0.1.0
Often times you will want to copy an existing app for use on another system, or simply to obtain a private copy of the app for your own use. This can be done using the clone functionality in the Apps service. The following tabs show how to do this using the unix curl command as well as with the Agave CLI.
Disabling an app
curl -sk -H "Authorization: Bearer $ACCESS_TOKEN" \
     -X PUT -d action=disable my-pyplot-demo-2.2
apps-disable -v my-pyplot-demo-2.2
Disabling an app make it unavailable for use. This means new job requests will fail due to the app being disabled. Existing jobs queued up to run will be held until the app becomes available. Running jobs will continue as normal, but any retries will be held until the app is reenabled.
To disable an app, make a PUT request on the app’s URL with action=disable as the body.
Enabling an app
curl -sk -H "Authorization: Bearer $ACCESS_TOKEN" \
     -X PUT -d action=enable my-pyplot-demo-2.2
apps-enable -v my-pyplot-demo-2.2
Enabling an app instantly returns it to service. Any pending jobs will immediately start processing according to the queuing policy and quotas in place when the app is enabled.
To enable an app, make a PUT request on the app URL with action=enable as the body.
Deleting an app
curl -sk -H "Authorization: Bearer $ACCESS_TOKEN" \
     -X DELETE my-pyplot-demo-2.2
apps-delete -v my-pyplot-demo-2.2
Deleting an app is done by calling a HTTP DELETE on an app’s URL. Note that deleting an app does not make its id available for reuse.
App history
A full history of changes to an app’s definition, permissions, and availability is recorded for every app. The recorded history events represent a subset of the events thrown by the Apps API. Generally speaking, the events saved in an app’s history represent mutations to the app’s definition and state, not its assets. For further details about history associated with file items, see the section on File history.
Direct vs indirect events
Agave will record all the direct events related to an app. Examples of direct events are enabling and updating an app. Indirect events such as submitting a job, or deleting a system to which the app is associated, will not be recorded.
Publishing history
App is published for the first time
curl -sk -H "Authorization: Bearer $ACCESS_TOKEN" \
    -X PUT --data-binary '{"action":"publish","name":"demo-pyplot-demo"}' \
    https://sandbox.agaveplatform.org/apps/v2/demo-pyplot-demo-basic-0.1.0

curl -sk -H "Authorization: Bearer $ACCESS_TOKEN" \
    -X PUT --data-binary '{"action":"publish","name":"demo-pyplot-demo"}' \
    https://sandbox.agaveplatform.org/apps/v2/demo-pyplot-demo-intermediate-0.1.0

curl -sk -H "Authorization: Bearer $ACCESS_TOKEN" \
    -X PUT --data-binary '{"action":"publish","name":"demo-pyplot-demo"}' \
    https://sandbox.agaveplatform.org/apps/v2/demo-pyplot-demo-advanced-0.1.0
apps-publish -v -N demo-pyplot-demo demo-pyplot-demo-basic-0.1.0
apps-publish -v -N demo-pyplot-demo demo-pyplot-demo-intermediate-0.1.0
apps-publish -v -N demo-pyplot-demo demo-pyplot-demo-advanced-0.1.0
The following (appreviated) entries are written to the app histories as follows
Original app demo-pyplot-demo-basic-0.1.0
[
  {
      "status": "PUBLISHED",
      "description": "App was published by nryan as demo-pyplot-demo-0.1.0u1. The published asset checksum is 6aea5f80fa7c1af9a945fc5d1cfc8c95",
      ...
   }
]
Original app demo-pyplot-demo-intermediate-0.1.0
[
  {
      "status": "PUBLISHED",
      "description": "App was published by nryan as demo-pyplot-demo-0.1.0u1. The published asset checksum is 6aea5f80fa7c1af9a945fc5d1cfc8c95",
      ...
   }
]
Original app demo-pyplot-demo-advanced-0.1.0
[
  {
      "status": "PUBLISHED",
      "description": "App was published by nryan as demo-pyplot-demo-0.1.0u3. The published asset checksum is f4193325b37b879e7218dcd81c81c614",
      ...
   }
]
Published app demo-pyplot-demo-0.1.0u1
[
  {
    "status": "CREATED",
    "description": "App was created by nryan as a result of publishing demo-pyplot-demo-basic-0.1.0. The asset checksum is 6aea5f80fa7c1af9a945fc5d1cfc8c95",
    ...
  },
  {
    "status": "REPUBLISHED",
    "description": "A new version of this app, demo-pyplot-demo-0.1.0u2, was created by nryan as a result of publishing demo-pyplot-demo-intermediate-0.1.0. The published asset checksum is 9b7f72f279ad41a993fe9b1eaca87e3a",
    ...
  },
  {
    "status": "REPUBLISHED",
    "description": "A new version of this app, demo-pyplot-demo-0.1.0u3, was created by nryan as a result of publishing demo-pyplot-demo-advanced-0.1.0. The published asset checksum is f4193325b37b879e7218dcd81c81c614",
    ...
  },
]
Published app demo-pyplot-demo-0.1.0u2
[
  {
    "status": "CREATED",
    "description": "App was created by nryan as a result of publishing demo-pyplot-demo-intermediate-0.1.0. The asset checksum is 9b7f72f279ad41a993fe9b1eaca87e3a",
    ...
  },
  {
    "status": "REPUBLISHED",
    "description": "A new version of this app, demo-pyplot-demo-0.1.0u3, was created by nryan as a result of publishing demo-pyplot-demo-advanced-0.1.0. The published asset checksum is f4193325b37b879e7218dcd81c81c614",
    ...
  }
]
Published app demo-pyplot-demo-0.1.0u3
[
  {
    "status": "CREATED",
    "description": "App was created by nryan as a result of publishing demo-pyplot-demo-advanced-0.1.0. The asset checksum is f4193325b37b879e7218dcd81c81c614",
    ...
   }
]
When publishing an app, the published name and the original name may not be the same. Thus, there may be multiple apps from which a public app was created over time. Further, since every app publication results in a new public app id, there may not be any outwardly apparent relationship between the current and previous versions of a published app. To help track the changes of a published app over time, Agave will propagate and record publication REPUBLISHED events through the entire ancestry of a published app. Take the following example using our pyplot app to illustrate this behavior.
We see that republishing an app records the change in the history of every app in the published app’s ancestry. This makes it easy to track down changes that occur both in the past and future of a given published app.
Listing app history
List the history of an app
curl -sk -H "Authorization: Bearer $ACCESS_TOKEN" \
    https://sandbox.agaveplatform.org/apps/v2/history/demo-pyplot-demo-advanced-0.1.0
app-history -v demo-pyplot-demo-advanced-0.1.0
The response to this contains a summary listing all recorded events in the app history
[
  {
    "status": "DOWNLOAD",
    "created": "2016-09-20T19:47:56.000-05:00",
    "createdBy": "public",
    "description": "File was downloaded"
  },
  {
    "status": "STAGING_QUEUED",
    "created": "2016-09-20T19:48:12.000-05:00",
    "createdBy": "nryan",
    "description": "File/folder queued for staging"
  },
  {
    "status": "STAGING_COMPLETED",
    "created": "2016-09-20T19:48:16.000-05:00",
    "createdBy": "nryan",
    "description": "Staging completed successfully"
  },
  {
    "status": "TRANSFORMING_COMPLETED",
    "created": "2016-09-20T19:48:17.000-05:00",
    "createdBy": "nryan",
    "description": "Your scheduled transfer of http://129.114.97.92/picksumipsum.txt completed staging. You can access the raw file on iPlant Data Store at /home/nryan/picksumipsum.txt or via the API at https://sandbox.agaveplatform.org/files/v2/media/system/data.agaveplatform.org//nryan/picksumipsum.txt."
  }
]
Basic paginated listing of app history events is available as shown in the example. Currently, the app history service is readonly. The only way to erase the history on an app is to delete the app through the API.
Jobs
    /$$$$$         /$$
   |__  $$        | $$
      | $$ /$$$$$$| $$$$$$$  /$$$$$$$
      | $$/$$__  $| $$__  $$/$$_____/
 /$$  | $| $$  \ $| $$  \ $|  $$$$$$
| $$  | $| $$  | $| $$  | $$\____  $$
|  $$$$$$|  $$$$$$| $$$$$$$//$$$$$$$/
 \______/ \______/|_______/|_______/
The Jobs service is a basic execution service that allows you to run applications registered with the Apps service across multiple, distributed, heterogeneous systems through a common REST interface. The service manages all aspects of execution and job management from data staging, job submission, monitoring, output archiving, event logging, sharing, and notifications. The Jobs service also provides a persistent reference to your job’s output data and a mechanism for sharing all aspects of your job with others. Each feature will be described in more detail below.
Job submission
Job submission is a term recycled from shared batch computing environments where a user would submit a request for a unit of computational work (called a Job) to the batch scheduler, then go head home for dinner while waiting for the computer to complete the job they gave it.
Originally the batch scheduler was a person and the term batch came from their ability to process several submissions together. Later on, as human schedulers were replaced by software, the term stuck even though the process remained unchanged. Today the term job submission is essentially unchanged.
A user submits a request for a unit of work to be done. The primary difference is that today, often times, the wait time between submission and execution is considerably less. On shared systems, such as many of the HPC systems originally targeted by Agave, waiting for your job to start is the price you pay for the incredible performance you get once your job starts.
Agave, too, adopts the concept of job submission, though it is not in and of itself a scheduler. In the context of Agave’s Job service, the process of running an application registered with the Apps service is referred to as submitting a job.
Unlike in the batch scheduling world where each scheduler has its own job submission syntax and its own idiosyncrasies, the mechanism for submitting a job to Agave is consistent regardless of the application or system on which you run. A HTML form or JSON object are posted to the Jobs service. The submission is validated, and the job is forwarded to the scheduling and execution services for processing.
Because Agave takes an app-centric view of science, execution does not require knowing about the underlying systems on which an application runs. Simply knowing how the parameters and inputs you want to use when running an app is sufficient to define a job. Agave will handle the rest.
As mentioned previously, jobs are submitted by making a HTTP POST request either a HTML form or a JSON object to the Jobs service. All job submissions must include a few mandatory values that are used to define a basic unit of work. Table 1 lists the optional and required attributes of all job submissions.
| Name | Value(s) | Description |
|---|---|---|
| name | string | Descriptive name of the job. This will be slugified and used as one component of directory names in certain situations. |
| appId | string | The unique name of the application being run by this job. This must be a valid application that the calling user has permission to run. |
| batchQueue | string | The batch queue on the execution system to which this job is submitted. Defaults to the app’s defaultQueue property if specified. Otherwise a best-fit algorithm is used to match the job parameters to a queue on the execution system with sufficient capabilities to run the job. |
| nodeCount | integer | The number of nodes to use when running this job. Defaults to the app’s defaultNodes property or 1 if no default is specified. |
| processorsPerNode | integer | The number of processors this application should utilize while running. Defaults to the app’s defaultProcessorsPerNode property or 1 if no default is specified. If the application is not of executionType PARALLEL, this should be 1. |
| memoryPerNode | string | The maximum amount of memory needed per node for this application to run given in ####.#[E|P|T|G]B format. Defaults to the app’s defaultMemoryPerNode property if it exists. GB are assumed if no magnitude is specified. |
| maxRunTime | string | The estimated compute time needed for this application to complete given in hh:mm:ss format. This value must be less than or equal to the max run time of the queue to which this job is assigned. |
| notifications* | JSON array | An array of one or more JSON objects describing an event and url which the service will POST to when the given event occurs. For more on Notifications, see the section on webhooks below. |
| archive* | boolean | Whether the output from this job should be archived. If true, all new files created by this application’s execution will be archived to the archivePath in the user’s default storage system. |
| archiveSystem* | string | System to which the job output should be archived. Defaults to the user’s default storage system if not specified. |
| archivePath* | string | Location where the job output should be archived. A relative path or absolute path may be specified. If not specified, a unique folder will be created in the user’s home directory of the archiveSystem at ‘archive/jobs/job-$JOB_ID’ |
Table 1. The optional and required attributes common to all job submissions. Optional fields are marked with an astericks.
In addition to the standard fields for all jobs, the application you specify in the appId field will also have its own set of inputs and parameters specified during registration that are unique to that app. (For more information about app registration and descriptions, see the App Management Tutorial).
The following snippet shows a sample JSON job request that could be submitted to the Jobs service to run the pyplot-0.1.0 app from the Advanced App Example tutorial.
{
  "name":"pyplot-demo test",
  "appId":"demo-pyplot-demo-advanced-0.1.0",
  "inputs":{
    "dataset":[
      "agave://$PUBLIC_STORAGE_SYSTEM/$API_USERNAME/inputs/pyplot/testdata.csv",
      "agave://$PUBLIC_STORAGE_SYSTEM/$API_USERNAME/inputs/pyplot/testdata2.csv"
    ]
  },
  "archive":false,
  "parameters":{
    "unpackInputs":false,
    "chartType":[
      "bar",
      "line"
    ],
    "width":1024,
    "height":512,
    "background":"#d96727",
    "showYLabel":true,
    "ylabel":"The Y Axis Label",
    "showXLabel":true,
    "xlabel":"The X Axis Label",
    "showLegend":true,
    "separateCharts":false
  },
  "notifications":[
    {
      "url":"$API_EMAIL",
      "event":"RUNNING"
    },
    {
      "url":"$API_EMAIL",
      "event":"FINISHED"
    },
    {
      "url":"http://requestbin.agaveplatform.org/o1aiawo1?job_id=${JOB_ID}&status=${JOB_STATUS}",
      "event":"*",
      "persistent":true
    }
  ]
}
Notice that this example specifies a single input attribute, dataset. The pyplot-0.1.0 app definition specified that the dataset input attribute could accept more than one value (maxCardinality = 2). In the job request object, that translates to an array of string values. Each string represents a piece of data that Agave will transfer into the job work directory prior to job execution. Any value accepted by the Files service when importing data is accepted here. Some examples of valid values are given in the following table.
| Name | Description |
|---|---|
| inputs/pyplot/testdata.csv | A relative path on the user’s default storage system. |
| /home/apiuser/inputs/pyplot/testdata.csv | An absolute path on the user’s default storage system. |
| agave://$PUBLIC_STORAGE_SYSTEM/$API_USERNAME/inputs/pyplot/testdata.csv | An Agave URL explicitly specifying a source system and relative path. |
| agave://$PUBLIC_STORAGE_SYSTEM//home/apiuser/$API_USERNAME/inputs/pyplot/testdata.csv | An Agave URL explicitly specifying a source system and absolute path. |
| http://example.com/inputs/pyplot/testdata.csv | Standard url with any supported transfer protocol. |
Table 2. Examples of different syntaxes that input values can be specified in the job request object. Here we assume that the validator for the input field is such that these would pass.
The example job request also specifies parameters object with the parameters defined in the pyplot-0.1.0 app description. Notice that the parameter type value specified in the app description is reflected here. Numbers are given as numbers, not strings. Boolean and flag attributes are given as boolean true and false values. As with the input section, there is also a parameter chartType that accepts multiple values. In this case that translates to an array of string value. Had the parameter type required another primary type, that would be used in the array instead.
Finally, we see a notifications array specifying that we want Agave send three notifications related to this job. The first is a one-time email when the job starts running. The second is a one-time email when the job reaches a terminal state. The third is a webhook to the url we specified. More on notifications in the section on monitoring below.
Job submission validation
If everything went well, you will receive a response that looks something like the following JSON object.
curl -sk -H "Authorization: Bearer $ACCESS_TOKEN" -X POST -F "fileToUpload=@job.json" https://sandbox.agaveplatform.org/jobs/v2?pretty=true
jobs-submit -F job.json
{
  "status" : "success",
  "message" : null,
  "version" : "2.1.0-r6d11c",
  "result" : {
    "id" : "0001414144065563-5056a550b8-0001-007",
    "name" : "demo-pyplot-demo-advanced test-1414139896",
    "owner" : "$API_USERNAME",
    "appId" : "demo-pyplot-demo-advanced-0.1.0",
    "executionSystem" : "$PUBLIC_EXECUTION_SYSTEM",
    "batchQueue" : "debug",
    "nodeCount" : 1,
    "processorsPerNode" : 1,
    "memoryPerNode" : 1.0,
    "maxRunTime" : "01:00:00",
    "archive" : false,
    "retries" : 0,
    "localId" : "10321",
    "outputPath" : null,
    "status" : "FINISHED",
    "submitTime" : "2014-10-24T04:48:11.000-05:00",
    "startTime" : "2014-10-24T04:48:08.000-05:00",
    "endTime" : "2014-10-24T04:48:15.000-05:00",
    "inputs" : {
      "dataset" : "agave://$PUBLIC_STORAGE_SYSTEM/$API_USERNAME/inputs/pyplot/testdata.csv"
    },
    "parameters" : {
      "chartType" : "bar",
      "height" : "512",
      "showLegend" : "false",
      "xlabel" : "Time",
      "background" : "#FFF",
      "width" : "1024",
      "showXLabel" : "true",
      "separateCharts" : "false",
      "unpackInputs" : "false",
      "ylabel" : "Magnitude",
      "showYLabel" : "true"
    },
    "_links" : {
      "self" : {
        "href" : "https://sandbox.agaveplatform.org/jobs/v2/0001414144065563-5056a550b8-0001-007"
      },
      "app" : {
        "href" : "https://sandbox.agaveplatform.org/apps/v2/demo-pyplot-demo-advanced-0.1.0"
      },
      "executionSystem" : {
        "href" : "https://sandbox.agaveplatform.org/systems/v2/$PUBLIC_EXECUTION_SYSTEM"
      },
      "archiveData" : {
        "href" : "https://sandbox.agaveplatform.org/jobs/v2/0001414144065563-5056a550b8-0001-007/outputs/listings"
      },
      "owner" : {
        "href" : "https://sandbox.agaveplatform.org/profiles/v2/$API_USERNAME"
      },
      "permissions" : {
        "href" : "https://sandbox.agaveplatform.org/jobs/v2/0001414144065563-5056a550b8-0001-007/pems"
      },
      "history" : {
        "href" : "https://sandbox.agaveplatform.org/jobs/v2/0001414144065563-5056a550b8-0001-007/history"
      },
      "metadata" : {
        "href" : "https://sandbox.agaveplatform.org/meta/v2/data/?q={"associationIds":"0001414144065563-5056a550b8-0001-007"}"
      },
      "notifications" : {
        "href" : "https://sandbox.agaveplatform.org/notifications/v2/?associatedUuid=0001414144065563-5056a550b8-0001-007"
      }
    }
  }
}
Job monitoring
Once you submit your job request, the job will be handed off to Agave’s back end execution service. Your job may run right away, or it may wait in a batch queue on the execution system until the required resources are available. Either way, the execution process occurs completely asynchronous to the submission process. To monitor the status of your job, Agave supports two different mechanisms: polling and webhooks.
Polling
If you have ever taken a long road trip with children, you are probably painfully aware of how polling works. Starting several minutes from the time you leave the house, a child asks, “Are we there yet?” You reply, “No.” Several minutes later the child again asks, “Are we there yet?” You again reply, “No.” This process continues until you finally arrive at your destination. This is called polling and polling is bad
Polling for your job status works the same way. After submitting your job, you start a while loop that queries the Jobs service for your job status until it detects that the job is in a terminal state. The following two URLs both return the status of your job. The first will result in a list of abbreviated job descriptions, the second will result in a full description of the job with the given $JOB_ID, exactly like that returned when submitting the job. The third will result in a much smaller response object that contains only the $JOB_ID and status being returned.
curl -sk -H "Authorization: Bearer  $ACCESS_TOKEN" https://sandbox.agaveplatform.org/jobs/v2
curl -sk -H "Authorization: Bearer  $ACCESS_TOKEN" https://sandbox.agaveplatform.org/jobs/v2/0001414144065563-5056a550b8-0001-007
curl -sk -H "Authorization: Bearer  $ACCESS_TOKEN" https://sandbox.agaveplatform.org/jobs/v2/0001414144065563-5056a550b8-0001-007/status
Sample response snippet
{
  "status" : "success",
  "message" : null,
  "version" : "2.1.0-r6d11c",
  "result" : {
    "id" : "0001414144065563-5056a550b8-0001-007",
    "status" : "FINISHED",
    "_links" : {
      "self" : {
        "href" : "$API_BASE_URL/jobs/v2/0001414144065563-5056a550b8-0001-007"
      }
    }
  }
}
The list of all possible job statuses is given in table 2.
| Event | Description |
|---|---|
| CREATED | The job was updated |
| UPDATED | The job was updated |
| DELETED | The job was deleted |
| PERMISSION_GRANT | User permission was granted |
| PERMISSION_REVOKE | Permission was removed for a user on this job |
| PENDING | Job accepted and queued for submission. |
| STAGING_INPUTS | Transferring job input data to execution system |
| CLEANING_UP | Job completed execution |
| ARCHIVING | Transferring job output to archive system |
| STAGING_JOB | Job inputs staged to execution system |
| FINISHED | Job complete |
| KILLED | Job execution killed at user request |
| FAILED | Job failed |
| STOPPED | Job execution intentionally stopped |
| RUNNING | Job started running |
| PAUSED | Job execution paused by user |
| QUEUED | Job successfully placed into queue |
| SUBMITTING | Preparing job for execution and staging binaries to execution system |
| STAGED | Job inputs staged to execution system |
| PROCESSING_INPUTS | Identifying input files for staging |
| ARCHIVING_FINISHED | Job archiving complete |
| ARCHIVING_FAILED | Job archiving failed |
| HEARTBEAT | Job heartbeat received |
Table 2. Job statuses listed in progressive order from job submission to completion.
Polling is an incredibly effective approach, but it is bad practice for two reasons. First, it does not scale well. Querying for one job status every few seconds does not take much effort, but querying for 100 takes quite a bit of time and puts unnecessary load on Agave’s servers. Second, polling provides what is effectively a binary response. It tells you whether a job is done or not done, it does not give you any information on what is actually going on with the job or where it is in the overall execution process.
The job history URL provides much more detailed information on the various state changes, system messages, and progress information associated with data staging. The syntax of the job history URL is as follows
curl -sk -H "Authorization: Bearer $ACCESS_TOKEN" https://sandbox.agaveplatform.org/jobs/v2/0001414144065563-5056a550b8-0001-007/history
Sample response snippet
{
  "status":"success",
  "message":null,
  "version":"2.1.0-r6d11c",
  "result":[
    {
      "created":"2014-10-24T04:47:45.000-05:00",
      "status":"PENDING",
      "description":"Job accepted and queued for submission."
    },
    {
      "created":"2014-10-24T04:47:47.000-05:00",
      "status":"PROCESSING_INPUTS",
      "description":"Attempt 1 to stage job inputs"
    },
    {
      "created":"2014-10-24T04:47:47.000-05:00",
      "status":"PROCESSING_INPUTS",
      "description":"Identifying input files for staging"
    },
    {
      "created":"2014-10-24T04:47:48.000-05:00",
      "status":"STAGING_INPUTS",
      "description":"Staging agave://$PUBLIC_STORAGE_SYSTEM/$API_USERNAME/inputs/pyplot/testdata.csv to remote job directory"
    },
    {
      "progress":{
        "averageRate":0,
        "totalFiles":1,
        "source":"agave://$PUBLIC_STORAGE_SYSTEM/$API_USERNAME/inputs/pyplot/testdata.csv",
        "totalActiveTransfers":0,
        "totalBytes":3212,
        "totalBytesTransferred":3212
      },
      "created":"2014-10-24T04:47:48.000-05:00",
      "status":"STAGING_INPUTS",
      "description":"Copy in progress"
    },
    {
      "created":"2014-10-24T04:47:50.000-05:00",
      "status":"STAGED",
      "description":"Job inputs staged to execution system"
    },
    {
      "created":"2014-10-24T04:47:55.000-05:00",
      "status":"SUBMITTING",
      "description":"Preparing job for submission."
    },
    {
      "created":"2014-10-24T04:47:55.000-05:00",
      "status":"SUBMITTING",
      "description":"Attempt 1 to submit job"
    },
    {
      "created":"2014-10-24T04:48:08.000-05:00",
      "status":"RUNNING",
      "description":"Job started running"
    },
    {
      "created":"2014-10-24T04:48:12.000-05:00",
      "status":"CLEANING_UP"
    },
    {
      "created":"2014-10-24T04:48:15.000-05:00",
      "status":"FINISHED",
      "description":"Job completed. Skipping archiving at user request."
    }
  ]
}
Depending on the nature of your job and the reliability of the underlying systems, the response from this service can grow rather large, so it is important to be aware that this query can be an expensive call for your client application to make. Everything we said before about polling job status applies to polling job history with the additional caveat that you can chew through quite a bit of bandwidth polling this service, so keep that in mind if your application is bandwidth starved.
Often times, however, polling is unavoidable. In these situations, we recommend using an exponential backoff to check job status. An exponential backoff is an alogrithm that increases the time between retries as the number of failures increases.
Webhooks
Webhooks are the alternative, preferred way for your application to monitor the status of asynchronous actions in Agave. If you are a Gang of Four disciple, webhooks are a mechanism for implementing the Observer Pattern. They are widely used across the web and chances are that something you’re using right now is leveraging them. In the context of Agave, a webhook is a URL that you give to Agave in advance of an event which it later POSTs a response to when that event occurs. A webhook can be any web accessible URL.
The Jobs service provides several template variables for constructing dynamic URLs. Template variables can be included anywhere in your URL by surrounding the variable name in the following manner ${VARIABLE_NAME}. When an event of interest occurs, the variables will be resolved and the resulting URL called. Several example urls are given below.
http://example.com/?job_id=${JOB_ID}&job_status=${EVENT}

http://example.com/trigger/job/${JOB_NAME}/${EVENT}

http://example.com/webhooks/?nonce=sdfkajerouiwe234289fahlkqr&id=${JOB_ID}&status=${EVENT}&start=${JOB_START_TIME}&end=${JOB_END_TIME}&url=${JOB_ARCHIVE_URL}
The full list of template variables are listed in the following table.
| Variable | Description |
|---|---|
| UUID | The UUID of the job |
| EVENT | The name of the event which occurred. |
| OWNER | The username of the user who triggered the event. |
| JOB_STATUS | The status of the job at the time the event occurs |
| JOB_URL | The url of the job within the API |
| JOB_ID | The unique id used to reference the job within Agave. |
| JOB_SYSTEM | ID of the job execution system (ex. ssh.execute.example.com) |
| JOB_NAME | The user-supplied name of the job |
| JOB_START_TIME | The time when the job started running in ISO8601 format. |
| JOB_END_TIME | The time when the job stopped running in ISO8601 format. |
| JOB_SUBMIT_TIME | The time when the job was submitted to Agave for execution by the user in ISO8601 format. |
| JOB_ARCHIVE_PATH | The path on the archive system where the job output will be staged. |
| JOB_ARCHIVE_URL | The Agave URL for the archived data. |
| JOB_ERROR | The error message explaining why a job failed. Null if completed successfully. |
| JOB_APP_ID | The id of the app being run. |
| JOB_BATCH_QUEUE | The batch queue of the JOB_EXECUTION_SYSTEM on which the job is assigned. |
| JOB_CREATED | The time when the job request was initially received in ISO8601 format. |
| JOB_EXECUTION_SYSTEM | The agave execution system id on which the job will run. |
| JOB_INPUTS | The serialized JSON object representing the job inputs. |
| JOB_LOCAL_ID | The id of the job on the JOB_EXECUTION_SYSTEM. This will be the id assigned to the batch scheduler, condor schedd, or sytem PID depending on the system scheduler type. |
| JOB_MAX_RUNTIME | The max job run from the job request in HH:MM:SS format. |
| JOB_MAX_RUNTIME_MILLISECONDS | The max job run time from the job request converted to milliseconds. |
| JOB_MAX_RUNTIME_SECONDS | The max job run time from the job request converted to seconds. |
| JOB_MEMORY_PER_NODE | The memory requested per node in the job request in GB. |
| JOB_NODE_COUNT | The number of nodes from the job request. |
| JOB_OWNER | The username of the user who submitted the job request. |
| JOB_OUTPUT_PATH | The absolute path to the job directory on the remote system. |
| JOB_PARAMETERS | The serialized JSON object representing the job parameters. |
| JOB_PROCESSORS_PER_NODE | The processors per node from the job request. |
| JOB_STATUS | The current job status. |
| JOB_START_TIME | The time when the job moved to a “RUNNING” status in ISO8601 format. |
| JOB_TENANT | The code of the tenant to which the job was submitted. |
| JOB_URL | The canonical Agave URL of the job. |
| JOB_ARCHIVE | Whether Agave will attempt to archive the job. Values “true” or “false”. |
| JOB_ARCHIVE_SYSTEM | The Agave storage system id to which the job output will be archived. This will be NULL if the the job is not archived. |
| JOB_ERROR/td> | The current debug or error message set for the job. |
| JOB_JSON | The serialized JSON object representing the job. This is identical to what would come back if you made a naked GET request on the job url. |
| RAW_JSON | The serialized JSON event payload. This is identical to what is sent in the body of a webhook POST callback. |
Table 3. Template variables available for use when defining webhooks for your job.
In situations where you do not have a persistent web address, or access to a backend service, you may find it more convenient to subscribe for email notifications rather then providing a webhook. Agave supports email notifications as well. Simply specify a valid email address in the url field in your job submission notification object and an email will be sent to that address when a relevant event occurs. A sample email message is given below.
The status of job 0001414144065563-5056a550b8-0001-007, "demo-pyplot-demo-advanced test-1414139896," has changed to FINISHED.

Name: demo-pyplot-demo-advanced test-1414139896
URL: https://sandbox.agaveplatform.org/jobs/v2/0001414144065563-5056a550b8-0001-007
Message: Job completed successfully.
Submit Time: 2014-10-24T04:48:11.000-05:00
Start Time: 2014-10-24T04:48:08.000-05:0
End Time: 2014-10-24T04:48:15.000-05:00
Output Path: $API_USERNAME/archive/jobs/job-0001414144065563-5056a550b8-0001-007
Output URL: https://sandbox.agaveplatform.org/jobs/v2/0001414144065563-5056a550b8-0001-007/outputs
Websockets
Websockets are a realtime approach to monitoring where your client application listens on a dedicated channel for notification messages from Agave. Simply subscribe to Agave’s websocket server (https://realtime.agaveplatform.org and listen for a channel matching the job id.
/agave.prod/$API_USERNAME/$JOB_ID
Stopping
Once your job is submitted, you have the ability to stop the job. This will kill the job on the system on which it is running.
curl -sk -H "Authorization: Bearer $ACCESS_TOKEN" -X POST -d "action=kill" https://sandbox.agaveplatform.org/jobs/v2/$JOB_ID
jobs-stop $JOB_ID
{
  "id" : "$JOB_ID",
  "name" : "demo-pyplot-demo-advanced test-1414139896",
  "owner" : "$API_USERNAME",
  "appId" : "demo-pyplot-demo-advanced-0.1.0",
  "executionSystem" : "$PUBLIC_EXECUTION_SYSTEM",
  "batchQueue" : "debug",
  "nodeCount" : 1,
  "processorsPerNode" : 1,
  "memoryPerNode" : 1.0,
  "maxRunTime" : "01:00:00",
  "archive" : false,
  "retries" : 0,
  "localId" : "10321",
  "outputPath" : null,
  "status" : "STOPPED",
  "submitTime" : "2014-10-24T04:48:11.000-05:00",
  "startTime" : "2014-10-24T04:48:08.000-05:00",
  "endTime" : null,
  "inputs" : {
    "dataset" : "agave://$PUBLIC_STORAGE_SYSTEM/$API_USERNAME/inputs/pyplot/testdata.csv"
  },
  "parameters" : {
    "chartType" : "bar",
    "height" : "512",
    "showLegend" : "false",
    "xlabel" : "Time",
    "background" : "#FFF",
    "width" : "1024",
    "showXLabel" : "true",
    "separateCharts" : "false",
    "unpackInputs" : "false",
    "ylabel" : "Magnitude",
    "showYLabel" : "true"
  },
  "_links" : {
    "self" : {
      "href" : "https://sandbox.agaveplatform.org/jobs/v2/0001414144065563-5056a550b8-0001-007"
    },
    "app" : {
      "href" : "https://sandbox.agaveplatform.org/apps/v2/demo-pyplot-demo-advanced-0.1.0"
    },
    "executionSystem" : {
      "href" : "https://sandbox.agaveplatform.org/systems/v2/$PUBLIC_EXECUTION_SYSTEM"
    },
    "archiveData" : {
      "href" : "https://sandbox.agaveplatform.org/jobs/v2/0001414144065563-5056a550b8-0001-007/outputs/listings"
    },
    "owner" : {
      "href" : "https://sandbox.agaveplatform.org/profiles/v2/$API_USERNAME"
    },
    "permissions" : {
      "href" : "https://sandbox.agaveplatform.org/jobs/v2/0001414144065563-5056a550b8-0001-007/pems"
    },
    "history" : {
      "href" : "https://sandbox.agaveplatform.org/jobs/v2/0001414144065563-5056a550b8-0001-007/history"
    },
    "metadata" : {
      "href" : "https://sandbox.agaveplatform.org/meta/v2/data/?q={"associationIds":"0001414144065563-5056a550b8-0001-007"}"
    },
    "notifications" : {
      "href" : "https://sandbox.agaveplatform.org/notifications/v2/?associatedUuid=0001414144065563-5056a550b8-0001-007"
    }
  }
}
Deleting
Deleting a job
curl -sk -H "Authorization: Bearer $ACCESS_TOKEN" -X DELETE https://sandbox.agaveplatform.org/jobs/v2/$JOB_ID
jobs-delete $JOB_ID
Over time the number of jobs you have run can grow rather large. You can delete jobs to remove them from your listing results.
Resubmitting
Resubmitting a job
curl -sk -H "Authorization: Bearer $ACCESS_TOKEN" -X POST -d "action=resubmit" https://sandbox.agaveplatform.org/jobs/v2/$JOB_ID
jobs-resubmit $JOB_ID
Often times you will want to rerun a previous job as part of a pipeline, automation, or validation that the results were valid. In this situation, it is convenient to use the resubmit feature of the Jobs service.
Resubmission provides you the options to enforce as much or as little rigor as you desire with respect to reproducibility in the job submission process. The following options are available to you for configuring a resubmission according to your requirements.
| Field | Type | Description |
|---|---|---|
| ignoreInputConflicts | boolean | Whether to ignore discrepencies in the previous app inputs for the resubmitted job. If true, the resubmitted job will make a best fit attempt and migrating the inputs. |
| ignoreParameterConflicts | boolean | Whether to ignore discrepencies in the previous app parameters for the resubmitted job. If true, the resubmitted job will make a best fit attempt and migrating the parameters. |
| preserveNotifications | boolean | Whether to recreate the notification of the original job for the resubmitted job. |
Outputs
Throughout the lifecycle of a job, your inputs, application assets, and outputs are copied from and shuffled between several different locations. Though it is possible in many instances to explicitly locate and view all the moving pieces of your job through the Files service, resolving where those pieces are given the status, execution system, storage systems, data protocols, login protocols, and execution mechanisms of your job at a given time is…challenging. It is important, however, that you have the ability to monitor your job’s output throughout the lifetime of the job.
To make tracking the output of a specific job easier to do, the Jobs service provides a special URL for referencing individual job outputs
curl -sk -H "Authorization: Bearer $ACCESS_TOKEN" https://sandbox.agaveplatform.org/jobs/v2/$JOB_ID/outputs/listings/$PATH
The syntax of this service is consistent with the Files service syntax, as is the JSON response from the service. The response would be similar to the following:
{
  "status" : "success",
  "message" : null,
  "version" : "2.1.0-r6d11c",
  "result" : [ {
    "name" : "output",
    "path" : "/output",
    "lastModified" : "2014-11-06T13:34:35.000-06:00",
    "length" : 0,
    "permission" : "NONE",
    "mimeType" : "text/directory",
    "format" : "folder",
    "type" : "dir",
    "_links" : {
      "self" : {
        "href" : "https://sandbox.agaveplatform.org/jobs/v2/0001414144065563-5056a550b8-0001-007/outputs/media/output"
      },
      "system" : {
        "href" : "https://sandbox.agaveplatform.org/systems/v2/data.agaveplatform.org"
      },
      "parent" : {
        "href" : "https://sandbox.agaveplatform.org/jobs/v2/0001414144065563-5056a550b8-0001-007"
      }
    }
  }, {
    "name" : "demo-pyplot-demo-advanced-test-1414139896.err",
    "path" : "/demo-pyplot-demo-advanced-test-1414139896.err",
    "lastModified" : "2014-11-06T13:34:27.000-06:00",
    "length" : 442,
    "permission" : "NONE",
    "mimeType" : "application/octet-stream",
    "format" : "unknown",
    "type" : "file",
    "_links" : {
      "self" : {
        "href" : "https://sandbox.agaveplatform.org/jobs/v2/0001414144065563-5056a550b8-0001-007/outputs/media/demo-pyplot-demo-advanced-test-1414139896.err"
      },
      "system" : {
        "href" : "https://sandbox.agaveplatform.org/systems/v2/data.agaveplatform.org"
      },
      "parent" : {
        "href" : "https://sandbox.agaveplatform.org/jobs/v2/0001414144065563-5056a550b8-0001-007"
      }
    }
  }, {
    "name" : "demo-pyplot-demo-advanced-test-1414139896.out",
    "path" : "/demo-pyplot-demo-advanced-test-1414139896.out",
    "lastModified" : "2014-11-06T13:34:30.000-06:00",
    "length" : 1396,
    "permission" : "NONE",
    "mimeType" : "application/octet-stream",
    "format" : "unknown",
    "type" : "file",
    "_links" : {
      "self" : {
        "href" : "https://sandbox.agaveplatform.org/jobs/v2/0001414144065563-5056a550b8-0001-007/outputs/media/demo-pyplot-demo-advanced-test-1414139896.out"
      },
      "system" : {
        "href" : "https://sandbox.agaveplatform.org/systems/v2/data.agaveplatform.org"
      },
      "parent" : {
        "href" : "https://sandbox.agaveplatform.org/jobs/v2/0001414144065563-5056a550b8-0001-007"
      }
    }
  }, {
    "name" : "demo-pyplot-demo-advanced-test-1414139896.pid",
    "path" : "/demo-pyplot-demo-advanced-test-1414139896.pid",
    "lastModified" : "2014-11-06T13:34:33.000-06:00",
    "length" : 6,
    "permission" : "NONE",
    "mimeType" : "application/octet-stream",
    "format" : "unknown",
    "type" : "file",
    "_links" : {
      "self" : {
        "href" : "https://sandbox.agaveplatform.org/jobs/v2/0001414144065563-5056a550b8-0001-007/outputs/media/demo-pyplot-demo-advanced-test-1414139896.pid"
      },
      "system" : {
        "href" : "https://sandbox.agaveplatform.org/systems/v2/data.agaveplatform.org"
      },
      "parent" : {
        "href" : "https://sandbox.agaveplatform.org/jobs/v2/0001414144065563-5056a550b8-0001-007"
      }
    }
  }, {
    "name" : "testdata.csv",
    "path" : "/testdata.csv",
    "lastModified" : "2014-11-06T13:34:42.000-06:00",
    "length" : 3212,
    "permission" : "NONE",
    "mimeType" : "application/octet-stream",
    "format" : "unknown",
    "type" : "file",
    "_links" : {
      "self" : {
        "href" : "https://sandbox.agaveplatform.org/jobs/v2/0001414144065563-5056a550b8-0001-007/outputs/media/testdata.csv"
      },
      "system" : {
        "href" : "https://sandbox.agaveplatform.org/systems/v2/data.agaveplatform.org"
      },
      "parent" : {
        "href" : "https://sandbox.agaveplatform.org/jobs/v2/0001414144065563-5056a550b8-0001-007"
      }
    }
  } ]
}
To download a file you would use the following syntax
curl -sk -H "Authorization: Bearer $ACCESS_TOKEN" https://sandbox.agaveplatform.org/jobs/v2/$JOB_ID/outputs/media/$PATH
Regardless of job status, the above services will always point to the most recent location of the job data. If you choose for the Jobs service to archive your job after completion, the URL will point to the archive folder of the job. If you do not choose to archive your data, or if archiving fails, the URL will point to the execution folder created for your job at runtime. Because Agave does not own any of the underlying hardware, it cannot guarantee that those locations will always exist. If, for example, the execution system enforces a purge policy, the output data may be deleted by the system administrators. Agave will let you know if the data is no longer present, however, it cannot prevent it from being deleted. This is another reason that it is important to archive data you feel will be needed in the future.
Job Lifecycle Management
Pseudocode for job work directory naming
if (executionSystem.scratchDir exists)

    $jobDir = executionSystem.scratchDir

else if (executionSystem.workDir exists)

    $jobDir = system.workDir

else

    $jobDir = system.storage.homeDir

endif

$jobDir = $jobDir + "/" + job.owner + "/job-" + job.uuid
Agave handles all of the end-to-end details involved with managing a job lifecycle for you. This can seem like black magic at times, so here we detail the overall lifecycle process every job goes through.
- Job request is made, validated, and saved.
- Job is queued up for execution. Job stays in a pending state until there are resources to run the job. This means that the target execution system is online, the storage system with the app assets is online, and neither the user nor the system are over quota. If resource do not become available with 7 days, the job is killed.
- When resources are available to run the job on the execution system, a work directory is created on the execution system. The job work directory is created based on the following pseudocode.
The job inputs are staged to the job work directory, job status is updated to “INPUTS_STAGING”
- If all inputs succeed and the job is updated to “STAGED”
- If one or more inputs fail to transfer. Job status is set back to “PENDING” and staging will be attempted up to 2 more times.
- If the user does not have permission to access one or more inputs. The job is set to “FAILED” and exists.
- If all inputs succeed and the job is updated to “STAGED”
The job again waits until the resources are available to run the job. Usually this is immediately after the inputs finish staging. If resource do not become available with 7 days, the job is killed.
The app deploymentPath is copied from the app.deploymentSystem to a temp dir on the API server. The jobs API then processes the
app.deploymentDir+ “/” + app.templatePath`` file to create the .ipcexe file. The process goes as follows:- Script headers are written. This includes scheduler directives if a batch system, shbang if a forked app.
- Additional
executionSystem[job.batchQueue].customDirectivesare written - “RUNNING” callback written
- Module commands are written
- executionSystem.environment is written
- wrapper script is filtered
- blacklisted commands are removed
- app parameter template variables are resolved against job parameter values.
- app input template variables are resolved against job input values
- blacklisted commands are removed again
- blacklisted commands are removed
- “CLEANING_UP” callback written
- All template macros are resolved.
job.name.slugify + ".ipcexe"file written to temp directory
- Script headers are written. This includes scheduler directives if a batch system, shbang if a forked app.
App assets with wrapper template are copied to remote job work directory.
Directory listing of job work directory is written to a .agave.archive manifest file in the remote job work directory.
Command line is generated to invoke the *.ipcexe file by the appropriate method for the execution system.
Command line is run on the remote system. If the command succeeds, the schedule, process, or other remote job id is captured and stored with the job record. If the command fails, the job status is updated to “STAGED”, and submission will be attempted up to 2 more times.
Job is updated to “QUEUED”
Job waits for a “RUNNING” callback and adds a background process to monitor the job in case the callback never comes.
Callback checks the job status according the the following schedule
- every 30 seconds for the first 5 minutes
- every minute for the next 30 minutes
- every 5 minutes for the next hour
- every 15 minutes for the next 12 hours
- every 30 minutes for the next 24 hours
- every hour for the next 14 days
Job either calls back with a “CLEANING_UP” status update or the monitoring process discovers the job no longer exists on the remote system.
If job.archive is true, send job to archiving queue to stage outputs to job.archiveSystem. Resource do not become available with 7 days, the job is killed.
Read the .agave.archive manifest file from the job work directory
Begin a breadth first directory traversal of the job work directory
If a file/folder is not in the .agave.archive manifest, copy it to the job.archivePath on the job.archiveSystem
Delete the job work directory
Update job status to “FINISHED”
Permissions and sharing
As with the Systems, Apps, and Files services, your jobs have their own set of access controls. Using these, you can share your job and its data with other Agave users. Job permissions are private by default. The permissions you give a job apply both to the job, its outputs, its metadata, and the permissions themselves. Thus, by sharing a job with another user, you share all aspects of that job.
Job permissions are managed through a set of URLs consistent with the permissions URL elsewhere in the API.
Granting
# General grant
curl -sk -H "Authorization: Bearer $ACCESS_TOKEN" \
     -H "Content-Type: application/json" \
     -X POST --data-binary '{"permission":"READ","username":"$USERNAME"}' \
     https://sandbox.agaveplatform.org/jobs/v2/$JOB_ID/pems

# Custom url grant
curl -sk -H "Authorization: Bearer $ACCESS_TOKEN" \
     -H "Content-Type: application/json" \
     -X POST --data-binary '{"permission":"READ"}' \
     https://sandbox.agaveplatform.org/jobs/v2/$JOB_ID/pems/$USERNAME
jobs-pems-update -u $USERNAME $JOB_ID
{
  "username": "$USERNAME",
  "internalUsername": null,
  "permission": {
    "read": true,
    "write": false
  },
  "_links": {
    "self": {
      "href": "https://sandbox.agaveplatform.org/jobs/v2/$JOB_ID/pems/$USERNAME"
    },
    "parent": {
      "href": "https://sandbox.agaveplatform.org/jobs/v2/$JOB_ID"
    },
    "profile": {
      "href": "https://sandbox.agaveplatform.org/profiles/v2/$USERNAME"
    }
  }
}
Granting permissions is simply a matter of issuing a POST with the desired permission object to the job’s pems collection.
The available permission values are listed in Table 2.
| Permission | Description |
|---|---|
| READ | Gives the ability to view the job status, and output data. |
| WRITE | Gives the ability to perform actions, manage metadata, and set permissions. |
| ALL | Gives full READ and WRITE permissions to the user. |
| READ_WRITE | Synonymous to ALL. Gives full READ and WRITE permissions to the user |
Table 2. Supported job permission values.
Listing
curl -sk -H "Authorization: Bearer $AUTH_TOKEN" \
    'https://sandbox.agaveplatform.org/jobs/v2/$JOB_ID/pems/'
jobs-pems-list -V $JOB_ID
[
  {
    "username": "$API_USERNAME",
    "internalUsername": null,
    "permission": {
      "read": true,
      "write": true
    },
    "_links": {
      "self": {
        "href": "https://sandbox.agaveplatform.org/jobs/v2/6608339759546166810-242ac114-0001-007/pems/$API_USERNAME"
      },
      "parent": {
        "href": "https://sandbox.agaveplatform.org/jobs/v2/6608339759546166810-242ac114-0001-007"
      },
      "profile": {
        "href": "https://sandbox.agaveplatform.org/profiles/v2/$API_USERNAME"
      }
    }
  },
  {
    "username": "$USERNAME",
    "internalUsername": null,
    "permission": {
      "read": true,
      "write": false
    },
    "_links": {
      "self": {
        "href": "https://sandbox.agaveplatform.org/jobs/v2/$JOB_ID/pems/$USERNAME"
      },
      "parent": {
        "href": "https://sandbox.agaveplatform.org/jobs/v2/$JOB_ID"
      },
      "profile": {
        "href": "https://sandbox.agaveplatform.org/profiles/v2/$USERNAME"
      }
    }
  }
]
To find the permissions for a given job, make a GET on the job’s pems collection. Here we see that both the job owner and the user we just granted permission to appear in the response.
Updating
curl -sk -H "Authorization: Bearer  $ACCESS_TOKEN" \
     -H "Content-Type: application/json" \
     -X POST --data-binary {"permission":"READ_WRITE}" \
     https://sandbox.agaveplatform.org/jobs/v2/$JOB_ID/$USERNAME
jobs-pems-update -u $USERNAME -p READ_WRITE $JOB_ID
{
  "username": "$USERNAME",
  "internalUsername": null,
  "permission": {
    "read": true,
    "write": true
  },
  "_links": {
    "self": {
      "href": "https://sandbox.agaveplatform.org/jobs/v2/$JOB_ID/pems/$USERNAME"
    },
    "parent": {
      "href": "https://sandbox.agaveplatform.org/jobs/v2/$JOB_ID"
    },
    "profile": {
      "href": "https://sandbox.agaveplatform.org/profiles/v2/$USERNAME"
    }
  }
}
Updating is exactly like granting permissions. Just POST to the same job’s pems collection.
Deleting
curl -sk -H "Authorization: Bearer  $ACCESS_TOKEN" \
     -X DELETE \
     https://sandbox.agaveplatform.org/jobs/v2/$JOB_ID/$USERNAME
jobs-pems-update -u $USERNAME -p '' $JOB_ID
To delete a permission, you can issue a DELETE request on the user permission resource we’ve been using, or update with an empty permission value.
Notifications
 /$$$$$$$          /$$       /$$$$$$          /$$
| $$__  $$        | $$      /$$__  $$        | $$
| $$  \ $$/$$   /$| $$$$$$$| $$  \__//$$   /$| $$$$$$$
| $$$$$$$| $$  | $| $$__  $|  $$$$$$| $$  | $| $$__  $$
| $$____/| $$  | $| $$  \ $$\____  $| $$  | $| $$  \ $$
| $$     | $$  | $| $$  | $$/$$  \ $| $$  | $| $$  | $$
| $$     |  $$$$$$| $$$$$$$|  $$$$$$|  $$$$$$| $$$$$$$/
|__/      \______/|_______/ \______/ \______/|_______/
Under the covers, the Agave API is an event-driven distributed system implemented on top of a reliable, cloud-based messaging system. This means that every action either observed or taken by Agave is tied to an event. The changing of a job from one status to another is an event. The granting of permissions on a file is an event. Editing a piece of metadata is an event, and to be sure, the moment you created an account with Agave was an event. You get the idea.
Having such a fine-grain event system is helpful for the same reason that having a fine-grain permission model is helpful. It affords you the highest degree of flexibility and control possible to achieve the behavior you desire. With Agave’s event system, you have the ability to alert your users (or yourself) the instant something occurs. You can be proactive rather than reactive, and you can begin orchestrating your complex tasks in a loosely coupled, asynchronous way.
Subscriptions
Example notification subscription request
{
  "associatedUuid": "0001409758089943-5056a550b8-0001-002",
  "event": "OVERWRITTEN",
  "persistent": true,
  "url": "nryan@rangers.mlb.com"
}
As consumers of Agave, you have the ability to subscribe to events occurring on any resource to which you have access. By that we mean, for example, you could subscribe to events on your job and a job that someone shared with you, but you could not subscribe to events on a job submitted by someone else who has not shared the job with you. Basically, if you can see a resource, you can subscribe to its events.
The Notifications service is the primary mechanism by which you create and manage your event subscriptions. A typical use case is a user subscribing for an email alert when her job completes. The following JSON object represents a request for such a notification.
The associatedUuid value is the UUID of her job. Here, we given the UUID of the picsumipsum.txt file we uploaded in the Files API guide. The event value is the name of the event to which she wants to be notified. This example is asking for an email to be sent whenever the file is overwritten. She could have just as easily specified a status of DELETED or RENAME to be notified when the file was deleted or renamed.
The persistent value specifies whether the notification should fire more than once. By default, all event subscriptions are transient. This is because the events themselves are transient. An event occurs, then it is over. There are, however, many situations where events could occur over and over again. Permission events, changes to metadata and data, application registrations on a system, job submissions to a system or queue, etc., all are transient events that can potentially occur many, many times. In these cases it is either not possible or highly undesirable to constantly resubscribe for the same event. The persistent attribute tells the notification service to keep a subscription alive until it is explicitly deleted.
Continuing to work through the example, the url value specifies where the notification should be sent. In this example, our example user specified that she would like to be notified via email. Agave supports both email and webhook notifications. If you are unfamiliar with webhooks, take a moment to glance at the webhooks.org page for a brief overview. If you are a Gang of Four disciple, webhooks are a mechanism for implementing the Observer Pattern. Webhooks are widely used across the web and chances are that something you’re using right now is leveraging them.
URL Macros
Receive a callback when a new user is created that includes the new user’s information
https://example.com/sendWelcome.php?username=${USERNAME}&email=${EMAIL}&firstName=${FIRST_NAME}&lastName=${LAST_NAME}&src=agaveplatform.org&nonce=1234567
Receive self-describing job status updates
http://example.com/job/${JOB_ID}?status=${JOB_STATUS}&lastUpdated=${JOB_START_TIME}
Get notified on all jobs going into and out of queues
http://example.com/system/${JOB_EXECUTION_SYSTEM}/queue/${JOB_BATCH_QUEUE}?action=add
http://example.com/system/${JOB_EXECUTION_SYSTEM}/queue/${JOB_BATCH_QUEUE}?action=subtract
Use plus mailing to route job notifications to different folders
nryan+${EXECUTION_SYSTEM}+${JOB_ID}@gmail.com
In the context of Agave, a webhook is a URL to which Agave will send a POST request when that event occurs. A webhook can be any web accessible URL. While you cannot customize the POST content that Agave sends (it is unique to the event), you can take advantage of the many template variables that Agave provides to customize the URL at run time. The following tables show the webhook template variables available for each resource. Use the select box to view the macros for different resources.
| Variable | Description |
|---|---|
| UUID | The UUID of the app. |
| EVENT | The event which occurred |
| OWNER | The username of the user who triggered the event. |
| APP_ID | The id of the app. |
| APP_NAME | The name of the app. |
| APP_VERSION | The version of the app. |
| APP_OWNER | The username of the user who created or published the app. |
| APP_SHORT_DESCRIPTION | The short textual app description. |
| APP_UUID | The uuid of the app. |
| APP_IS_PUBLIC | Whether the app is public or private. Values are “true” and “false”. |
| APP_LABEL | The display label of the app. |
| APP_LONG_DESCRIPTION | The full textual app description. |
| APP_AVAILABLE | Whether the app is available. Values are “true” and “false”. |
| APP_CHECKPOINTABLE | Whether the app is checkpointable. Values are “true” and “false”. |
| APP_DEFAULT_MAX_RUN_TIME | The default max runtime of a job running this app. This is the value used by the job service if no maxRunTime is specified in the job request. |
| APP_DEFAULT_MEMORY_PER_NODE | The default memory of a job running this app. This is the value used by the job service if no memoryPerNode is specified in the job request. |
| APP_DEFAULT_PROCESSORS_PER_NODE | The default processors per node of a job running this app. This is the value used by the job service if no processorsPerNode is specified in the job request. |
| APP_DEFAULT_NODE_COUNT | The default node count of a job running this app. This is the value used by the job service if no nodeCount is specified in the job request. |
| APP_DEFAULT_QUEUE | The name of the default batch queue of a job running this app. This is the value used by the job service if no batchQueue is specified in the job request. |
| APP_DEPLOYMENT_PATH | The default deployment path of the app assets on the remote deploymentSystem. |
| APP_DEPLOYMENT_SYSTEM | The id of the Agave system on which the app assets are stored. |
| APP_HELP_URI | The help URL of the app. |
| APP_URL | The canonical URL of the app. |
| APP_JSON | The serialized JSON representation of the resource. This is what would be returned if you made a naked GET request to the API for the resource details. |
| RAW_JSON | The serialized JSON event payload. This is identical to what is sent in the body of a webhook POST callback. |
| Variable | Description |
|---|---|
| UUID | The UUID of the job |
| EVENT | The name of the event which occurred. |
| OWNER | The username of the user who triggered the event. |
| JOB_STATUS | The status of the job at the time the event occurs |
| JOB_URL | The url of the job within the API |
| JOB_ID | The unique id used to reference the job within Agave. |
| JOB_SYSTEM | ID of the job execution system (ex. ssh.execute.example.com) |
| JOB_NAME | The user-supplied name of the job |
| JOB_START_TIME | The time when the job started running in ISO8601 format. |
| JOB_END_TIME | The time when the job stopped running in ISO8601 format. |
| JOB_SUBMIT_TIME | The time when the job was submitted to Agave for execution by the user in ISO8601 format. |
| JOB_ARCHIVE_PATH | The path on the archive system where the job output will be staged. |
| JOB_ARCHIVE_URL | The Agave URL for the archived data. |
| JOB_ERROR | The error message explaining why a job failed. Null if completed successfully. |
| JOB_APP_ID | The id of the app being run. |
| JOB_BATCH_QUEUE | The batch queue of the JOB_EXECUTION_SYSTEM on which the job is assigned. |
| JOB_CREATED | The time when the job request was initially received in ISO8601 format. |
| JOB_EXECUTION_SYSTEM | The agave execution system id on which the job will run. |
| JOB_INPUTS | The serialized JSON object representing the job inputs. |
| JOB_LOCAL_ID | The id of the job on the JOB_EXECUTION_SYSTEM. This will be the id assigned to the batch scheduler, condor schedd, or sytem PID depending on the system scheduler type. |
| JOB_MAX_RUNTIME | The max job run from the job request in HH:MM:SS format. |
| JOB_MAX_RUNTIME_MILLISECONDS | The max job run time from the job request converted to milliseconds. |
| JOB_MAX_RUNTIME_SECONDS | The max job run time from the job request converted to seconds. |
| JOB_MEMORY_PER_NODE | The memory requested per node in the job request in GB. |
| JOB_NODE_COUNT | The number of nodes from the job request. |
| JOB_OWNER | The username of the user who submitted the job request. |
| JOB_OUTPUT_PATH | The absolute path to the job directory on the remote system. |
| JOB_PARAMETERS | The serialized JSON object representing the job parameters. |
| JOB_PROCESSORS_PER_NODE | The processors per node from the job request. |
| JOB_STATUS | The current job status. |
| JOB_START_TIME | The time when the job moved to a “RUNNING” status in ISO8601 format. |
| JOB_TENANT | The code of the tenant to which the job was submitted. |
| JOB_URL | The canonical Agave URL of the job. |
| JOB_ARCHIVE | Whether Agave will attempt to archive the job. Values “true” or “false”. |
| JOB_ARCHIVE_SYSTEM | The Agave storage system id to which the job output will be archived. This will be NULL if the the job is not archived. |
| JOB_ERROR/td> | The current debug or error message set for the job. |
| JOB_JSON | The serialized JSON object representing the job. This is identical to what would come back if you made a naked GET request on the job url. |
| RAW_JSON | The serialized JSON event payload. This is identical to what is sent in the body of a webhook POST callback. |
| Variable | Description |
|---|---|
| UUID | The UUID of the file |
| EVENT | The name of the event which occurred. |
| OWNER | The username of the user who triggered the event. |
| FILE_UUID | The file item UUID. |
| FILE_NAME | The file item name. |
| FILE_OWNER | The file item owner. |
| FILE_LASTMODIFIED | The file item last modified timestamp in ISO8601 format. |
| FILE_PATH | The agave path of the file item on the agave system. |
| FILE_STATUS | The status of the file item at the time of the event. |
| FILE_SYSTEMID | The id of the agave system on which the file item resides. |
| FILE_TYPE | The agave file type of the file item. |
| FILE_PERMISSIONS | The native file system permissions of the file item on the remote system. |
| FILE_LENGTH | The size of the file item in bytes. |
| FILE_URL | The canonical URL of the file item. |
| FILE_MIMETYPE | The mimetype of the file item. |
| FILE_JSON | The serialized JSON representation of the resource. This is what would be returned if you made a naked GET request to the API for the resource details. |
| RAW_JSON | The serialized JSON event payload. This is identical to what is sent in the body of a webhook POST callback. |
| Variable | Description |
|---|---|
| UUID | The UUID of the schemata object. |
| EVENT | The name of the event which occurred. |
| OWNER | The username of the user who triggered the event. |
| METADATA_ID | The id of the metadata item. |
| METADATA_SCHEMAID | The id of the metadata schema used to validate this metadata item. NULL if none was assigned. |
| METADATA_VALUE | The raw value of the metadata item. |
| METADATA_ASSOCIATIONIDS | The serialized JSON array of AGAVE UUID representing resources associated with this metadata item. |
| METADATA_LASTUPDATED | The last time this metadata item was updated in ISO8601 format. |
| METADATA_CREATED | The creation timestamp of this metadata item in ISO8601 format. |
| RAW_JSON | The serialized JSON event payload. This is identical to what is sent in the body of a webhook POST callback. |
| Variable | Description |
|---|---|
| UUID | The UUID of the schemata object. |
| EVENT | The name of the event which occurred. |
| OWNER | The username of the user who triggered the event. |
| METADATA_SCHEMA_ID | The id of the metadata item. |
| METADATA_SCHEMA_OWNER | The username of the user who created the metadata schema. |
| METADATA_SCHEMA_SCHEMA | The serialized JSON schema definition. |
| METADATA_SCHEMA_LASTUPDATED | The last time this metadata schema was updated in ISO8601 format. |
| METADATA_SCHEMA_CREATED | The creation timestamp of this metadata schema in ISO8601 format. |
| RAW_JSON | The serialized JSON event payload. This is identical to what is sent in the body of a webhook POST callback. |
| Variable | Description |
|---|---|
| UUID | The uuid of the monitor. |
| EVENT | The name of the event which occurred. |
| OWNER | The owner of the monitor. |
| ID | The ID of the monitor. |
| TARGET | The system to which the monitor applies. |
| ACTIVE | Whether the monitor is active or inactive. |
| UPDATE_SYSTEM_STATUS | Whether the system status will be updated with the check results. |
| INTERNAL_USERNAME | The internal user associated with the status check. |
| CREATED | The time the monitor was created in ISO8601 format. |
| LAST_SUCCESS | The time the monitor last successfully ran in ISO8601 format. |
| LAST_UPDATED | The time the monitor last ran in ISO8601 format. |
| NEXT_CHECK | The time the monitor will run in ISO8601 format. |
| LAST_CHECK_ID | The id of the last check. **Only present in monitoring check events fire.. |
| LAST_MESSAGE | The message returned from the check. **Only present in monitoring check events fire.. |
| TYPE | Type of the monitoring check run: EXECUTION, STORAGE. **Only present in monitoring check events fire.. |
| Variable | Description |
|---|---|
| UUID | The UUID of the notification object |
| EVENT | The name of the event which occurred. |
| OWNER | The username of the user who triggered the event. |
| URL | The URL to which this notification will be published. |
| ATTEMPTS | Maximum retry attempts that will be made for this notification. |
| RESPONSE_CODE | The last response code for a delivery attempt for this notification |
| LAST_UPDATED | The timestamp of the last time this notification was updated in ISO8601 format |
| ASSOCIATED_ID | The resource whose events this notification is subscribed |
| CREATED | The timestamp when the notification was created in ISO8601 format |
| STATUS | The current status of this notification. eg. ACTIVE, INACTIVE, FAILED, COMPLETE. |
| Variable | Description |
|---|---|
| UUID | The UUID of the PostIt |
| EVENT | The event which occurred |
| OWNER | The username of the user who triggered the event. |
| NONCE | Nonce specified in the POSTIT url |
| CREATED | Time the PostIt was created ISO8601 format |
| RENEWED | Last time the PostIt was renewed in ISO8601 format |
| EXPIRES | Time the PostIt expires in ISO8601 format |
| TARGET_URL | Remote URL which will be called when the PostIt is redeemed |
| TARGET_METHOD | HTTP method that will be called on the TARGET_URL |
| REMAINING_USES | Number of invocations remaining for this PostIt |
| POSTIT | Full PostIt URL |
| Variable | Description |
|---|---|
| UUID | The UUID of the profile |
| EVENT | The name of the event which occurred. |
| OWNER | The username of the user who triggered the event. |
| USERNAME | Username of the user |
| Variable | Description |
|---|---|
| UUID | The UUID of the system |
| EVENT | The name of the event which occurred. |
| OWNER | The username of the user who triggered the event. |
| SYSTEM_ID | ID of the system (ex. ssh.execute.example.com) |
| SYSTEM_STATUS | Current status of the system: UP, DOWN, UNKNOWN |
| SYSTEM_PUBLIC | True if the system is publicly available, false otherwise |
| SYSTEM_GLOBALDEFAULT | True if the system is one of the two default publicly available systems, false otherwise |
| SYSTEM_LASTUPDATED | The last time this system was updated in ISO8601 format |
| SYSTEM_STORAGE_PROTOCOL | The protocol used to move data to and from this system |
| SYSTEM_STORAGE_HOST | The storage host for this sytem |
| SYSTEM_STORAGE_PORT | The storage port for this system |
| SYSTEM_STORAGE_RESOURCE | The system resource for iRODS systems |
| SYSTEM_STORAGE_ZONE | The system zone for iRODS systems |
| SYSTEM_STORAGE_CONTAINER | The the object store bucket in which the rootDir resides. |
| SYSTEM_STORAGE_ROOT_DIR | The virtual root directory exposed on this system |
| SYSTEM_STORAGE_HOME_DIR | The home directory on this system relative to the STORAGE_ROOT_DIR |
| SYSTEM_STORAGE_AUTH_TYPE | The storage authentication method for this system |
| SYSTEM_LOGIN_PROTOCOL | The protocol used to establish a session with this system (eg SSH, GSISSH, etc) |
| SYSTEM_LOGIN_HOST | The login host for this system |
| SYSTEM_LOGIN_PORT | The login port for this system |
| SYSTEM_LOGIN_AUTH_TYPE | The login authentication method for this system |
| Variable | Description |
|---|---|
| UUID | The UUID of the schemata object. |
| EVENT | The name of the event which occurred. |
| OWNER | The username of the user who triggered the event. |
| TAG_ID | The id of the tag. |
| TAG_NAME | The name of the tag. |
| TAG_OWNER | The username of the user who created the tag. |
| TAG_URL | The canonical URL to the tag. |
| TAG_ASSOCIATIONIDS | The serialized JSON array of AGAVE UUID representing resources associated with this tag. |
| PERMISSION_ID | The id of the tag permission. **Only present on tag permission events |
| PERMISSION_PERMISSION | The resulting permission after completion of the event. **Only present on tag permission events |
| PERMISSION_USERNAME | The user to whom the permission was applied. **Only present on tag permission events |
| PERMISSION_LASTUPDATED | The last time this permission was updated in ISO8601 format. **Only present on tag permission events |
| PERMISSION_JSON | The serialized JSON representation of the permission. This is identical to what is returned from a GET request for this permission. |
| TAG_CREATED | The creation timestamp of this tag in ISO8601 format. |
| RAW_JSON | The serialized JSON event payload. This is identical to what is sent in the body of a webhook POST callback. |
| Variable | Description |
|---|---|
| UUID | The UUID of the transfer |
| EVENT | The event which occurred |
| SOURCE | The source URL of this transfer |
| DESTINATION | The destination URL of this transfer |
| STATUS | The current status of this transfer in ISO8601 format |
| CREATED | The time the transfer was submitted to Agave in ISO8601 format |
| START_TIME | The time the transfer started in ISO8601 format |
| END_TIME | The time the transfer ended in ISO8601 format |
| TOTAL_SIZE | Total data size to be transferred |
| TOTAL_TRANSFER | Total bytes transferred |
| TRANSFER_RATE | Average transfer rate of all data moved in this transfer given in Gbps |
| ATTEMPTS | Number of attempts made to transfer the SOURCE data |
The value of webhook template variables is that they allow you to build custom callbacks using the values of the resource variable at run time. Several commonly used webhooks are shown in the tables above.
Creating
Create a new notification subscription
curl -sk -H "Authorization: Bearer $ACCESS_TOKEN" -X POST \
    -H "Content-Type: application/json" \
    --data-binary '{"associatedUuid": "7554973644402463206-242ac114-0001-007", "event": "FINISHED", "url": "http://requestbin.agaveplatform.org/zyiomxzy?path=${PATH}&system=${SYSTEM}&event=${EVENT}" }' \
    https://sandbox.agaveplatform.org/notifications/v2?pretty=true
notifications-addupdate -F notification.json
Which will result in output similar to this
{
  "id": "7612526206168863206-242ac114-0001-011",
  "owner": "nryan",
  "url": "http://requestbin.agaveplatform.org/zyiomxzy?path=${PATH}&system=${SYSTEM}&event=${EVENT}",
  "associatedUuid": "7554973644402463206-242ac114-0001-007",
  "event": "FINISHED",
  "responseCode": null,
  "attempts": 0,
  "lastSent": null,
  "success": false,
  "persistent": false,
  "status": "ACTIVE",
  "lastUpdated": "2016-08-24T10:07:03.000-05:00",
  "created": "2016-08-24T10:07:03.000-05:00",
  "policy": {
    "retryLimit": 5,
    "retryRate": 5,
    "retryDelay": 0,
    "saveOnFailure": true,
    "retryStrategy": "NONE"
  },
  "_links": {
    "self": {
      "href": "https://sandbox.agaveplatform.org/notifications/v2/7612526206168863206-242ac114-0001-011"
    },
    "history": {
      "href": "https://sandbox.agaveplatform.org/notifications/v2/7612526206168863206-242ac114-0001-011/history"
    },
    "attempts": {
      "href": "https://sandbox.agaveplatform.org/notifications/v2/7612526206168863206-242ac114-0001-011/attempts"
    },
    "owner": {
      "href": "https://sandbox.agaveplatform.org/profiles/v2/nryan"
    },
    "job": {
      "href": "https://sandbox.agaveplatform.org/jobs/v2/7554973644402463206-242ac114-0001-007"
    }
  }
}
Subscribing to an event is done by posting a form or JSON object to the Notifications service. An example of doing this using curl as well as the CLI is given below.
Updating
The updated notification subscription object
{
    "associatedUuid": "7554973644402463206-242ac114-0001-007",
    "event": "*",
    "url": "http://requestbin.agaveplatform.org/zyiomxzy?path=${PATH}&system=${SYSTEM}&event=${EVENT}"
}
The JSON used to update the subscription is shown above
Updating a subscription is done identically to creation except that the form or JSON is POSTed to the existing subscription URL. An example of doing this using curl as well as the CLI is given below.
curl -sk -H "Authorization: Bearer $ACCESS_TOKEN" -X POST \
    -H "Content-Type: application/json" \
    -F "fileToUpload=@notification.json" \
    https://sandbox.agaveplatform.org/notifications/v2/2699130208276770330-242ac114-0001-011
notifications-addupdate -F notification.json 2699130208276770330-242ac114-0001-011
Which will result in output similar to this
{
  "id": "7612526206168863206-242ac114-0001-011",
  "owner": "nryan",
  "url": "http://requestbin.agaveplatform.org/zyiomxzy?path=${PATH}&system=${SYSTEM}&event=${EVENT}",
  "associatedUuid": "7554973644402463206-242ac114-0001-007",
  "event": "*",
  "responseCode": null,
  "attempts": 0,
  "lastSent": null,
  "success": false,
  "persistent": false,
  "status": "ACTIVE",
  "lastUpdated": "2016-08-24T10:07:03.000-05:00",
  "created": "2016-08-24T10:07:03.000-05:00",
  "policy": {
    "retryLimit": 5,
    "retryRate": 5,
    "retryDelay": 0,
    "saveOnFailure": true,
    "retryStrategy": "NONE"
  },
  "_links": {
    "self": {
      "href": "https://sandbox.agaveplatform.org/notifications/v2/7612526206168863206-242ac114-0001-011"
    },
    "history": {
      "href": "https://sandbox.agaveplatform.org/notifications/v2/7612526206168863206-242ac114-0001-011/history"
    },
    "attempts": {
      "href": "https://sandbox.agaveplatform.org/notifications/v2/7612526206168863206-242ac114-0001-011/attempts"
    },
    "owner": {
      "href": "https://sandbox.agaveplatform.org/profiles/v2/nryan"
    },
    "job": {
      "href": "https://sandbox.agaveplatform.org/jobs/v2/7554973644402463206-242ac114-0001-007"
    }
  }
}
Listing
Listing notification subscriptions
curl -sk -H "Authorization: Bearer $ACCESS_TOKEN" \
    https://sandbox.agaveplatform.org/notifications/v2/2699130208276770330-242ac114-0001-011
notifications-list -V
Which will result in output similar to this
[
  {
    "id": "7612526206168863206-242ac114-0001-011",
    "url": "http://requestbin.agaveplatform.org/zyiomxzy?path=${PATH}&system=${SYSTEM}&event=${EVENT}",
    "associatedUuid": "7554973644402463206-242ac114-0001-007",
    "event": "*",
    "_links": {
      "self": {
        "href": "https://sandbox.agaveplatform.org/notifications/v2/7612526206168863206-242ac114-0001-011"
      },
      "profile": {
        "href": "https://sandbox.agaveplatform.org/profiles/v2/nryan"
      },
      "job": {
        "href": "https://sandbox.agaveplatform.org/jobs/v2/7554973644402463206-242ac114-0001-007"
      }
    }
  },
  {
    "id": "7404907487080223206-242ac114-0001-011",
    "url": "nryan@rangers.texas.mlb.com",
    "associatedUuid": "6904887394479903206-242ac114-0001-007",
    "event": "FINISHED",
    "_links": {
      "self": {
        "href": "https://sandbox.agaveplatform.org/notifications/v2/7404907487080223206-242ac114-0001-011"
      },
      "profile": {
        "href": "https://sandbox.agaveplatform.org/profiles/v2/nryan"
      },
      "job": {
        "href": "https://sandbox.agaveplatform.org/jobs/v2/6904887394479903206-242ac114-0001-007"
      }
    }
  },
  {
    "id": "3676815741209931290-242ac114-0001-011",
    "url": "nryan@rangers.texas.mlb.com",
    "associatedUuid": "3717016635100491290-242ac114-0001-007",
    "event": "FINISHED",
    "_links": {
      "self": {
        "href": "https://sandbox.agaveplatform.org/notifications/v2/3676815741209931290-242ac114-0001-011"
      },
      "profile": {
        "href": "https://sandbox.agaveplatform.org/profiles/v2/nryan"
      },
      "job": {
        "href": "https://sandbox.agaveplatform.org/jobs/v2/3717016635100491290-242ac114-0001-007"
      }
    }
  }
]
You can get a list of your current notification subscriptions by performing a GET operation on the base /notifications collection. Adding the UUID of a notification will return just that notification. You can also query for all notifications assigned to a specific UUID by adding associatedUuid=$uuid. An example of querying all notifications using curl as well as the CLI is given below.
Unsubscribing
Unsubscribing from a notification subscription
curl -sk -H "Authorization: Bearer $ACCESS_TOKEN" \
     -X DELETE \
     https://sandbox.agaveplatform.org/notifications/v2/2699130208276770330-242ac114-0001-011
notifications-delete -V
An standard Agave response with an empty result will be returned.
To unsubscribe from an event, perform a DELETE on the notification URL. Once deleted, you can not restore a subscription. You can, however create a new one. Keep in mind that if you do this, the UUID of the new notification will be different that that of the deleted one. An example of deleting a notification using curl as well as the CLI is given below.
Retry Policies
Sample notification subscription object with custom retry policy.
{
  "url" : "$REQUEST_BIN?path=${PATH}&system=${SYSTEM}&event=${EVENT}",
  "event" : "*",
  "persistent": true,
  "policy": {
      "retryStrategy": "IMMEDIATE",
      "retryLimit": 20,
      "retryRate": 5,
      "retryDelay": 0,
      "saveOnFailure": true
    }
}
In some situations, Agave may be unable to publish a specific notification. When this happens, Agave will immediately retry the notification 5 times in an attempt to deliver it successfully. When delivery fails for a 5th time, the notification is abandoned. If your application requires a more tenacious or methodical approach to retry delivery, you may provide a notification policy.
| Name | Type | Description |
|---|---|---|
| retryStrategy | NONE, IMMEDIATE, DELAYED, EXPONENTIAL | The retry strategy to employ. Default is IMMEDIATE |
| retryRate | int; 0:86400 | The frequency with which attempts should be made to deliver the message. |
| retryLimit | int; 0:1440 | The maximum attempts that should be made to delivery the message. |
| retryDelay | int; 0:86400 | The initial delay between the initial delivery attempt and the first retry. |
| saveOnFailure | boolean | Whether the failed message should be persisted if unable to be delivered within the retryLimit |
Notification retry policies describe the strategy, frequency, delay, limit, and persistence to be applied when publishing an individual event for a given notification. The example above is our previous example with a notification policy included.
Failed deliveries
Query failed attempts for a specific notification
curl -sk -H "Authorization: Bearer $ACCESS_TOKEN" \
     https://$API_BASE_URL/notifications/$API_VERSION/229681451607921126-8e1831906a8e-0001-042"/attempts
notifications-list-failures 229681451607921126-8e1831906a8e-0001-042"
A list of notification attempts will be returned.
[
  {
    "id" : "229681451607921126-8e1831906a8e-0001-042",
    "url" : "https://httpbin.org/status/500",
    "event" : "SENT",
    "associatedUuid" : "5833036796741676570-b0b0b0bb0b-0001-011",
    "startTime" : "2016-06-19T22:21:02.266-05:00",
    "endTime" : "2016-06-19T22:21:03.268-05:00",
    "response" : {
      "code" : 500,
      "message" : ""
    },
    "_links" : {
      "self" : {
        "href" : "https://$API_BASE_URL/notifications/$API_VERSION/229123105859441126-8e1831906a8e-0001-011/attempts/229681451607921126-8e1831906a8e-0001-042"
      },
      "notification" : {
        "href" : "https://$API_BASE_URL/notifications/$API_VERSION/5833036796741676570-b0b0b0bb0b-0001-011"
      },
      "profile" : {
        "href" : "https://$API_BASE_URL/profiles/$API_VERSION/ipcservices"
      }
    }
  }
]
By providing a retry policy where saveOnFailure is true, failed messages will be persisted and made available for querying at a later time. This is a great way to handled missed work due to a server failure, maintenance downtime, etc. To query for for failed messages
PostIts
 /$$$$$$$                       /$$    /$$$$$$ /$$
| $$__  $$                     | $$   |_  $$_/| $$
| $$  \ $$ /$$$$$$   /$$$$$$$ /$$$$$$   | $$ /$$$$$$
| $$$$$$$//$$__  $$ /$$_____/|_  $$_/   | $$|_  $$_/
| $$____/| $$  \ $$|  $$$$$$   | $$     | $$  | $$
| $$     | $$  | $$ \____  $$  | $$ /$$ | $$  | $$ /$$
| $$     |  $$$$$$/ /$$$$$$$/  |  $$$$//$$$$$$|  $$$$/
|__/      \______/ |_______/    \___/ |______/ \___/
The PostIts service is a URL shortening service similar to bit.ly, goo.gl, and t.co. It allows you to create pre-authenticated, disposable URLs to any resource in the Agave Platform. You have control over the lifetime and number of times the URL can be redeemed, and you can expire a PostIt at any time. As with all Science API resources, a full set of events is available for you to track usage and integrate the lifecycle of a PostIt into external applications as needed.
The most common use of PostIts is to create URLs to files and folders you can share with others without having to upload them to a third-party service. For example, using the PostIts service, you can share the output(s) of an experimental run, distribute materials for a class, submit data to a third-party service, and serve up assets for a static website like Agave ToGo.
Other uses cases for the PostIts service include creating “drop” folders to which anyone with the link can upload data, allowing a job to be reproducibly rerun for peer review, publishing metadata for public consumption, publishing a canonical reference to your user profile. The possibilities go on and on. Anytime you need to share your science with your world, PostIts can help you.
Creating PostIts
Creating a PostIt
curl -sk -H "Authorization: Bearer $AUTH_TOKEN" \
    -X POST \
    -d "lifetime=3600" \
    -d "maxUses=10" \
    -d "method=GET" \
    -d "url=https://sandbox.agaveplatform.org/files/v2/media/system/data.agaveplatform.org/nryan/picksumipsum.txt" \
    'https://sandbox.agaveplatform.org/postits/v2/?pretty=true'
postits-create \
-m 10 \
-l 86400 \
https://sandbox.agaveplatform.org/files/v2/media/system/data.agaveplatform.org/nryan/picksumipsum.txt
Should result in something similar to the following:
{
"creator":"nryan",
"internalUsername":null,
"authenticated":true,
"created":"2016-09-30T21:51:31-05:00",
"expires":"2016-10-01T00:14:51-05:00",
"remainingUses":10,
"postit":"f61256c53bf3744185de4ac6c0c839b4",
"noauth":false,
"url":"https://sandbox.agaveplatform.org/files/v2/media/system/data.agaveplatform.org//home/nryan/picksumipsum.txt",
"method":"GET",
"_links":{
"self":{
"href":"https://sandbox.agaveplatform.org/postits/v2/f61256c53bf3744185de4ac6c0c839b4"
},
"profile":{
"href":"https://sandbox.agaveplatform.org/profiles/v2/nryan"
},
"file":{
"href":"https://sandbox.agaveplatform.org/files/v2/media/system/data.agaveplatform.org//home/nryan/picksumipsum.txt"
}
}
}
To create a PostIt, send a POST request to the PostIts service with the target url you want to share. In this example, we are sharing a file we have in Agave’s cloud storage account.
In the response you see standard fields such as created timestamp and the postit token. You also see several fields that lead into the discussion of another aspect of PosIts, the ability to restrict usage and expire them on demand.
Restricting PostIt usage
When creating a PostIt, you have the ability to limit the lifespan, number of uses, and HTTP method used to connect to the target resource. The following table shows the fields available for this purpose. Not specifying any of these fields results in a single-use PostIt that remains valid for 1 calendar month.
| Attribute | Type | Description |
|---|---|---|
| maxUses | JSON object | The maximum number of times the postit may be redeemed. Defaults to 1. |
| maxLifetime | string | The maximum lifetime in seconds over which the postit may be redeemed. Defaults to 1 month. |
| method | GET,POST,PUT,DELETE | The HTTP method to be used to request the target resource when redeeming a postit. Defaults to GET |
| noauth | boolean | Whether the request to the target resource should be authenticated. Defaults to true. |
Listing Active PostIts
Listing active PostIts
curl -sk -H "Authorization: Bearer $AUTH_TOKEN" \
'https://sandbox.agaveplatform.org/postits/v2/?pretty=true'
postits-list -v
Should result in something similar to the following:
[
{
"creator":"nryan",
"internalUsername":null,
"authenticated":true,
"created":"2016-09-30T21:51:31-05:00",
"expires":"2016-10-01T00:14:51-05:00",
"remainingUses":10,
"postit":"f61256c53bf3744185de4ac6c0c839b4",
"noauth":false,
"url":"https://sandbox.agaveplatform.org/files/v2/media/system/data.agaveplatform.org//home/nryan/picksumipsum.txt",
"method":"GET",
"_links":{
"self":{
"href":"https://sandbox.agaveplatform.org/postits/v2/f61256c53bf3744185de4ac6c0c839b4"
},
"profile":{
"href":"https://sandbox.agaveplatform.org/profiles/v2/nryan"
},
"file":{
"href":"https://sandbox.agaveplatform.org/files/v2/media/system/data.agaveplatform.org//home/nryan/picksumipsum.txt"
}
}
}
]
Redeeming PostIts
Redeeming a PostIt
curl -s -o picksumipsum.txt 'https://sandbox.agaveplatform.org/postits/v2/f61256c53bf3744185de4ac6c0c839b4'
curl -s -o picksumipsum.txt 'https://sandbox.agaveplatform.org/postits/v2/f61256c53bf3744185de4ac6c0c839b4'
Which would download the
picksumipsum.txtfile from your storage system.
You redeem a postit by making a non-authenticated HTTP request on the PostIt URL. In the above example, that would be https://sandbox.agaveplatform.org/postits/v2/ead227bace394790e56beb07e7c3ff4d. Every time you make a get request on the PostIt, the remainingUses field decrements by 1. This continues until the value hits 0 or the PostIt outlives its expires field.
Forcing PostIt browser downloads
If you are using PostIts in a browser environment, you can force a file download by adding force=true to the PostIt URL query. If the target URL is a file item, the name of the file item will be included in the Content-Disposition header so the downloaded file has the correct file name. You may also add the same query parameter to any target file item to force the Content-Disposition header from the Files API.
Expiring PostIts
Manually expiring a PostIt
curl -sk -H "Authorization: Bearer $AUTH_TOKEN" \
-X DELETE
'https://sandbox.agaveplatform.org/postits/v2/f61566c53bf3744185de4ac6c0c839b4?pretty=true'
postits-delete f61566c53bf3744185de4ac6c0c839b4
Which will result in an empty response from the server.
In addition to setting expiration parameters when you create a PostIt, you can manually expire a PostIt at any time by making an authenticated DELETE request on the PostIt URL. This will instantly expire the PostIt from further use and remove it from your listing results.
Metadata
/$$ /$$ /$$
| $$$ /$$$ | $$
| $$$$ /$$$$ /$$$$$$ /$$$$$$ /$$$$$$
| $$ $$/$$ $$ /$$__ $$|_ $$_/ |____ $$
| $$ $$$| $$| $$$$$$$$ | $$ /$$$$$$$
| $$\ $ | $$| $$_____/ | $$ /$$ /$$__ $$
| $$ \/ | $$| $$$$$$$ | $$$$/| $$$$$$$
|__/ |__/ \_______/ \___/ \_______/
The Agave Metadata service allows you to manage metadata and associate it with Agave entities via associated UUIDs. It supports JSON schema for structured JSON metadata; it also accepts any valid JSON-formatted metadata or plain text String when no schema is specified. As with other Agave services, a full access control layer is available, enabling you to keep your metadata private or share it with your colleagues.
Metadata Structure
Key-value metadata item
{
"name": "some metadata",
"value": "A model organism...",
}
Structured metadata item, metadata.json
{
"name":"some metadata",
"value":{
"title":"Example Metadata",
"properties":{
"species":"arabidopsis",
"description":"A model organism..."
}
}
}
Every metadata item has four fields shown in the following table.
| Field name | Type | Description |
|---|---|---|
| name | string; 1-256 | required A non-unique key you can use to reference and group your metadata. |
| value | json | string; 0-5M |
| associationIds | array; | An JSON array of zero or more UUID to which this metadata item should be associated. |
| schemaId | string; | The id of a valid Agave metadata schema object representing the JSON Schema definition used to validate this metadata item. |
The name field is just that, a user-defined name you give to your metadata item. There is no uniqueness constraint put on the name field, so it is up to you to the application to enforce whatever naming policy it sees fit.
Depending on your application needs, you may use the Metadata service as a key-value store, document store, or both. When using it as a key-value store, you provide text for the value field. When you fetching data, you could search by exact value or full-text search as needed.
When using the Metadata service as a document store, you provide a JSON object or array for the value field. In this use case you can leverage additional functionality such as structured queries, atomic updates, etc.
Either use case is acceptable and fully supported. Your application needs will determine the best approach for you to take.
Associations
Each metadata item also has an optional associationIds field. This field contains a JSON array of Agave UUID for which this metadata item applies. This provides a convenient grouping mechanism by which to organize logically-related resources. One common examples is creating a metadata item to represent a “data collection” and associating files and folders that may be geographically distributed under that “data collection”. Another is creating a metadata item to represent a “project”, then sharing the “project” with other users involved in the “project”.
Metadata items can also be associated with other metadata items to create hierarchical relationships. Building on the “project” example, additional metadata items could be created for “links”, “videos”, and “experiments” to hold references for categorized groups of postits, video file items, and jobs respectively. Such a model translates well to a user interface layer and eliminates a large amount of boilerplate code in your application.
Creating metadata
Create a new metadata item
curl -sk -H "Authorization: Bearer $ACCESS_TOKEN" -X POST
-H 'Content-Type: application/json'
--data-binary '{"value": {"title": "Example Metadata", "properties": {"species": "arabidopsis", "description": "A model organism..."}}, "name": "some metadata"}'
https://sandbox.agaveplatform.org/meta/v2/data
metadata-addupdate -v -F - <<<'{"value": {"title": "Example Metadata", "properties": {"species": "arabidopsis", "description": "A model organism..."}}, "name": "some metadata"}'
The response will look something like the following:
{
"uuid": "7341557475441971686-242ac11f-0001-012",
"owner": "nryan",
"schemaId": null,
"internalUsername": null,
"associationIds": [],
"lastUpdated": "2016-08-29T04:49:34.532-05:00",
"name": "some metadata",
"value": {
"title": "Example Metadata",
"properties": {
"species": "arabidopsis",
"description": "A model organism..."
}
},
"created": "2016-08-29T04:49:34.532-05:00",
"_links": {
"self": {
"href": "https://sandbox.agaveplatform.org/meta/v2/data/7341557475441971686-242ac11f-0001-012"
},
"permissions": {
"href": "https://sandbox.agaveplatform.org/meta/v2/data/7341557475441971686-242ac11f-0001-012/pems"
},
"owner": {
"href": "https://sandbox.agaveplatform.org/profiles/v2/nryan"
},
}
}
New Metadata are created in the repository via a POST to their collection URLs. As we mentioned before, there is no uniqueness constraint placed on metadata items. Thus, repeatedly POSTing the same metadata item to the service will create duplicate entries, each with their own unique UUID assigned by the service.
Updating metadata
Update a metadata item
curl -sk -H "Authorization: Bearer $ACCESS_TOKEN" -X POST
-H 'Content-Type: application/json'
--data-binary '{"value": {"title": "Example Metadata", "properties": {"species": "arabidopsis", "description": "A model plant organism..."}}, "name": "some metadata", "associationIds":["179338873096442342-242ac113-0001-002","6608339759546166810-242ac114-0001-007"]}'
https://sandbox.agaveplatform.org/meta/v2/data/7341557475441971686-242ac11f-0001-012
metadata-addupdate -v -F - 7341557475441971686-242ac11f-0001-012 <<<'{"value": {"title": "Example Metadata", "properties": {"species": "arabidopsis", "description": "A model plant organism..."}}, "name": "some metadata", "associationIds":["179338873096442342-242ac113-0001-002","6608339759546166810-242ac114-0001-007"]}'
The response will look something like the following:
{
"uuid": "7341557475441971686-242ac11f-0001-012",
"schemaId": null,
"internalUsername": null,
"associationIds": [
"179338873096442342-242ac113-0001-002",
"6608339759546166810-242ac114-0001-007"
],
"lastUpdated": "2016-08-29T05:51:39.908-05:00",
"name": "some metadata",
"value": {
"title": "Example Metadata",
"properties": {
"species": "arabidopsis",
"description": "A model plant organism..."
}
},
"created": "2016-08-29T05:43:18.618-05:00",
"owner": "nryan",
"_links": {
"self": {
"href": "https://sandbox.agaveplatform.org/meta/v2/data/7341557475441971686-242ac11f-0001-012"
},
"permissions": {
"href": "https://sandbox.agaveplatform.org/meta/v2/data/7341557475441971686-242ac11f-0001-012/pems"
},
"owner": {
"href": "https://sandbox.agaveplatform.org/profiles/v2/nryan"
},
"associationIds": [
{
"rel": "179338873096442342-242ac113-0001-002",
"href": "https://sandbox.agaveplatform.org/files/v2/media/system/storage.example.com//",
"title": "file"
},
{
"rel": "6608339759546166810-242ac114-0001-007",
"href": "https://sandbox.agaveplatform.org/jobs/v2/6608339759546166810-242ac114-0001-007",
"title": "job"
}
]
}
}
Updating metadata is done by POSTing an updated metadata object to the existing resource. When updating, it is important to note that it is not possible to change the metadata uuid, owner, lastUpdated or created fields. Those fields are managed by the service.
Deleting metadata
Delete a metadata item
curl -sk -H "Authorization: Bearer $ACCESS_TOKEN"
-X DELETE
https://sandbox.agaveplatform.org/meta/v2/data/7341557475441971686-242ac11f-0001-012
metadata-delete 7341557475441971686-242ac11f-0001-012
An empty response will be returned from the service.
To delete a metadata item, simply make a DELETE request on the metadata resource.
Metadata details
Fetching a metadata item
curl -sk -H "Authorization: Bearer $ACCESS_TOKEN"
https://sandbox.agaveplatform.org/meta/v2/data/7341557475441971686-242ac11f-0001-012
metadata-list -v 7341557475441971686-242ac11f-0001-012
The response will look something like the following:
{
"uuid":"7341557475441971686-242ac11f-0001-012",
"schemaId":null,
"internalUsername":null,
"associationIds":[
"179338873096442342-242ac113-0001-002",
"6608339759546166810-242ac114-0001-007"
],
"lastUpdated":"2016-08-29T05:51:39.908-05:00",
"name":"some metadata",
"value":{
"title":"Example Metadata",
"properties":{
"species":"arabidopsis",
"description":"A model plant organism..."
}
},
"created":"2016-08-29T05:43:18.618-05:00",
"owner":"nryan",
"_links":{
"self":{
"href":"https://sandbox.agaveplatform.org/meta/v2/schemas/4736020169528054246-242ac11f-0001-013"
},
"permissions":{
"href":"https://sandbox.agaveplatform.org/meta/v2/schemas/4736020169528054246-242ac11f-0001-013/pems"
},
"owner":{
"href":"https://sandbox.agaveplatform.org/profiles/v2/nryan"
},
"associationIds":[
{
"rel":"179338873096442342-242ac113-0001-002",
"href":"https://sandbox.agaveplatform.org/files/v2/media/system/storage.example.com//",
"title":"file"
},
{
"rel":"6608339759546166810-242ac114-0001-007",
"href":"https://sandbox.agaveplatform.org/jobs/v2/6608339759546166810-242ac114-0001-007",
"title":"job"
}
]
}
}
To fetch a detailed description of a metadata item, make a GET request on the resource URL. The response will be the full metadata item representation. Two points of interest in the example response are that the response does not have an id field. Instead, it has a uuid field which serves as its ID. This is the result of regression support for legacy consumers and will be changed in the next major release.
The second point of interest in the response is the _links.associationIds array in the hypermedia response. This contains an expanded representation of the associationIds field in the body. The objects in this array are similar to the information you would recieve by calling the UUID API to resolve each of the associationIds array values. By leveraging the information in the hypermedia response, you can save several round trips to resolve basic information about the resources the associationIds represent.
Metadata browsing
Listing your metadata
curl -sk -H "Authorization: Bearer $ACCESS_TOKEN"
https://sandbox.agaveplatform.org/meta/v2/data?limit=1
metadata-list -v -l 1
The response will look something like the following:
[
{
"uuid": "7341557475441971686-242ac11f-0001-012",
"schemaId": null,
"internalUsername": null,
"associationIds": [
"179338873096442342-242ac113-0001-002",
"6608339759546166810-242ac114-0001-007"
],
"lastUpdated": "2016-08-29T05:51:39.908-05:00",
"name": "some metadata",
"value": {
"title": "Example Metadata",
"properties": {
"species": "arabidopsis",
"description": "A model plant organism..."
}
},
"created": "2016-08-29T05:43:18.618-05:00",
"owner": "nryan",
"_links": {
"self": {
"href": "https://sandbox.agaveplatform.org/meta/v2/schemas/4736020169528054246-242ac11f-0001-013"
},
"permissions": {
"href": "https://sandbox.agaveplatform.org/meta/v2/schemas/4736020169528054246-242ac11f-0001-013/pems"
},
"owner": {
"href": "https://sandbox.agaveplatform.org/profiles/v2/nryan"
},
"associationIds": [
{
"rel": "179338873096442342-242ac113-0001-002",
"href": "https://sandbox.agaveplatform.org/files/v2/media/system/storage.example.com//",
"title": "file"
},
{
"rel": "6608339759546166810-242ac114-0001-007",
"href": "https://sandbox.agaveplatform.org/jobs/v2/6608339759546166810-242ac114-0001-007",
"title": "job"
}
]
}
}
]
To browse your Metadata, make a GET request against the /meta/v2/data collection. This will return all the metadata you created and to which you have been granted READ access. This includes any metadata items that have been shared with the public or world users. In practice, users will have many metadata items created and shared with them as part of normal use of the platform, so pagination and search become important aspects of interacting with the service.
For admins, who have implicit access to all metadata, the default listing response will be a paginated list of every metadata item in the tenant. To avoid such a scenario, admin users can append privileged=false to bypass implicit permissions and only return the metadata queries to which they have ownership or been granted explicit access.
Metadata Validation
curl -sk -H "Authorization: Bearer $ACCESS_TOKEN" -X POST
-H 'Content-Type: application/json'
--data-binary '{"schemaId": "4736020169528054246-242ac11f-0001-013", "value": {"title": "Example Metadata", "properties": {"description": "A model organism..."}}, "name": "some metadata"}'
https://sandbox.agaveplatform.org/meta/v2/data
metadata-addupdate -v -F - <<<'{"schemaId": "4736020169528054246-242ac11f-0001-013", "value": {"title": "Example Metadata", "properties": {"description": "A model organism..."}}, "name": "some metadata"}'
The response will look something like the following:
{
"status" : "error",
"message" : "Metadata value does not conform to schema.",
"version" : "2.1.8-r8bb7e86"
}
Often times it is necessary to validate metadata for format or simple quality control. The Metadata service is capable of validating the value of a metadata item against a predefined JSON Schema definition. In order to leverage this feature, you must first register your JSON Schema definition with the Metadata Schemata service, then reference the UUID of that metadata schema resource in the schemaId field.
Given our previous example metadata schema object, the following request would fail due to a missing “species” value in the metadata item value field.
Metadata Searching
Searching metadata for all items with name like “mustard plant”
curl -sk -H "Authorization: Bearer $ACCESS_TOKEN"
--data-urlencode '{"name": "mustard plant"}'
https://sandbox.agaveplatform.org/meta/v2/data
metadata-list -v -Q '{"name":"mustard+plant"}'
The response will look something like the following:
[
{
"uuid": "7341557475441971686-242ac11f-0001-012",
"schemaId": null,
"internalUsername": null,
"associationIds": [
"179338873096442342-242ac113-0001-002",
"6608339759546166810-242ac114-0001-007"
],
"lastUpdated": "2016-08-29T05:51:39.908-05:00",
"name": "some metadata",
"value": {
"title": "Example Metadata",
"properties": {
"species": "arabidopsis",
"description": "A model plant organism..."
}
},
"created": "2016-08-29T05:43:18.618-05:00",
"owner": "nryan",
"_links": {
"self": {
"href": "https://sandbox.agaveplatform.org/meta/v2/schemas/4736020169528054246-242ac11f-0001-013"
},
"permissions": {
"href": "https://sandbox.agaveplatform.org/meta/v2/schemas/4736020169528054246-242ac11f-0001-013/pems"
},
"owner": {
"href": "https://sandbox.agaveplatform.org/profiles/v2/nryan"
},
"associationIds": [
{
"rel": "179338873096442342-242ac113-0001-002",
"href": "https://sandbox.agaveplatform.org/files/v2/media/system/storage.example.com//",
"title": "file"
},
{
"rel": "6608339759546166810-242ac114-0001-007",
"href": "https://sandbox.agaveplatform.org/jobs/v2/6608339759546166810-242ac114-0001-007",
"title": "job"
}
]
}
}
]
In addition to retrieving Metadata via its UUID, the Metadata service supports MongoDB query syntax. Just add the q=<value> to URL query portion of your GET request on the metadata collection. This differs from other APIs, but provides a richer syntax to query and filter responses.
If you wanted to look up Metadata corresponding to a specific value within its JSON Metadata value, you can specify this using a JSON object such as {"name": "mustard plant"}. Remember that, in order to send JSON in a URL query string, it must first be URL encoded. Luckily this is easily handled for us by curl and the Agave CLI.
The given query will return all metadata with name, “mustard plant” that you have permission to access.
Search Examples
metadata search by exact name
{"name": "mustard plant"}
metadata search by field in value
{"value.type": "a plant"}
metadata search for values with any field matching an item in the given array
{ "value.profile.status": { "$in": [ "active", "paused" ] } }
metadata search for items with a name matching a case-insensitive regex
{ "name": { "$regex": "^Cactus.*", "$options": "i"}}
metadata search for value by regex matched against each line of a value
{ "value.description": { "$regex": ".*monocots.*", "$options": "m"}}
metadata search for value by conditional queries
{
"$or":[
{
"value.description":{
"$regex":[
".*prickly pear.*",
".*agave.*",
".*century.*"
],
"$options":"i"
}
},
{
"value.title":{
"$regex":".*Cactus$"
},
"value.order":{
"$regex":"Agavoideae"
}
}
]
}
Some common search syntax examples. Consult the MongoDB Query Documentation for more examples and full syntax documentation.
Metadata Permissions
The Metadata service supports permissions for both Metadata and Schemata consistent with that of a number of other Agave services. If no permissions are explicitly set, only the owner of the Metadata and tenant administrators can access it.
The permissions available for Metadata and Metadata Schemata are listed in the following table. Please note that a user must have WRITE permissions to grant or revoke permissions on a metadata or schema item.
| Name | Description |
|---|---|
| READ | User can view the resource |
| WRITE | User can edit, but not view the resource |
| READ_WRITE | User can manage the resource |
| ALL | User can manage the resource |
| NONE | User can view the resource |
Listing all permissions
List the permissions on Metadata for a given user
curl -sk -H "Authorization: Bearer $ACCESS_TOKEN"
https://sandbox.agaveplatform.org/meta/v2/data/7341557475441971686-242ac11f-0001-012/pems/rclemens
metadata-pems-list -u rclemens \
7341557475441971686-242ac11f-0001-012
The response will look something like the following:
[
{
"username": "nryan",
"permission": {
"read": true,
"write": true
},
"_links": {
"self": {
"href": "https://sandbox.agaveplatform.org/meta/v2/7341557475441971686-242ac11f-0001-012/pems/nryan"
},
"parent": {
"href": "https://sandbox.agaveplatform.org/meta/v2/7341557475441971686-242ac11f-0001-012"
},
"profile": {
"href": "https://sandbox.agaveplatform.org/meta/v2/nryan"
}
}
}
]
To list all permissions for a metadata item, make a GET request on the metadata item’s permission collection
List permissions for a specific user
List the permissions on Metadata for a given user
curl -sk -H "Authorization: Bearer $ACCESS_TOKEN"
https://sandbox.agaveplatform.org/meta/v2/data/7341557475441971686-242ac11f-0001-012/pems/nryan
metadata-pems-list -u rclemens \
7341557475441971686-242ac11f-0001-012
The response will look something like the following:
{
"username":"nryan",
"permission":{
"read":true,
"write":true
},
"_links":{
"self":{
"href":"https://sandbox.agaveplatform.org/meta/v2/7341557475441971686-242ac11f-0001-012/pems/nryan"
},
"parent":{
"href":"https://sandbox.agaveplatform.org/meta/v2/7341557475441971686-242ac11f-0001-012"
},
"profile":{
"href":"https://sandbox.agaveplatform.org/meta/v2/nryan"
}
}
}
Checking permissions for a single user is simply a matter of adding the username of the user in question to the end of the metadata permission collection.
Grant permissions
Grant read access to a metadata item
curl -sk -H "Authorization: Bearer $ACCESS_TOKEN" -X POST
--data '{"permission":"READ"}'
https://sandbox.agaveplatform.org/meta/v2/data/7341557475441971686-242ac11f-0001-012/pems/rclemens
metadata-pems-addupdate -u rclemens \
-p READ 7341557475441971686-242ac11f-0001-012
Grant read and write access to a metadata item
curl -sk -H "Authorization: Bearer $ACCESS_TOKEN" -X POST
--data '{"permission":"READ_WRITE"}'
https://sandbox.agaveplatform.org/meta/v2/data/7341557475441971686-242ac11f-0001-012/pems/rclemens
metadata-pems-addupdate -u rclemens \
-p READ_WRITE 7341557475441971686-242ac11f-0001-012
The response will look something like the following:
{
"username": "rclemens",
"permission": {
"read": true,
"write": true
},
"_links": {
"self": {
"href": "https://sandbox.agaveplatform.org/meta/v2/7341557475441971686-242ac11f-0001-012/pems/rclemens"
},
"parent": {
"href": "https://sandbox.agaveplatform.org/meta/v2/7341557475441971686-242ac11f-0001-012"
},
"profile": {
"href": "https://sandbox.agaveplatform.org/meta/v2/jstubbs"
}
}
}
To grant another user read access to your metadata item, assign them READ permission. To enable another user to update a metadata item, grant them READ_WRITE or ALL access.
Delete single user permissions
Delete permission for single user on a Metadata item
curl -sk -H "Authorization: Bearer $ACCESS_TOKEN"
-X DELETE
https://sandbox.agaveplatform.org/meta/v2/data/7341557475441971686-242ac11f-0001-012/pems/rclemens
metadata-pems-delete -u rclemens 7341557475441971686-242ac11f-0001-012
An empty response will come back from the API.
Permissions may be deleted for a single user by making a DELETE request on the metadata user permission resource. This will immediately revoke all permissions to the metadata item for that user.
Deleting all permissions
Delete all permissions on a Metadata item
curl -sk -H "Authorization: Bearer $ACCESS_TOKEN"
-X DELETE
https://sandbox.agaveplatform.org/meta/v2/data/7341557475441971686-242ac11f-0001-012/pems
metadata-pems-delete 7341557475441971686-242ac11f-0001-012
An empty response will be returned from the service.
Permissions may be deleted for a single user by making a DELETE request on the metadata resource permission collection.
Metadata Schemata
/$$$$$$ /$$
/$$__ $$ | $$
| $$ \__/ /$$$$$$| $$$$$$$ /$$$$$$ /$$$$$$/$$$$ /$$$$$$
| $$$$$$ /$$_____| $$__ $$/$$__ $| $$_ $$_ $$|____ $$
\____ $| $$ | $$ \ $| $$$$$$$| $$ \ $$ \ $$ /$$$$$$$
/$$ \ $| $$ | $$ | $| $$_____| $$ | $$ | $$/$$__ $$
| $$$$$$| $$$$$$| $$ | $| $$$$$$| $$ | $$ | $| $$$$$$$
\______/ \_______|__/ |__/\_______|__/ |__/ |__/\_______/
Schema can be provided in JSON Schema form. The service will validate that the schema is valid JSON and store it. To validate Metadata against it, the schema UUID should be given as a parameter, schemaId, when uploading Metadata. If no schemaId` is provided, the Metadata service will accept any JSON Object or plain text string and store it accordingly. This flexible approach allows Agave a high degree of flexibility in handling structured and unstructured metadata alike.
For more on JSON Schema please see http://json-schema.org/
To add a metadata schema to the repository:
Creating schemata
Example JSON Schema document, schema.json
{
"title": "Example Schema",
"type": "object",
"properties": {
"species": {
"type": "string"
}
},
"required": [
"species"
]
}
Creating a new metadata schema
curl -sk -H "Authorization: Bearer $ACCESS_TOKEN"
-X POST -H "Content-Type: application/json"
--data-binary '{ "title": "Example Schema", "type": "object", "properties": { "species": { "type": "string" } },"required": ["species"] }'
https://sandbox.agaveplatform.org/meta/v2/schemas/
metadata-schema-addupdate -v -F schema.json
The response will look something like the following:
{
"uuid": "4736020169528054246-242ac11f-0001-013",
"internalUsername": null,
"lastUpdated": "2016-08-29T04:52:11.474-05:00",
"schema": {
"title": "Example Schema",
"type": "object",
"properties": {
"species": {
"type": "string"
}
},
"required": [
"species"
]
},
"created": "2016-08-29T04:52:11.474-05:00",
"owner": "nryan",
"_links": {
"self": {
"href": "https://sandbox.agaveplatform.org/meta/v2/schemas/4736020169528054246-242ac11f-0001-013"
},
"permissions": {
"href": "https://sandbox.agaveplatform.org/meta/v2/schemas/4736020169528054246-242ac11f-0001-013/pems"
},
"owner": {
"href": "https://sandbox.agaveplatform.org/profiles/v2/nryan"
}
}
}
To create a new metadata schema that can be used to validate metadata items upon addition or updating, POST a JSON Schema document to the service.
More JSON Schema examples can be found in the Agave Samples project.
Updating schema
Update a metadata schema
curl -sk -H "Authorization: Bearer $ACCESS_TOKEN" -X POST
-H 'Content-Type: application/json'
--data-binary '{ "title": "Example Schema", "type": "object", "properties": { "species": { "type": "string" }, "description": {"type":"string"} },"required": ["species"] }'
https://sandbox.agaveplatform.org/meta/v2/data/4736020169528054246-242ac11f-0001-013
metadata-addupdate -v -F - 4736020169528054246-242ac11f-0001-013 <<< '{ "title": "Example Schema", "type": "object", "properties": { "species": { "type": "string" }, "description": {"type":"string"} },"required": ["species"] }'
The response will look something like the following:
{
"uuid": "4736020169528054246-242ac11f-0001-013",
"internalUsername": null,
"lastUpdated": "2016-08-29T04:52:11.474-05:00",
"schema": {
"title": "Example Schema",
"type": "object",
"properties": {
"species": {
"type": "string"
}
},
"required": [
"species"
]
},
"created": "2016-08-29T04:52:11.474-05:00",
"owner": "nryan",
"_links": {
"self": {
"href": "https://sandbox.agaveplatform.org/meta/v2/schemas/4736020169528054246-242ac11f-0001-013"
},
"permissions": {
"href": "https://sandbox.agaveplatform.org/meta/v2/schemas/4736020169528054246-242ac11f-0001-013/pems"
},
"owner": {
"href": "https://sandbox.agaveplatform.org/profiles/v2/nryan"
}
}
}
Updating metadata schema is done by POSTing an updated schema object to the existing resource. When updating, it is important to note that it is not possible to change the schema uuid, owner, lastUpdated or created fields. Those fields are managed by the service.
Deleting schema
Delete a metadata schema
curl -sk -H "Authorization: Bearer $ACCESS_TOKEN"
-X DELETE
https://sandbox.agaveplatform.org/meta/v2/data/4736020169528054246-242ac11f-0001-013
metadata-schema-delete 4736020169528054246-242ac11f-0001-013
An empty response will be returned from the service.
To delete a metadata schema, simply make a DELETE request on the metadata schema resource.
Specifying schemata as $ref
When building new JSON Schema definitions, it is often helpful to break each object out into its own definition and use $ref fields to reference them. The metadata service supports such references between metadata schema resources. Simply provide the fully qualified URL of another valid metadata schema resources as the value to a $ref field and Agave will resolve the reference internally, applying the appropriate authentication and authorization for the requesting user to the request to the referenced resource.
Monitors
/$$ /$$ /$$ /$$
| $$$ /$$$ |__/ | $$
| $$$$ /$$$$ /$$$$$$ /$$$$$$$ /$$/$$$$$$ /$$$$$$ /$$$$$$
| $$ $$/$$ $$/$$__ $| $$__ $| $|_ $$_/ /$$__ $$/$$__ $$
| $$ $$$| $| $$ \ $| $$ \ $| $$ | $$ | $$ \ $| $$ \__/
| $$\ $ | $| $$ | $| $$ | $| $$ | $$ /$| $$ | $| $$
| $$ \/ | $| $$$$$$| $$ | $| $$ | $$$$| $$$$$$| $$
|__/ |__/\______/|__/ |__|__/ \___/ \______/|__/
The Agave Monitors API provides a familiar paradigm for monitoring the use ability and accessibility of storage and execution systems you registered with Agave. Similar to services like Pingdom, Pagerduty, and WebCron, the Monitors API allows you to to create regular health checks on a registered system. Unlike standard uptime services, Agave will check that your system is responsive and accessible by performing proactive tests on availability (ping), accessibility (authentication), and functionality (listing or echo). Each check result is persisted and the check history of a given monitor is queryable through the API. As with all resources in the Agave Platform, a full event model is available so you can subscribe to event you care about such as failed checks, restored system availability, and system disablement.
Creating Monitors
Create a new default monitor
curl -sk -H "Authorization: Bearer $AUTH_TOKEN" \
-H "Content-Type: application-json" \
-X POST --data-binary '{"target": "storage.example.com"}' \
https://sandbox.agaveplatform.org/monitors/v2/
monitors-addupdate -S storage.example.com
The response will look something like the following:
{
"active": true,
"created": "2016-06-03T17:22:59.000-05:00",
"frequency": 60,
"id": "5024717285821443610-242ac11f-0001-014",
"internalUsername": null,
"lastCheck": null,
"lastSuccess": null,
"lastUpdated": "2016-06-03T17:22:59.000-05:00",
"nextUpdate": "2016-06-03T18:22:59.000-05:00",
"owner": "nryan",
"target": "storage.example.com",
"updateSystemStatus": false,
"_links": {
"checks": {
"href": "https://sandbox.agaveplatform.org/monitor/v2/5024717285821443610-242ac11f-0001-014/checks"
},
"notifications": {
"href": "https://sandbox.agaveplatform.org/notifications/v2/?associatedUuid=5024717285821443610-242ac11f-0001-014"
},
"owner": {
"href": "https://sandbox.agaveplatform.org/profiles/v2/nryan"
},
"self": {
"href": "https://sandbox.agaveplatform.org/monitor/v2/5024717285821443610-242ac11f-0001-014"
},
"system": {
"href": "https://sandbox.agaveplatform.org/systems/v2/storage.example.com"
}
}
}
The only piece of information needed to monitor a system is the system ID. Sending a POST request to the Monitors API with a monitor definition containing just the systemId field with a valid system ID or UUID will create a monitor that will run hourly health checks starting an hour from when you sent the request.
Custom frequency and start time
Create a monitor with a custom frequency
curl -sk -H "Authorization: Bearer $AUTH_TOKEN" \
-H "Content-Type: application-json" \
-X POST --data-binary '{"target": "storage.example.com","frequency":15}' \
https://sandbox.agaveplatform.org/monitors/v2/
monitors-addupdate -S storage.example.com -I 15
The response will look something like the following:
{
"_links": {
"checks": {
"href": "https://sandbox.agaveplatform.org/monitor/v2/5024717285821443610-242ac11f-0001-014/checks"
},
"notifications": {
"href": "https://sandbox.agaveplatform.org/notifications/v2/?associatedUuid=5024717285821443610-242ac11f-0001-014"
},
"owner": {
"href": "https://sandbox.agaveplatform.org/profiles/v2/nryan"
},
"self": {
"href": "https://sandbox.agaveplatform.org/monitor/v2/5024717285821443610-242ac11f-0001-014"
},
"system": {
"href": "https://sandbox.agaveplatform.org/systems/v2/storage.example.com"
}
},
"active": true,
"created": "2016-06-03T17:22:59.000-05:00",
"frequency": 15,
"id": "5024717285821443610-242ac11f-0001-014",
"internalUsername": null,
"lastCheck": null,
"lastSuccess": null,
"lastUpdated": "2016-06-03T17:22:59.000-05:00",
"nextUpdate": "2016-06-03T17:37:59.000-05:00",
"owner": "nryan",
"target": "storage.example.com",
"updateSystemStatus": false
}
If you need the monitor to run more frequently, you can customize the frequency and time at which a monitor runs by including the interval and startTime fields in your monitor definition. By providing a time expression in the interval field, you can control the frequency at which a monitor runs. The maximum interval you can set for a monitor is one month. The minimum interval varies from tenant to tenant, but is generally no less than 5 minutes.
The startTime field allows you to schedule when you would like Agave to start the monitor on your system. Any date or time expression representing a moment between the current time and one month from then is acceptable. If you do not specify a value for startTime, Agave will add the value of interval to the current time and use that as the startTIme. Setting stop times or “off hours” is not currently supported.
Automating system status updates
Create a monitor that updates system status on change
curl -sk -H "Authorization: Bearer $AUTH_TOKEN" \
-H "Content-Type: application-json" \
-X POST \
--data-binary '{"target": "storage.example.com","frequency":15,"updateSystemStatus"=true}' \
https://sandbox.agaveplatform.org/monitors/v2/
monitors-addupdate -S storage.example.com -I 15 -U true
The response will look something like the following:
{
"active": true,
"created": "2016-06-03T17:22:59.000-05:00",
"frequency": 15,
"id": "5024717285821443610-242ac11f-0001-014",
"internalUsername": null,
"lastCheck": null,
"lastSuccess": null,
"lastUpdated": "2016-06-03T17:22:59.000-05:00",
"nextUpdate": "2016-06-03T17:37:59.000-05:00",
"owner": "nryan",
"target": "storage.example.com",
"updateSystemStatus": true,
"_links": {
"checks": {
"href": "https://sandbox.agaveplatform.org/monitor/v2/5024717285821443610-242ac11f-0001-014/checks"
},
"notifications": {
"href": "https://sandbox.agaveplatform.org/notifications/v2/?associatedUuid=5024717285821443610-242ac11f-0001-014"
},
"owner": {
"href": "https://sandbox.agaveplatform.org/profiles/v2/nryan"
},
"self": {
"href": "https://sandbox.agaveplatform.org/monitor/v2/5024717285821443610-242ac11f-0001-014"
},
"system": {
"href": "https://sandbox.agaveplatform.org/systems/v2/storage.example.com"
}
}
}
In the section on Events and notifications, we cover the ways in which you can get alerted about events pertaining to a monitor. Here we will simply point out that a convenience field, updateStatus, is built into all monitors. Setting this field to true will authorize Agave to update the status of the monitored system based on the result of the monitor checks. This is a convenient way to ensure that the status value in your system description matches the actual operational status of the system.
Updating an existing monitor
Update an existing monitor
curl -sk -H "Authorization: Bearer $AUTH_TOKEN" \
-H "Content-Type: application-json" \
-X POST \
--data-binary '{"target": "storage.example.com","frequency":5,"updateSystemStatus"=false}' \
https://sandbox.agaveplatform.org/monitors/v2/5024717285821443610-242ac11f-0001-014
monitors-addupdate -S storage.example.com -I 5 -U false 5024717285821443610-242ac11f-0001-014
The response will look something like the following:
{
"active": true,
"created": "2016-06-03T17:22:59.000-05:00",
"frequency": 15,
"id": "5024717285821443610-242ac11f-0001-014",
"internalUsername": null,
"lastCheck": null,
"lastSuccess": null,
"lastUpdated": "2016-06-03T17:24:59.000-05:00",
"nextUpdate": "2016-06-03T17:29:59.000-05:00",
"owner": "nryan",
"target": "storage.example.com",
"updateSystemStatus": false,
"_links": {
"checks": {
"href": "https://sandbox.agaveplatform.org/monitor/v2/5024717285821443610-242ac11f-0001-014/checks"
},
"notifications": {
"href": "https://sandbox.agaveplatform.org/notifications/v2/?associatedUuid=5024717285821443610-242ac11f-0001-014"
},
"owner": {
"href": "https://sandbox.agaveplatform.org/profiles/v2/nryan"
},
"self": {
"href": "https://sandbox.agaveplatform.org/monitor/v2/5024717285821443610-242ac11f-0001-014"
},
"system": {
"href": "https://sandbox.agaveplatform.org/systems/v2/storage.example.com"
}
}
}
Monitors can be managed by making traditional GET, POST, and DELETE operations. When updating a monitor, pay attention to the response because the time of the next check will change. In fact, any change to a monitor will recalculate the time when the next health check will run.
Disabling an existing monitor
Disable an existing monitor
curl -sk -H "Authorization: Bearer $AUTH_TOKEN"
-H "Content-Type: application/json"
-X PUT --data-binary '{"action": "disable"}'
https://sandbox.agaveplatform.org/monitors/v2/5024717285821443610-242ac11f-0001-014
monitors-disable 5024717285821443610-242ac11f-0001-014
The response will look something like the following:
{
"active": false,
"created": "2016-06-03T17:22:59.000-05:00",
"frequency": 15,
"id": "5024717285821443610-242ac11f-0001-014",
"internalUsername": null,
"lastCheck": null,
"lastSuccess": null,
"lastUpdated": "2016-06-03T17:24:59.000-05:00",
"nextUpdate": "2016-06-03T17:29:59.000-05:00",
"owner": "nryan",
"target": "storage.example.com",
"updateSystemStatus": false,
"_links": {
"checks": {
"href": "https://sandbox.agaveplatform.org/monitor/v2/5024717285821443610-242ac11f-0001-014/checks"
},
"notifications": {
"href": "https://sandbox.agaveplatform.org/notifications/v2/?associatedUuid=5024717285821443610-242ac11f-0001-014"
},
"owner": {
"href": "https://sandbox.agaveplatform.org/profiles/v2/nryan"
},
"self": {
"href": "https://sandbox.agaveplatform.org/monitor/v2/5024717285821443610-242ac11f-0001-014"
},
"system": {
"href": "https://sandbox.agaveplatform.org/systems/v2/storage.example.com"
}
}
}
There may be times when you need to pause a monitor. If your system has scheduled maintenance periods, you may want to disable the monitor until the maintenance period ends. You can do this by making a PUT request on a monitor with the a field name action set to “disabled”. While disabled, all health checks will be skipped.
Enabling an existing monitor
Enable an existing monitor
curl -sk -H "Authorization: Bearer $AUTH_TOKEN"
-H "Content-Type: application/json"
-X PUT --data-binary '{"action": "enable"}'
https://sandbox.agaveplatform.org/monitors/v2/5024717285821443610-242ac11f-0001-014
monitors-enable 5024717285821443610-242ac11f-0001-014
{
"active": true,
"created": "2016-06-03T17:22:59.000-05:00",
"frequency": 15,
"id": "5024717285821443610-242ac11f-0001-014",
"internalUsername": null,
"lastCheck": null,
"lastSuccess": null,
"lastUpdated": "2016-06-03T17:24:59.000-05:00",
"nextUpdate": "2016-06-03T17:29:59.000-05:00",
"owner": "nryan",
"target": "storage.example.com",
"updateSystemStatus": false,
"_links": {
"checks": {
"href": "https://sandbox.agaveplatform.org/monitor/v2/5024717285821443610-242ac11f-0001-014/checks"
},
"notifications": {
"href": "https://sandbox.agaveplatform.org/notifications/v2/?associatedUuid=5024717285821443610-242ac11f-0001-014"
},
"owner": {
"href": "https://sandbox.agaveplatform.org/profiles/v2/nryan"
},
"self": {
"href": "https://sandbox.agaveplatform.org/monitor/v2/5024717285821443610-242ac11f-0001-014"
},
"system": {
"href": "https://sandbox.agaveplatform.org/systems/v2/storage.example.com"
}
}
}
Similarly, to enable a monitor, make a PUT request with the a field name action set to “enabled”. Once reenabled, the monitor will resume its previous check schedule as specified in the nextUpdate field, or immediately if that time has already expired.
Deleting a monitor
Deleting an existing monitor
curl -sk -H "Authorization: Bearer $AUTH_TOKEN"
-H "Content-Type: application/json"
-X DELETE
https://sandbox.agaveplatform.org/monitors/v2/5024717285821443610-242ac11f-0001-014
monitors-delete 5024717285821443610-242ac11f-0001-014
An empty response will be returned
To delete a monitor, simply make a DELETE request on the monitor.
Monitor Checks
Listing past monitor checks
curl -sk -H "Authorization: Bearer $AUTH_TOKEN"
'https://sandbox.agaveplatform.org/monitors/v2/5024717285821443610-242ac11f-0001-014/checks?limit=1'
monitors-checks-list -v -l 1
-M 5024717285821443610-242ac11f-0001-014
The response will look something like the following:
[
{
"created": "2016-06-03T17:29:59.000-05:00",
"id": "4035070921477123610-242ac11f-0001-015",
"message": null,
"result": "PASSED",
"type": "STORAGE",
"_links": {
"monitor": {
"href": "https://sandbox.agaveplatform.org/monitor/v2/5024717285821443610-242ac11f-0001-014"
},
"self": {
"href": "https://sandbox.agaveplatform.org/monitor/v2/5024717285821443610-242ac11f-0001-014/checks/4035070921477123610-242ac11f-0001-015"
},
"system": {
"href": "https://sandbox.agaveplatform.org/systems/v2/storage.example.com"
}
}
}
]
Each instance of a monitor testing a system is called a Check. Monitor Checks are persisted over time and query able as a collection of a monitor resource. Monitor checks can be queried by result, timeframe, and type. By default, the last check is injected into a monitor description as the lastCheck field.
Each monitor check has a unique ID and represents a formal, addressable resource in the API. Here we see a typical successful monitor check. Checks will have one of two states: PASSED or FAILED. Successful monitors have a status of PASSED and no message. Unsuccessful monitors have a status of FAILED and a message describing why they failed.
Searching check history
Searching check history for a monitor
curl -sk -H "Authorization: Bearer $AUTH_TOKEN" \
'https://sandbox.agaveplatform.org/monitors/v2/5024717285821443610-242ac11f-0001-014/checks?limit=1&result.eq=PASSED'
monitors-checks-search -v -l 1 \
-M 5024717285821443610-242ac11f-0001-014 \
result.eq=PASSED
The response will look something like the following:
[
{
"created": "2016-06-03T17:29:59.000-05:00",
"id": "4035070921477123610-242ac11f-0001-015",
"message": null,
"result": "PASSED",
"type": "STORAGE",
"_links": {
"monitor": {
"href": "https://sandbox.agaveplatform.org/monitor/v2/5024717285821443610-242ac11f-0001-014"
},
"self": {
"href": "https://sandbox.agaveplatform.org/monitor/v2/5024717285821443610-242ac11f-0001-014/checks/4035070921477123610-242ac11f-0001-015"
},
"system": {
"href": "https://sandbox.agaveplatform.org/systems/v2/storage.example.com"
}
}
}
]
Long-running monitor checks can build up a large history which can become prohibitive to page through. When generating graphs and looking for specific incidents, you can search for specific checks based on result, startTime, endTime, type, and id. The standard JSON SQL search syntax used across the rest of the Science APIs is supported for monitor checks as well.
Manually running a check
Forcing a monitor check to run
curl -sk -H "Authorization: Bearer $AUTH_TOKEN" \
-H "Content-Type: application-json" \
-X POST --data-binary '{}' \
https://sandbox.agaveplatform.org/monitors/v2/5024717285821443610-242ac11f-0001-014/checks
monitors-fire -v 5024717285821443610-242ac11f-0001-014
The response will look something like the following:
{
"created": "2016-06-10T11:30:58.920-05:00",
"id": "5314048891498786330-242ac11f-0001-015",
"message": null,
"result": "PASSED",
"type": "STORAGE",
"_links": {
"monitor": {
"href": "https://sandbox.agaveplatform.org/monitor/v2/5024717285821443610-242ac11f-0001-014"
},
"self": {
"href": "https://sandbox.agaveplatform.org/monitor/v2/5024717285821443610-242ac11f-0001-014/checks/5314048891498786330-242ac11f-0001-015"
},
"system": {
"href": "https://sandbox.agaveplatform.org/systems/v2/storage.example.com"
}
}
}
If you need to verify the accessibility of your system, or behavior of your monitor, you can force an existing monitor to run on demand by sending a POST request to the monitor checks collection. When doing this, you are still subject to the same minimum check interval configured for your tenant.
Permissions
At this time, monitors do not have permissions associated with them.
History
List the change history of a monitor
curl -sk -H "Authorization: Bearer $AUTH_TOKEN" \
-H "Content-Type: application-json" \
-X POST --data-binary '{}' \
https://sandbox.agaveplatform.org/monitors/v2/5024717285821443610-242ac11f-0001-014/history
monitors-history -v 5024717285821443610-242ac11f-0001-014
The response will look something like the following:
[
{
"createdBy": "nryan",
"created": "2016-06-12T19:10:22Z",
"status": "CREATED",
"description": "This monitor was created by nryan",
"id": "5705275956568068582-242ac11f-0001-035",
"_links": {
"self": {
"href": "https://sandbox.agaveplatform.org/monitor/v2/5024717285821443610-242ac11f-0001-014/history/5705275956568068582-242ac11f-0001-035"
},
"monitor_event": {
"href": "https://sandbox.agaveplatform.org/monitor/v2/5024717285821443610-242ac11f-0001-014"
}
}
}
]
A full history of the lifecycle of a monitor is available via the monitor history collection. Here you can list events that have occurred during the life of the monitor.
Events
The following events will be thrown by the Monitors API.
| API | Description |
|---|---|
| CREATED | The monitor was created |
| UPDATED | The monitor was updated |
| DELETED | The monitor was deleted |
| ENABLED | The monitor was enabled |
| DISABLED | The monitor was disabled |
| PERMISSION_GRANT | A new user permission was granted on this monitor |
| PERMISSION_REVOKE | A user permission was revoked on this sytem |
| FORCED_CHECK_REQUESTED | A status check was requested by the user outside of the existing monitor schedule. |
| CHECK_PASSED | The status check passed |
| CHECK_FAILED | The status check failed |
| CHECK_UNKNOWN | The status check finished in an unknown state |
| STATUS_CHANGE | The status condition of the monitored resource changed since the last check |
| RESULT_CHANGE | The cumulative result of all checks performed on the monitored resource changed since the last suite of checks |
User Profiles
/$$$$$$$ /$$$$$$ /$$/$$
| $$__ $$ /$$__ $|__| $$
| $$ \ $$/$$$$$$ /$$$$$$| $$ \__//$| $$ /$$$$$$ /$$$$$$$
| $$$$$$$/$$__ $$/$$__ $| $$$$ | $| $$/$$__ $$/$$_____/
| $$____| $$ \__| $$ \ $| $$_/ | $| $| $$$$$$$| $$$$$$
| $$ | $$ | $$ | $| $$ | $| $| $$_____/\____ $$
| $$ | $$ | $$$$$$| $$ | $| $| $$$$$$$/$$$$$$$/
|__/ |__/ \______/|__/ |__|__/\_______|_______/
The Agave hosted identity service (profiles service) is a RESTful web service that gives organizations a way to create and manage the user accounts within their Agave tenant. The service is backed by a redundant LDAP instance hosted in multiple datacenters making it highly available. Additionally, passwords are stored using the openldap md5crypt algorithm.
Tenant administrators can manage only a basic set of fields on each user account within LDAP itself. For more complex profiles, we recommend combing the profiles service with the metadata service. See the section on Extending the Basic Profile with the Metadata Service below.
The service uses OAuth2 for authentication, and user’s must have special privileges to create and update user accounts within the tenant. Please work with the Agave development team to make sure your admins have the user-account-manager role.
In addition to the web service, there is also a basic front-end web application providing user sign up. The web application will suffice for basic user profiles and can be used as a starting point for more advanced use cases.
Creating
Create a user account by sending a POST request to the profiles service, providing an access token of a user with the user-account-manager role. The fields username, password and email are required to create a new user.
curl -sk -H "Authorization: Bearer $ACCESS_TOKEN" \
-X POST \
-d "username=testuser" \
-d "password=abcd123" \
-d "email=testuser@test.com" \
https://sandbox.agaveplatform.org/profiles/v2
profiles-create -u testuser -p abcd123 -e testuser@test.com
The response to this call for our example user looks like this:
{
"message":"User created successfully.",
"result":{
"email":"testuser@test.com",
"first_name":"",
"full_name":"testuser",
"last_name":"testuser",
"mobile_phone":"",
"phone":"",
"status":"Active",
"uid":null,
"username":"testuser"
},
"status":"success",
"version":"2.0.0-SNAPSHOT-rc3fad"
}
The complete list of available fields and their descriptions is provided in the table below.
| Field Name | Description | Required? |
|---|---|---|
| username | The username for the user; must be unique across the tenant | Yes |
| The email address for the user. | Yes | |
| password | The password for the user. | Yes |
| first_name | First name of the user | No |
| last_name | Last name of the user | No |
| phone | User’s phone number | No |
| mobile_phone | User’s mobile phone number. | No |
Note that the service does not do any password strength enforcement or other password management policies. We leave it to each organization to implement the policies best suited for their use case.
Extending with Metadata
Sample metadata object extending a user profile
{
"name":"user_profile",
"value":{
"firstName":"Test",
"lastName":"User",
"email":"testuser@test.com",
"city":"Springfield",
"state":"IL",
"country":"USA",
"phone":"636-555-3226",
"gravatar":"http://www.gravatar.com/avatar/ed53e691ee322e24d8cc843fff68ebc6"
}
}
Save the extended profile document to the metadata service
curl -sk -H "Authorization: Bearer $ACCESS_TOKEN" \
-X POST \
-F "fileToUpload=@profile_ex" \
https://sandbox.agaveplatform.org/meta/v2/data/?pretty=true
metadata-addupdate -v -F profile_ex
The response would resemble something like the following:
{
"status" : "success",
"message" : null,
"version" : "2.1.0-rc0c5a",
"result" : {
"uuid" : "0001429724043699-5056a550b8-0001-012",
"owner" : "jstubbs",
"schemaId" : null,
"internalUsername" : null,
"associationIds" : [ ],
"lastUpdated" : "2015-04-22T12:34:03.698-05:00",
"name" : "user_profile",
"value" : {
"firstName" : "Test",
"lastName" : "User",
"email" : "testuser@test.com",
"city" : "Springfield",
"state" : "IL",
"country" : "USA",
"phone" : "636-555-3226",
"gravatar" : "http://www.gravatar.com/avatar/ed53e691ee322e24d8cc843fff68ebc6"
},
"created" : "2015-04-22T12:34:03.698-05:00",
"_links" : {
"self" : {
"href" : "https://sandbox.agaveplatform.org/meta/v2/data/0001429724043699-5056a550b8-0001-012"
}
}
}
}
We do not expect the fields above to provide full support for anything but the most basic profiles. The recommended strategy is to use the profiles service in combination with the metadata service the (see Metadata Guide for more details) to store additional information. The metadata service allows you to create custom types using JSON schema, making it more flexible than standard LDAP from within a self-service model. Additionally, the metadata service includes a rich query interface for retrieving users based on arbitrary JSON queries.
The general approach used by existing tenants has been to create a single entry per user where the entry contains all additional profile data for the user. Every metadata item representing a user profile can be identified using a fixed string for the “name” attribute (e.g., “user_profile’). The value of the metadata item contains a unique identifier for the user (e.g. username or email address) along with all the additional fields you wish to track on the profile. One benefit of this approach is that it cleanly delineates multiple classes of profiles, for example "admin_profile”, “developer_profile”, “mathematician_profile”, etc. When consuming this information in a web interface, such user-type grouping makes presentation significantly easier.
Another issue to consider when extending user profile information through the Metadata service is ownership. If you create the user’s account, then prompt them to login before entering their extended data, it is possible to create the user’s metadata record under their account. This has the advantage of giving the user full ownership over the information, however it also opens up the possibility that the user, or a third-party application, could modify or delete the record.
A better approach is to use a service account to create all extended profile metadata records and grant the user READ access on the record. This still allows third-party applications to access the user’s information at their request, but prevents any malicious things from happening.
The example above represents a possible JSON document that could be used to store a metadata record representing a profile:
Updating
curl -sk -H "Authorization: Bearer $ACCESS_TOKEN" -X PUT -d "password=abcd123&email=testuser@test.com&first_name=Test&last_name=User" https://sandbox.agaveplatform.org/profiles/v2/testuser
profiles-addupdate -v -p abcd123 -e "testuser@test.com" -f Test -l User testuser
The response to this call looks like this:
{
"message":"User updated successfully.",
"result":{
"create_time":"20150421153504Z",
"email":"testuser@test.com",
"first_name":"Test",
"full_name":"Test User",
"last_name":"User",
"mobile_phone":"",
"phone":"",
"status":"Active",
"uid":0,
"username":"testuser"
},
"status":"success",
"version":"2.0.0-SNAPSHOT-rc3fad"
}
Updates to existing users can be made by sending a PUT request to https://sandbox.agaveplatform.org/profiles/v2/ and passing the fields to update. For example, we can add a gravatar attribute to the account we created above.
Deleting
curl -sk -H "Authorization: Bearer $ACCESS_TOKEN" -X DELETE https://sandbox.agaveplatform.org/profiles/v2/testuser
profiles-delete -v testuser
The response to this call looks like this:
{
"message": "User deleted successfully.",
"result": {},
"status": "success",
"version": "2.0.0-SNAPSHOT-rc3fad"
}
To delete an existing user, make a DELETE request on their profile resource.
Registration Web Application
The account creation web app provides a simple form to enable user self-sign. Here is a screenshot of the sign up form:
The web application also provides an email loop for verification of new accounts. The code is open source and freely available from bitbucket: Account Creation Web Application
Most likely you will want to customize the branding and other aspects of the application, but for simple use cases, the Agave team can deploy a stock instance of the application in your tenant. Work with the Agave developer team if this is of interest to your organization.
Tags
/$$$$$$$$
|__ $$__/
| $$ /$$$$$$ /$$$$$$ /$$$$$$$
| $$ |____ $$ /$$__ $$ /$$_____/
| $$ /$$$$$$$| $$ \ $$| $$$$$$
| $$ /$$__ $$| $$ | $$ \____ $$
| $$| $$$$$$$| $$$$$$$ /$$$$$$$/
|__/ \_______/ \____ $$|_______/
/$$ \ $$
| $$$$$$/
\______/
The Agave Tags service provides free form tagging of any addressable resource in the platform. A Tag is similiar to a Metadata object in that it has name and associatedIds fields, but Tags do not contain any other data. Tags have permissions just like metadata, but unlike the Metadata service, Tag names must be unique for a given user or group. That means you can only have one tag with a given name, but multiple users may create tags with the same name.
Tag Structure
Tag structure
{
"name": "some metadata",
"associationIds": [],
}
Every tag has two fields shown in the following table.
| Field name | Type | Description |
|---|---|---|
| name | string; 1-256 | required An alphanumeric key unique within the set of tags for a given user, which can be used in leu of the id. |
| associationIds | array; | An JSON array of zero or more UUID to which this tag should be associated. |
The name field is just that, a user-defined name you give to your tag. Every name field must be unique within the set of tags available to the user. This means that two users can create tags with the same name, but each tag will have its own unique id and be managed as distinct resources. User may not create multiple tags with the same name, but they may share a tag with someone who already has a tag of the same name. In that situation, referencing the private and shared tag by ID will prevent ambiguity over which tag is being used. When the tag id is not specified, the private tag owned by the requesting user will always be selected.
Associations
Each tag also has an optional associationIds field. This field contains a JSON array of Agave UUID for which this tag applies. We refer to the resources in this array as the tagged resources. No implied behavior comes with this relationship, it is simply a way to define arbitrary associations between resources.
Creating tags
Create a new tag
curl -sk -H "Authorization: Bearer $ACCESS_TOKEN" -X POST
-H 'Content-Type: application/json'
--data-binary '{"name": "demo"}'
https://sandbox.agaveplatform.org/tags/v2
tags-addupdate -v -F - <<<'{"name": "demo"}'
The response will look something like the following:
{
"id": "3042501574756462105-242ac113-0001-048",
"name": "demo",
"associationIds": [],
"lastUpdated": "2017-03-13T12:37:14.000-05:00",
"created": "2017-03-13T12:38:14.000-05:00",
"_links": {
"self": {
"href": "https://sandbox.agaveplatform.org/tags/v2/3042501574756462105-242ac113-0001-048"
},
"associationIds": {
"href": "https://sandbox.agaveplatform.org/tags/v2/3042501574756462105-242ac113-0001-048/associations"
},
"permissions": {
"href": "https://sandbox.agaveplatform.org/tags/v2/3042501574756462105-242ac113-0001-048/pems"
},
"owner": {
"href": "https://sandbox.agaveplatform.org/profiles/v2/nryan"
}
}
}
New Tags are created by making a POST request to the Tags collection. As we mentioned before, Tag names are unique for a given user, so attempting to create a tag with an existing name will fail.
Updating tags
Update a tag
curl -sk -H "Authorization: Bearer $ACCESS_TOKEN" -X POST
-H 'Content-Type: application/json'
--data-binary '{"name": "demo", "associationIds":["576158795084066330-242ac119-0001-007","1557538007895839206-242ac119-0001-007"]}'
https://sandbox.agaveplatform.org/tags/v2/demo
curl -sk -H "Authorization: Bearer $ACCESS_TOKEN" -X POST
-H 'Content-Type: application/json'
--data-binary '{"name": "demo", "associationIds":["576158795084066330-242ac119-0001-007","1557538007895839206-242ac119-0001-007"]}'
https://sandbox.agaveplatform.org/tags/v2/3042501574756462105-242ac113-0001-048
tags-addupdate -v -F - demo <<<'{"name": "demo", "associationIds":["576158795084066330-242ac119-0001-007","1557538007895839206-242ac119-0001-007"]}'
tags-addupdate -v -F - 3042501574756462105-242ac113-0001-048 <<<'{"name": "demo", "associationIds":["576158795084066330-242ac119-0001-007","1557538007895839206-242ac119-0001-007"]}'
The response will look something like the following:
{
"id": "3042501574756462105-242ac113-0001-048",
"name": "demo",
"associationIds": [
"576158795084066330-242ac119-0001-007",
"1557538007895839206-242ac119-0001-007"
],
"lastUpdated": "2017-03-13T12:38:14.000-05:00",
"created": "2017-03-13T12:38:14.000-05:00",
"_links": {
"self": {
"href": "https://sandbox.agaveplatform.org/tags/v2/3042501574756462105-242ac113-0001-048"
},
"associationIds": {
"href": "https://sandbox.agaveplatform.org/tags/v2/3042501574756462105-242ac113-0001-048/associations"
},
"permissions": {
"href": "https://sandbox.agaveplatform.org/tags/v2/3042501574756462105-242ac113-0001-048/pems"
},
"owner": {
"href": "https://sandbox.agaveplatform.org/profiles/v2/nryan"
}
}
}
Updating tags is done by POSTing an updated tag object to the existing resource. When updating, it is important to note that it is not possible to change the tag uuid, owner, lastUpdated or created fields. Those fields are managed by the service.
Deleting metadata
Delete a tag
curl -sk -H "Authorization: Bearer $ACCESS_TOKEN"
-X DELETE
https://sandbox.agaveplatform.org/tags/v2/demo
curl -sk -H "Authorization: Bearer $ACCESS_TOKEN"
-X DELETE
https://sandbox.agaveplatform.org/tags/v2/3042501574756462105-242ac113-0001-048
tags-delete demo
tags-delete 3042501574756462105-242ac113-0001-048
An empty response will be returned from the service.
To delete a tag, simply make a DELETE request on the tag resource.
Tag details
Fetching tag details
curl -sk -H "Authorization: Bearer $ACCESS_TOKEN"
https://sandbox.agaveplatform.org/tags/v2/3042501574756462105-242ac113-0001-048
curl -sk -H "Authorization: Bearer $ACCESS_TOKEN"
https://sandbox.agaveplatform.org/tags/v2/demo
tags-list -v 3042501574756462105-242ac113-0001-048
tags-list -v demo
The response will look something like the following:
{
"id": "3042501574756462105-242ac113-0001-048",
"name": "demo",
"associationIds": [
"576158795084066330-242ac119-0001-007",
"1557538007895839206-242ac119-0001-007"
],
"lastUpdated": "2017-03-13T12:38:14.000-05:00",
"created": "2017-03-13T12:38:14.000-05:00",
"_links": {
"self": {
"href": "https://sandbox.agaveplatform.org/tags/v2/3042501574756462105-242ac113-0001-048"
},
"associationIds": {
"href": "https://sandbox.agaveplatform.org/tags/v2/3042501574756462105-242ac113-0001-048/associations"
},
"permissions": {
"href": "https://sandbox.agaveplatform.org/tags/v2/3042501574756462105-242ac113-0001-048/pems"
},
"owner": {
"href": "https://sandbox.agaveplatform.org/profiles/v2/nryan"
}
}
}
To fetch a detailed description of a tag, make a GET request on the resource URL. You can use either the tag name or id when querying for the tag. The response will be the full tag representation. Unlike the Metadata API, the URL of each UUID in the associationIds are not resolved in the response. This is because assocations can be managed with their own API.
Tag browsing
Listing your tags
curl -sk -H "Authorization: Bearer $ACCESS_TOKEN"
https://sandbox.agaveplatform.org/tags/v2?limit=1
tags-list -v -l 1
The response will look something like the following:
[
{
"id": "3042501574756462105-242ac113-0001-048",
"name": "demo",
"associationIds": [
"576158795084066330-242ac119-0001-007",
"1557538007895839206-242ac119-0001-007"
],
"lastUpdated": "2017-03-13T12:38:14.000-05:00",
"created": "2017-03-13T12:38:14.000-05:00",
"_links": {
"self": {
"href": "https://sandbox.agaveplatform.org/tags/v2/3042501574756462105-242ac113-0001-048"
},
"associationIds": {
"href": "https://sandbox.agaveplatform.org/tags/v2/3042501574756462105-242ac113-0001-048/associations"
},
"permissions": {
"href": "https://sandbox.agaveplatform.org/tags/v2/3042501574756462105-242ac113-0001-048/pems"
},
"owner": {
"href": "https://sandbox.agaveplatform.org/profiles/v2/nryan"
}
}
}
]
To browse your Tags, make a GET request against the /tags/v2 collection. This will return all the tags you created and to which you have been granted READ access. This includes any tags that have been shared with the public or world users. In practice, users will have many tags created and shared with them as part of normal use of the platform, so pagination and search become important aspects of interacting with the service.
For admins, who have implicit access to all tags, the default listing response will be a paginated list of every tag in the tenant. To avoid such a scenario, admin users can append privileged=false to bypass implicit permissions and only return the metadata queries to which they have ownership or been granted explicit access.
Tag associations
Fetching tagged resources
curl -sk -H "Authorization: Bearer $ACCESS_TOKEN"
https://sandbox.agaveplatform.org/tags/v2/3042501574756462105-242ac113-0001-048/associations
curl -sk -H "Authorization: Bearer $ACCESS_TOKEN"
https://sandbox.agaveplatform.org/tags/v2/demo/associations
tags-associations-list -v 3042501574756462105-242ac113-0001-048
tags-associations-list -v demo
The response will look something like the following:
[
{
"uuid": "576158795084066330-242ac119-0001-007",
"type": "job",
"_links": {
"self": {
"href": "https://sandbox.agaveplatform.org/tags/v2/demo/associations/576158795084066330-242ac119-0001-007"
},
"job": {
"href": "https://sandbox.agaveplatform.org/jobs/v2/576158795084066330-242ac119-0001-007"
}
}
},
{
"uuid": "1557538007895839206-242ac119-0001-007",
"type": "job",
"_links": {
"self": {
"href": "https://sandbox.agaveplatform.org/tags/v2/demo/associations/1557538007895839206-242ac119-0001-007"
},
"job": {
"href": "https://sandbox.agaveplatform.org/jobs/v2/1557538007895839206-242ac119-0001-007"
}
}
}
]
Because the focus of the Tags API is on establishing and maintaining these relationships, the Tags API exposes the associationIds as a managed subresource. This was a design choice due to the large number of associations that tend to develop over time. associationIds can be managed much like permissions are managed across the Science APIs.
Browsing tag associations
To fetch a list of the resources associated with a given tag, query the associations subcollection of a tag. This will return a response JSON array of objects similar to that returned from the UUIDS service. Each response object will contain the resource uuid and type. In the hypermedia response, you will find the URL to the resource.
Updating tag associations
Tagging a resource
curl -sk -H "Authorization: Bearer $ACCESS_TOKEN"
-X POST
https://sandbox.agaveplatform.org/tags/v2/demo/associations/7322676215012195046-242ac114-0001-007
tags-associations-addupdate -v demo 7322676215012195046-242ac114-0001-007
The response will look something like the following:
{
"uuid": "7322676215012195046-242ac114-0001-007",
"type": "job",
"_links": {
"self": {
"href": "https://sandbox.agaveplatform.org/tags/v2/demo/associations/7322676215012195046-242ac114-0001-007"
}
"job": {
"href": "https://sandbox.agaveplatform.org/jobs/v2/7322676215012195046-242ac114-0001-007"
}
}
}
To tag a single resource, you can make an empty POST request to the tagged resource details endpoint. If this resource is not already associated with the given tag, it will be associated when the request is made.
Removing tag associations
Untagging a resource
curl -sk -H "Authorization: Bearer $ACCESS_TOKEN"
-X DELETE
https://sandbox.agaveplatform.org/tags/v2/demo/associations/7322676215012195046-242ac114-0001-007
tags-associations-delete -v demo 7322676215012195046-242ac114-0001-007
An empty response will be returned from the service
Bulk tagging resources
Tagging multiple resources
curl -sk -H "Authorization: Bearer $ACCESS_TOKEN"
-X POST
--data-binary '["911605847797535206-242ac114-0001-007",
"5369569074237730330-242ac114-0001-007",
"8333211822347981286-242ac114-0001-007"]'
https://sandbox.agaveplatform.org/tags/v2/demo/associations
tags-associations-addupdate -v demo \
911605847797535206-242ac114-0001-007 \
5369569074237730330-242ac114-0001-007 \
8333211822347981286-242ac114-0001-007
The response will look something like the following:
[
{
"uuid": "911605847797535206-242ac114-0001-007",
"type": "job",
"_links": {
"self": {
"href": "https://sandbox.agaveplatform.org/tags/v2/demo/associations/911605847797535206-242ac114-0001-007"
},
"job": {
"href": "https://sandbox.agaveplatform.org/jobs/v2/911605847797535206-242ac114-0001-007"
}
}
},
{
"uuid": "5369569074237730330-242ac114-0001-007",
"type": "job",
"_links": {
"self": {
"href": "https://sandbox.agaveplatform.org/tags/v2/demo/associations/5369569074237730330-242ac114-0001-007"
},
"job": {
"href": "https://sandbox.agaveplatform.org/jobs/v2/5369569074237730330-242ac114-0001-007"
}
}
},
{
"uuid": "8333211822347981286-242ac114-0001-007",
"type": "job",
"_links": {
"self": {
"href": "https://sandbox.agaveplatform.org/tags/v2/demo/associations/8333211822347981286-242ac114-0001-007"
},
"job": {
"href": "https://sandbox.agaveplatform.org/jobs/v2/8333211822347981286-242ac114-0001-007"
}
}
}
]
To tag multiple resources at once, POST a JSON array of the resource UUID to the associations collection of the tag. If the resoures are already tagged, no change will be made. If they are not currently tagged they will be tagged. Resources already tagged, but not included in the array of UUID will remain unchanged.
Deleting metadata
Delete a tag
curl -sk -H "Authorization: Bearer $ACCESS_TOKEN"
-X DELETE
https://sandbox.agaveplatform.org/tags/v2/demo/associations
curl -sk -H "Authorization: Bearer $ACCESS_TOKEN"
-X DELETE
https://sandbox.agaveplatform.org/tags/v2/3042501574756462105-242ac113-0001-048/associations
tags-resources-delete demo
tags-resources-delete 3042501574756462105-242ac113-0001-048
An empty response will be returned from the service.
Untag all the resources associated with a tag at once, make a DELETE erquest on the assocations collection of the tag.
Tag Searching
Search all tags for a given resource uuid
curl -sk -H "Authorization: Bearer $ACCESS_TOKEN"
https://sandbox.agaveplatform.org/tags/v2?associationIds.eq=179338873096442342-242ac113-0001-002z
tags-search -v associationIds.like=179338873096442342-242ac113-0001-002
The response will be an array of matching tag objects
[
{
"id": "3042501574756462105-242ac113-0001-048",
"name": "demo",
"associationIds": [
"576158795084066330-242ac119-0001-007",
"1557538007895839206-242ac119-0001-007"
],
"lastUpdated": "2017-03-13T12:38:14.000-05:00",
"created": "2017-03-13T12:38:14.000-05:00",
"_links": {
"self": {
"href": "https://sandbox.agaveplatform.org/tags/v2/3042501574756462105-242ac113-0001-048"
},
"associationIds": {
"href": "https://sandbox.agaveplatform.org/tags/v2/3042501574756462105-242ac113-0001-048/associations"
},
"permissions": {
"href": "https://sandbox.agaveplatform.org/tags/v2/3042501574756462105-242ac113-0001-048/pems"
},
"owner": {
"href": "https://sandbox.agaveplatform.org/profiles/v2/nryan"
}
}
}
]
Standard JSON sql syntax used across the rest of the Science APIs is available in the Tags service. All fields in the Tag object are available for querying.
Tag Permissions
The Tags service supports permissions consistent with that of a number of other Agave services. If no permissions are explicitly set, only the owner of the Tag and tenant administrators can access it.
The permissions available for Tags listed in the following table. Please note that a user must have WRITE permissions to grant or revoke permissions on a tag.
| Name | Description |
|---|---|
| READ | User can view the resource |
| WRITE | User can edit, but not view the resource |
| READ_WRITE | User can manage the resource |
| ALL | User can manage the resource |
| NONE | User can view the resource |
Listing all permissions
List the permissions on a Tag for a given user
curl -sk -H "Authorization: Bearer $ACCESS_TOKEN"
https://sandbox.agaveplatform.org/tags/v2/demo/pems/rclemens
curl -sk -H "Authorization: Bearer $ACCESS_TOKEN"
https://sandbox.agaveplatform.org/tags/v2/3042501574756462105-242ac113-0001-048/pems/rclemens
tags-pems-list -u rclemens demo
tags-pems-list -u rclemens \
3042501574756462105-242ac113-0001-048
The response will look something like the following:
[
{
"username": "nryan",
"permission": {
"read": true,
"write": true
},
"_links": {
"self": {
"href": "https://sandbox.agaveplatform.org/tags/v2/3042501574756462105-242ac113-0001-048/pems/nryan"
},
"parent": {
"href": "https://sandbox.agaveplatform.org/tags/v2/3042501574756462105-242ac113-0001-048"
},
"profile": {
"href": "https://sandbox.agaveplatform.org/tags/v2/nryan"
}
}
}
]
To list all permissions for a tag, make a GET request on the tag’s permission collection
List permissions for a specific user
List the permissions on Metadata for a given user
curl -sk -H "Authorization: Bearer $ACCESS_TOKEN"
https://sandbox.agaveplatform.org/tags/v2/data/3042501574756462105-242ac113-0001-048/pems/nryan
tags-pems-list -u rclemens \
3042501574756462105-242ac113-0001-048
The response will look something like the following:
{
"username":"nryan",
"permission":{
"read":true,
"write":true
},
"_links":{
"self":{
"href":"https://sandbox.agaveplatform.org/tags/v2/3042501574756462105-242ac113-0001-048/pems/nryan"
},
"parent":{
"href":"https://sandbox.agaveplatform.org/tags/v2/3042501574756462105-242ac113-0001-048"
},
"profile":{
"href":"https://sandbox.agaveplatform.org/tags/v2/nryan"
}
}
}
Checking permissions for a single user is simply a matter of adding the username of the user in question to the end of the tag permission collection.
Grant permissions
Grant read access to a tag
curl -sk -H "Authorization: Bearer $ACCESS_TOKEN" -X POST
--data '{"permission":"READ"}'
https://sandbox.agaveplatform.org/tags/v2/data/3042501574756462105-242ac113-0001-048/pems/rclemens
tags-pems-addupdate -u rclemens \
-p READ 3042501574756462105-242ac113-0001-048
Grant read and write access to a tag
curl -sk -H "Authorization: Bearer $ACCESS_TOKEN" -X POST
--data '{"permission":"READ_WRITE"}'
https://sandbox.agaveplatform.org/tags/v2/data/3042501574756462105-242ac113-0001-048/pems/rclemens
tags-pems-addupdate -u rclemens \
-p READ_WRITE 3042501574756462105-242ac113-0001-048
The response will look something like the following:
{
"username": "rclemens",
"permission": {
"read": true,
"write": true
},
"_links": {
"self": {
"href": "https://sandbox.agaveplatform.org/tags/v2/3042501574756462105-242ac113-0001-048/pems/rclemens"
},
"parent": {
"href": "https://sandbox.agaveplatform.org/tags/v2/3042501574756462105-242ac113-0001-048"
},
"profile": {
"href": "https://sandbox.agaveplatform.org/tags/v2/jstubbs"
}
}
}
To grant another user read access to your tag, assign them READ permission. To enable another user to update a tag, grant them READ_WRITE or ALL access.
Delete single user permissions
Delete permission for single user on a Metadata item
curl -sk -H "Authorization: Bearer $ACCESS_TOKEN"
-X DELETE
https://sandbox.agaveplatform.org/tags/v2/3042501574756462105-242ac113-0001-048/pems/rclemens
tags-pems-delete -u rclemens 3042501574756462105-242ac113-0001-048
An empty response will come back from the API.
Permissions may be deleted for a single user by making a DELETE request on the tag’s user permission resource. This will immediately revoke all permissions to the tag for that user.
Deleting all permissions
Delete all permissions on a Metadata item
curl -sk -H "Authorization: Bearer $ACCESS_TOKEN"
-X DELETE
https://sandbox.agaveplatform.org/tags/v2/demo/pems
curl -sk -H "Authorization: Bearer $ACCESS_TOKEN"
-X DELETE
https://sandbox.agaveplatform.org/tags/v2/3042501574756462105-242ac113-0001-048/pems
tags-pems-delete demo
tags-pems-delete 3042501574756462105-242ac113-0001-048
An empty response will be returned from the service.
Permissions may be deleted for a single user by making a DELETE request on the tag resource permission collection.
UUID
/$$ /$$ /$$ /$$ /$$$$$$ /$$$$$$$
| $$ | $$| $$ | $$|_ $$_/| $$__ $$
| $$ | $$| $$ | $$ | $$ | $$ \ $$
| $$ | $$| $$ | $$ | $$ | $$ | $$
| $$ | $$| $$ | $$ | $$ | $$ | $$
| $$ | $$| $$ | $$ | $$ | $$ | $$
| $$$$$$/| $$$$$$/ /$$$$$$| $$$$$$$/
\______/ \______/ |______/|_______/
The Agave UUID service resolves the type and representation of one or more Agave UUID. This is helpful, for instance, when you need to expand the hypermedia response of another resource, get the URL corresponding to a UUID, or fetch the representations of multiple resources in a single request.
Resolving a single UUID
Resolving a uuid
curl -sk -H "Authorization: Bearer $ACCESS_TOKEN" \
https://sandbox.agaveplatform.org/uuid/v2/0001409758089943-5056a550b8-0001-002
uuid-lookup -v 0001409758089943-5056a550b8-0001-002
The response will look something like this:
{
"uuid":"0001409758089943-5056a550b8-0001-002",
"type":"FILE",
"_links":{
"file":{
"href":"https://sandbox.agaveplatform.org/files/v2/history/system/data.agaveplatform.org/nryan/picksumipsum.txt"
}
}
}
A single UUID can be resolved by making a GET request on the UUID resource. The response will include the UUID and the type of the resource to which it is associated. The canonical resource URL is available in the hypermedia response. All calls to the UUID API are authenticated, however no permission checks will be made when doing basic resolving.
Expanding a UUID query
Resolving a uuid to a full resource representation
curl -sk -H "Authorization: Bearer $ACCESS_TOKEN" \
https://sandbox.agaveplatform.org/uuid/v2/0001409758089943-5056a550b8-0001-002?expand=true&pretty=true
uuid-lookup -v -e 0001409758089943-5056a550b8-0001-002
The response will include the entire representation of the resource just as if you queried the Files API.
{
"internalUsername":null,
"lastModified":"2014-09-03T10:28:09.943-05:00",
"name":"picksumipsum.txt",
"nativeFormat":"raw",
"owner":"nryan",
"path":"/home/nryan/picksumipsum.txt",
"source":"http://127.0.0.1/picksumipsum.txt",
"status":"STAGING_QUEUED",
"systemId":"data.agaveplatform.org",
"uuid":"0001409758089943-5056a550b8-0001-002",
"_links":{
"history":{
"href":"https://sandbox.agaveplatform.org/files/v2/history/system/data.agaveplatform.org/nryan/picksumipsum.txt"
},
"self":{
"href":"https://sandbox.agaveplatform.org/files/v2/media/system/data.agaveplatform.org/nryan/picksumipsum.txt"
},
"system":{
"href":"https://sandbox.agaveplatform.org/systems/v2/data.agaveplatform.org"
}
}
}
Often times you need more information about the resource associated with the UUID. You can save yourself an API request by adding expand=true to the URL query. The resulting response, if successful, will include the full resource representation of the resource associated with the UUID just as if you had called its URL directly. Filtering is also supported, so you can specify just the fields you want returned in the response.
Resolving multiple UUID
Resolving multiple UUID.
curl -sk -H "Authorization: Bearer $ACCESS_TOKEN" \
https://sandbox.agaveplatform.org/uuid/v2/?uuids.eq=0001409758089943-5056a550b8-0001-002,0001414144065563-5056a550b8-0001-007?expand=true&pretty=true
uuid-lookup -v -E 0001409758089943-5056a550b8-0001-002 0001414144065563-5056a550b8-0001-007
The response will be similar to the following.
[
{
"uuid":"0001409758089943-5056a550b8-0001-002",
"type":"FILE",
"url":"https://sandbox.agaveplatform.org/files/v2/history/system/data.agaveplatform.org/nryan/picksumipsum.txt",
"_links":{
"file":{
"href":"https://sandbox.agaveplatform.org/files/v2/history/system/data.agaveplatform.org/nryan/picksumipsum.txt"
}
}
},
{
"uuid":"0001414144065563-5056a550b8-0001-007",
"type":"JOB",
"url":"https://sandbox.agaveplatform.org/jobs/v2/0001414144065563-5056a550b8-0001-007",
"_links":{
"file":{
"href":"https://sandbox.agaveplatform.org/jobs/v2/0001414144065563-5056a550b8-0001-007"
}
}
}
]
To resolve multiple UUID, make a GET request on the uuids collection and pass the UUID in as a comma-separated list to the uuids query parameter. The response will contain a list of resolved resources in the same order that you requested them.
Expanding multiple UUID
Resolving multiple UUID to their resource representations
curl -sk -H "Authorization: Bearer $ACCESS_TOKEN" \
https://sandbox.agaveplatform.org/uuid/v2/?uuids.eq=0001409758089943-5056a550b8-0001-002,0001414144065563-5056a550b8-0001-007?expand=true&pretty=true
uuid-lookup -v -e 0001409758089943-5056a550b8-0001-002 0001414144065563-5056a550b8-0001-007
The response will include an array of the expanded representations in the order they were requested in the URL query.
[
{
"id":"$JOB_ID",
"name":"demo-pyplot-demo-advanced test-1414139896",
"owner":"$API_USERNAME",
"appId":"demo-pyplot-demo-advanced-0.1.0",
"executionSystem":"$PUBLIC_EXECUTION_SYSTEM",
"batchQueue":"debug",
"nodeCount":1,
"processorsPerNode":1,
"memoryPerNode":1.0,
"maxRunTime":"01:00:00",
"archive":false,
"retries":0,
"localId":"10321",
"outputPath":null,
"status":"STOPPED",
"submitTime":"2014-10-24T04:48:11.000-05:00",
"startTime":"2014-10-24T04:48:08.000-05:00",
"endTime":null,
"inputs":{
"dataset":"agave://$PUBLIC_STORAGE_SYSTEM/$API_USERNAME/inputs/pyplot/testdata.csv"
},
"parameters":{
"chartType":"bar",
"height":"512",
"showLegend":"false",
"xlabel":"Time",
"background":"#FFF",
"width":"1024",
"showXLabel":"true",
"separateCharts":"false",
"unpackInputs":"false",
"ylabel":"Magnitude",
"showYLabel":"true"
},
"_links":{
"self":{
"href":"https://sandbox.agaveplatform.org/jobs/v2/0001414144065563-5056a550b8-0001-007"
},
"app":{
"href":"https://sandbox.agaveplatform.org/apps/v2/demo-pyplot-demo-advanced-0.1.0"
},
"executionSystem":{
"href":"https://sandbox.agaveplatform.org/systems/v2/$PUBLIC_EXECUTION_SYSTEM"
},
"archiveData":{
"href":"https://sandbox.agaveplatform.org/jobs/v2/0001414144065563-5056a550b8-0001-007/outputs/listings"
},
"owner":{
"href":"https://sandbox.agaveplatform.org/profiles/v2/$API_USERNAME"
},
"permissions":{
"href":"https://sandbox.agaveplatform.org/jobs/v2/0001414144065563-5056a550b8-0001-007/pems"
},
"history":{
"href":"https://sandbox.agaveplatform.org/jobs/v2/0001414144065563-5056a550b8-0001-007/history"
},
"metadata":{
"href":"https://sandbox.agaveplatform.org/meta/v2/data/?q=%7b%22associationIds%22%3a%220001414144065563-5056a550b8-0001-007%22%7d"
},
"notifications":{
"href":"https://sandbox.agaveplatform.org/notifications/v2/?associatedUuid=0001414144065563-5056a550b8-0001-007"
}
}
},
{
"internalUsername":null,
"lastModified":"2014-09-03T10:28:09.943-05:00",
"name":"picksumipsum.txt",
"nativeFormat":"raw",
"owner":"nryan",
"path":"/home/nryan/picksumipsum.txt",
"source":"http://127.0.0.1/picksumipsum.txt",
"status":"STAGING_QUEUED",
"systemId":"data.agaveplatform.org",
"uuid":"0001409758089943-5056a550b8-0001-002",
"_links":{
"history":{
"href":"https://sandbox.agaveplatform.org/files/v2/history/system/data.agaveplatform.org/nryan/picksumipsum.txt"
},
"self":{
"href":"https://sandbox.agaveplatform.org/files/v2/media/system/data.agaveplatform.org/nryan/picksumipsum.txt"
},
"system":{
"href":"https://sandbox.agaveplatform.org/systems/v2/data.agaveplatform.org"
}
}
}
]
Expansion also works when querying UUID in bulk. Simply add expand=true to the URL query in your request and the full resource representation of each UUID will be returned in an array with the original UUID request order maintained. If any of the resolutions fail due to permission violation or server error, the error response object will be provided rather than resource representation.
Events
/$$$$$$$$ /$$
| $$_____/ | $$
| $$ /$$ /$$/$$$$$$ /$$$$$$$ /$$$$$$ /$$$$$$$
| $$$$| $$ /$$/$$__ $| $$__ $|_ $$_/ /$$_____/
| $$__/\ $$/$$| $$$$$$$| $$ \ $$ | $$ | $$$$$$
| $$ \ $$$/| $$_____| $$ | $$ | $$ /$\____ $$
| $$$$$$$\ $/ | $$$$$$| $$ | $$ | $$$$/$$$$$$$/
|________/\_/ \_______|__/ |__/ \___/|_______/
Events underpin everything in the Agave Platform. This section covers the events available to each resource.
Event Reference
Apps
| Event | Description |
|---|---|
| UPDATED | The app was updated |
| DELETED | The app was deleted |
| PUBLISHED | The app was made available for public use. |
| CLONED | The app was cloned as another app |
| PERMISSION_GRANT | A user permission was updated |
| PERMISSION_REVOKE | A user permission was deleted |
| RESTORED | App was restored from disabled status |
| UNPUBLISHED | App was unpublished. It will no longer be available for public use |
| PUBLISHING_FAILED | The app failed to complete publishing. The id given in the original request is not valid and the app will not be publicly available. |
| DISABLED | App was disabled and is not currently available for use. |
| CLONING_FAILED | The app failed to complete publishing. The id given in the original request is not valid and the app will not be available for use. |
| REGISTERED | A new app was registered |
Files
| Event | Description |
|---|---|
| CREATED | File or directory was created |
| DELETED | The file was deleted |
| INDEX_START | Indexing of file/folder started |
| INDEX_COMPLETE | Indexing of file/folder completed |
| INDEX_FAILED | Indexing of file/folder failed |
| RENAME | The file was renamed |
| MOVED | The file was moved to another path |
| OVERWRITTEN | The file was overwritten |
| PERMISSION_GRANT | A user permission was added |
| PERMISSION_REVOKE | A user permission was deleted |
| STAGING_QUEUED | File/folder queued for staging |
| STAGING | File or directory is currently in flight |
| STAGING_FAILED | Staging failed |
| STAGING_COMPLETED | Staging completed successfully |
| PREPROCESSING | Prepairing file for processing |
| TRANSFORMING_QUEUED | File/folder queued for transform |
| TRANSFORMING | Transforming file/folder |
| TRANSFORMING_FAILED | Transform failed |
| TRANSFORMING_COMPLETED | Transform completed successfully |
| UPLOAD | New content was uploaded to the file. |
| CONTENT_CHANGED | Content changed within this file/folder. If a folder, this event will be thrown whenever content changes in any file within this folder at most one level deep. |
| DOWNLOAD | The file item was downloaded. |
Internal Users
| Event | Description |
|---|---|
| CREATED | The internal user was updated |
| DELETED | The internal user was deleted |
| UPDATED | The internal user was updated |
Jobs
| Event | Description |
|---|---|
| CREATED | The job was updated |
| UPDATED | The job was updated |
| DELETED | The job was deleted |
| PERMISSION_GRANT | User permission was granted |
| PERMISSION_REVOKE | Permission was removed for a user on this job |
| PENDING | Job accepted and queued for submission. |
| STAGING_INPUTS | Transferring job input data to execution system |
| CLEANING_UP | Job completed execution |
| ARCHIVING | Transferring job output to archive system |
| STAGING_JOB | Job inputs staged to execution system |
| FINISHED | Job complete |
| KILLED | Job execution killed at user request |
| FAILED | Job failed |
| STOPPED | Job execution intentionally stopped |
| RUNNING | Job started running |
| PAUSED | Job execution paused by user |
| QUEUED | Job successfully placed into queue |
| SUBMITTING | Preparing job for execution and staging binaries to execution system |
| STAGED | Job inputs staged to execution system |
| PROCESSING_INPUTS | Identifying input files for staging |
| ARCHIVING_FINISHED | Job archiving complete |
| ARCHIVING_FAILED | Job archiving failed |
| HEARTBEAT | Job heartbeat received |
| JOB_RUNTIME_CALLBACK_EVENT | This is the default event thrown when a job pushes out runtime information using the AGAVE_JOB_CALLBACK_NOTIFICATION macro. |
| EMPTY_STATUS_RESPONSE | An empty response was received from the remote execution system when querying for job status |
| REMOTE_STATUS_CHANGE | The status of the job on the remote system was changed by an external process. The change does not reflect a change in Agave’s understanding of the job’s status. |
| UNKNOWN_TERMINATION | The job experienced an unknown termination event and is no longer running on the remote system. The job will be failed by Agave momentarily. |
Metadata
| Event | Description |
|---|---|
| CREATED | The metadata was updated |
| UPDATED | The metadata was updated |
| DELETED | The metadata was deleted |
| PERMISSION_GRANT | User permission was granted |
| PERMISSION_REVOKE |
Metadata Schema
| Event | Description |
|---|---|
| CREATED | The schema was updated |
| UPDATED | The schema was updated |
| DELETED | The schema was deleted |
| PERMISSION_GRANT | User permission was granted |
| PERMISSION_REVOKE |
Monitors
| API | Description |
|---|---|
| CREATED | The monitor was created |
| UPDATED | The monitor was updated |
| DELETED | The monitor was deleted |
| ENABLED | The monitor was enabled |
| DISABLED | The monitor was disabled |
| PERMISSION_GRANT | A new user permission was granted on this monitor |
| PERMISSION_REVOKE | A user permission was revoked on this sytem |
| FORCED_CHECK_REQUESTED | A status check was requested by the user outside of the existing monitor schedule. |
| CHECK_PASSED | The status check passed |
| CHECK_FAILED | The status check failed |
| CHECK_UNKNOWN | The status check finished in an unknown state |
| STATUS_CHANGE | The status condition of the monitored resource changed since the last check |
| RESULT_CHANGE | The cumulative result of all checks performed on the monitored resource changed since the last suite of checks |
Notifications
| Event | Description |
|---|---|
| CREATED | Notification was created |
| UPDATED | Notification was updated |
| DELETED | Notification was deleted |
| DISABLED | Notification was diabled |
| ENABLED | Notification was enabled |
| FAILURE | Notificaiton delivery failed |
| SUCCESS | Notification was successfully delivered |
| SEND_ERROR | Notification attempt was unsuccessful |
| RETRY_ERROR | Notification retry attempt was unsuccessful |
| PERMISSION_REVOKE | One or more user permissions were revoked on this tag |
| PERMISSION_GRANT | One or more user permissions were granted on this tag |
| FORCED_ATTEMPT | Notification attempt was forced by user |
PostIts
| Event | Description |
|---|---|
| CREATED | The metadata was updated |
| UPDATED | The metadata was updated |
| REFRESHED | PostIt was refreshed back to its original quotas or extended for another day |
| DELETED | The metadata was deleted |
| REDEEMED | User permission was granted |
Profiles
| Event | Description |
|---|---|
| CREATED | A new user account was created. |
| DELETED | The user account was deleted. |
| UPDATED | The user account was updated. |
| ACCOUNT_ACTIVATED | The user’s account was activated. |
| ACCOUNT_DEACTIVATED | The user’s account was deactivated. |
| ROLE_GRANTED | The user had a role added. |
| ROLE_REVOKED | The user had a role revoked. |
| QUOTA_EXCEEDED | The user has exceeded one or more quotas. |
Systems
| Event | Description |
|---|---|
| CREATED | The system was created |
| UPDATED | The system was updated |
| DELETED | The system was deleted |
| ROLES_GRANT | User permission was granted |
| ROLES_REVOKE | User role was removed from the system |
| STATUS_CHANGE | The system status changed |
Tags
| Event | Description | |
|---|---|---|
| CREATED | Tag was registered | |
| UPDATED | Tag was updated | |
| DELETED | Tag was deleted from active use | |
| RESOURCE_ADDED | Tag was restored from deleted status | |
| RESOURCE_REMOVED | Tag was disabled | |
| PUBLISHED | Tag was published for public use | |
| UNPUBLISHED | Tag was unpublished. It will no longer be available for public use | |
| PERMISSION_REVOKE | One or more user permissions were revoked on this tag | |
| PERMISSION_GRANT | One or more user permissions were granted on this tag |
Transfers
| Event | Description |
|---|---|
| CREATED | A new transfer was created |
| CANCELLED | The system was deleted |
| QUEUED | Transfer queued and waiting to start |
| COMPLETED | Transfer completed successfully |
| FAILED | Transfer failed while transferring |
| PAUSED | Transfer paused |
| RETRYING | Transfer failed, beginning to retry |
| TRANSFERRING | Transfer has started |
Search
/$$$$$$ /$$
/$$__ $$ | $$
| $$ \__/ /$$$$$$ /$$$$$$ /$$$$$$ /$$$$$$| $$$$$$$
| $$$$$$ /$$__ $$|____ $$/$$__ $$/$$_____| $$__ $$
\____ $| $$$$$$$$ /$$$$$$| $$ \__| $$ | $$ \ $$
/$$ \ $| $$_____//$$__ $| $$ | $$ | $$ | $$
| $$$$$$| $$$$$$| $$$$$$| $$ | $$$$$$| $$ | $$
\______/ \_______/\_______|__/ \_______|__/ |__/
Search is a fundamental feature of the Agave Platform. Most of the core science APIs support a mature, URL-based query mechanism allowing you to search using a sql-inspired json syntax. The two exceptions are the Files and Metadata APIs. The Files service does not index the directory or file contents of registered systems, so there is no way for it to performantly search the file system. The metadata service supports MongoDB query syntax, thus allowing more flexible, and slightly more complex, querying syntax.
Query syntax
http://sandbox.agaveplatform.org/jobs/v2?name=test%20job
You can include as multiple search expressions to build a more restrictive query.
http://sandbox.agaveplatform.org/jobs/v2?name=test%20job&executionSystem=aws-demo&status=FAILED
By default, search is enabled on each collection endpoint allowing you to trim the response down to the results you care about most. The list of available search terms is identical to the attributes included in the JSON returned when requesting the full resource description.
To search for a specific attribute, you simply append a search expression into the URL query of your request. For example:
Search operators
# systems with cloud in their name
systems/v2?name.like=*cloud*
# apps modified between October 1 and October 30 of this year
apps/v2?lastModified.between=10/1,10/30
# jobs with status equal to PENDING or ARCHIVING
jobs/v2?id.in=PENDING,ARCHIVING
# systems with cloud in their name
systems-search 'name.like=*cloud*'
# apps modified between October 1 and October 30 of this year
apps-search 'lastModified.between=10/1,10/30'
# jobs with status equal to PENDING or ARCHIVING
jobs-search 'id.in=PENDING,ARCHIVING'
By default, all search expressions are evaluated for equality. In order to perform more complex queries, you may append a search operator to the attribute in your search expression. The following examples should help clarify:
For resources with nested collections, you may use JSON dot notation to query the subresources in the collection.
# systems using Amazon S3 as the storage protocol
systems/v2?storage.protocol.eq="S3"
# systems with a batch queue allowing more than 10 concurrent user jobs
systems/v2?queues.maxUserJobs.gt=10
# systems using Amazon S3 as the storage protocol
systems-search 'storage.protocol.eq=S3'
# systems with a batch queue allowing more than 10 concurrent user jobs
systems-search 'queues.maxUserJobs.gt=10'
Multiple operators
# jobs whos app has hadoop in the name, ran on a system with id aws-demo, and started
# any time during the last business week
jobs/v2?appId.like=*hadoop*&executionSystem.eq=aws-demo&startTime.between=last%20monday,last%20friday
# users who profile has a last name ending in ross and an email address ending in texas.edu
profiles/v2?lastname.like=*ross&email.like=*texas.edu
# failed login checks on the a system with uuid 0001409867973952-5056a550b8-0001-014
monitors/v2/?target.like=*ec2*&result.eq=FAILED&type=LOGIN
# jobs whos app has hadoop in the name, ran on a system with id aws-demo, and started
# any time during the last business week
jobs-search 'appId.like=*hadoop*' \
'executionSystem.eq=aws-demo' \
'startTime.between=last%20monday,last%20friday'
# users who profile has a last name ending in ross and an email address ending in texas.edu
profiles-search 'lastname.like=*ross' 'email.like=*texas.edu'
# failed login monitor checks on systems with "ec2" in the name
monitors-checks-search -M target.like=*ec2* \
'result.eq=FAILED' \
'type=LOGIN'
As before you can include multiple search expressions to narrow your results.
The full list of search operators is given in the following table.
| Operator | Values | Description |
|---|---|---|
| eq | mixed | Matches values equal to the given search value. All comparisons are case sensitive. This cannot be used for complex object comparison. |
| on | datestring | Matches dates falling on the given datestring. Regardless of the precision given in the datestring, the search will look for matches from midnight to midnight on the resovled date. |
| neq | mixed | Matches values not equal to the given search value. All comparisons are case sensitive. This cannot be used for complex object comparison. |
| lt | mixed | Matches values less than the given search value. |
| before | datestring | Matches dates falling before the given datestring. Single second precision is supported. |
| lte | mixed | Matches values less than or equal to the given search value. |
| gt | mixed | Matches values greater than the given search value. |
| after | datestring | Matches values after the given datestring. |
| gte | mixed | Matches values greater than or equal to the given search value. |
| in | comma-separated list | Matches values in the given comma-separated list. This is equivalent to applying the like operator to each comma-separated value . |
| nin | comma-separated list | Matches values not in the given comma-separated list. This is equivalent to applying the nlike operator to each comma-separated value . |
| like | string | Matches values similar to the given search term. Wildcards (*) may be used to perform partial matches. |
| nlike | string | Matches values different from the given search term. Wildcards (*) may be used to perform partial matches. |
| between | comma-separated datestring | Matches dates falling within the given range. Single second precision is supported at either end of the range. |
Date support
Dates returned from the Agave core science API are always formatted as ISO8601 dates. When searching, however, a much more flexible date syntax is supported. The following table lists supported expressions by example.
| Expression | Equivalent Expression |
|---|---|
| 08:00:00.000 | |
| 4pm or 04:00pm or 16:00 | 16:00:00.000 |
| 430pm or 04:30pm or 16:30 | 16:30:00.000 |
| 4pm | 17:00:00.000 |
| +1 second|minute|hour|day|week|month|year | now +1 second|minute|hour|day|week|month|year |
| -1 second|minute|hour|day|week|month|year | now -1 second|minute|hour|day|week|month|year |
| next Tuesday | |
| last Tuesday | |
| now | new Date() |
| today | 00:00:00.000 |
| midnight | 00:00:00.000 +24 hours |
| morning or this morning | 07:00:00.000 |
| noon | 12:00:00.000 |
| afternoon or this afternoon | 13:00:00.000 |
| evening or this evening | 17:00:00.000 |
| tonight | 20:00:00.000 |
| tomorrow | now +24 hours |
| tomorrow morning | morning +24 hours |
| noon tomorrow or tomorrow noon | noon +24 hours |
| tomorrow afternoon | afternoon +24 hours |
| yesterday | now -24 hours |
| all the permutations of yesterday and morning, noon, afternoon, and evening | #colspan# |
| 2004 | |
| October or Oct | 10/1 |
| Tuesday or Tue | Calendar date of the next Tuesday |
| October 26, 1981 or Oct 26, 1981 | 10/26/1981 |
| October 26 or Oct 26 | 10/26 |
| 26 October 1981 | 10/26/1981 |
| 26 Oct 1981 | 10/26/1981 |
| 26 Oct 81 | 10/26/1981 |
| 10/26/1981 or 10-26-1981 | |
| 10/26/81 or 10-26-81 | |
| 1981/10/26 or 1981-10-26 | 10/26/1981 |
| 10/26 or 10-26 |
Custom search result
Search with multiple operators and return a custom response
# jobs whos app has hadoop in the name, ran on a system with id aws-demo, and started
# any time during the last business week
jobs/v2?appId.like=*cloud*&executionSystem.like=*docker*&startTime.after=2016-01-01&naked=true&limit=3
# jobs whos app has hadoop in the name, ran on a system with id aws-demo, and started
# any time during the last business week
jobs-search -v --limit=3 \
--filter=id,appId,executionSystem,status,created \
'appId.like=*cloud*' \
'executionSystem.like=*docker*'
'startTime.after=2016-01-01' \
'naked=true'
There response will be a JSON array of custom objects comprised of only the fields you specified in the
filterquery parameter.
[
{
"id":"2974032102330798566-242ac115-0001-007",
"appId":"cloud-runner-0.1.0u1",
"executionSystem":"docker.tacc.utexas.edu",
"status":"FINISHED",
"created":"2016-11-03T16:04:53.000-05:00"
},
{
"id":"8643408718823550490-242ac115-0001-007",
"appId":"cloud-runner-0.1.0u1",
"executionSystem":"docker.tacc.utexas.edu",
"status":"FINISHED",
"created":"2016-11-03T15:17:24.000-05:00"
},
{
"id":"9049010248689521126-242ac115-0001-007",
"appId":"cloud-runner-0.1.0u1",
"executionSystem":"docker.tacc.utexas.edu",
"status":"FINISHED",
"created":"2016-11-03T15:17:07.000-05:00"
}
]
By combining the search, filtering, and naked query parameters, you can query the API and return just the information you care about. The example search will return a JSON array of job objects with just the id, appId, executionSystem, status, and created fields from the full job object in the response. This combination of search, filtering, and pagination provides a powerful mechanism for generating custom views of the data.
Tooling
Sometimes the hardest part of a new project is taking the first step. Agave Tooling helps make taking that first step a little easier through reference web applications, boilerplate integrations scripts, and integrations with popular CMS and frameworks through native plugins and modules.
CLI
Checkout the source code
git clone https://github.com/agaveplatform/agave-cli
The Agave command-line interface (CLI) is an complete interface to the Agave REST API. The scripts include support for creating persistent authentication sessions, creating/renaming apps, registering and sharing systems, uploading and managing data, creating PostIts, etc. For existing projects looking to leverage Agave for back-end processing, for users wishing to integrate Agave into their existing scripted solutions, or for those new to Agave who just want to kick the tires, the Agave CLI is a powerful tool for all of these things. The Agave CLI can be checked out from the Agave git repository.
For more information on using the Agave CLI in common tasks, please consult the Guides which reference it in all their examples, or check out the Agave Samples project for sample data and examples of how to use it to populate and interact with your tenant.
Agave ToGo
Get a head start on your next development sprint by leveraging the open source Agave ToGo project. This AngularJS webapp can be reused in your existing project or used as-is for a clean, responsive, client-side web application that brings the full power of Agave to your browser.
Microsites
Agave Microsites are reference single-purpose web applications focused on delivering a specific solution to a target audience. Current microsite implementations focus on providing execution and management of a single app to a group of users. Upcoming microsites will focus on data management, automation, and data collection. All the Agave Microsites are white labeled and completely open source. You can view the latest Microsite Demo in our [Github repository]((https://github.com/agaveplatform/microsites).
Jupyter Hub
Jupyter notebooks (formerly iPython notebooks) provide users with interactive computing documents that contain both computer code and a mix of rich text elements such as data visualizations, text paragraphs, hyperlinks, formatted equations, etc. The code cells in notebooks can be executed interactively, cell by cell, and the results of the executions are displayed in subsequent cells in the notebook. The notebooks can also be exported to a serialized JSON formatted file and executed like a traditional program.
JupyterHub is an open source project to provide multi-user hosted notebook servers as a service. When a user signs in to JupyterHub, a notebook server with pre-configured software is automatically launched for them. The Agave team integrated JupyterHub into its identity and access management stack and made several other additional enhancements and customizations to enable the use of Agave’s language SDKs such as agavepy and the CLI, persistent storage, and multiple kernel support, directly from their notebooks with very minimal setup. Agave’s deployment of JupyterHub, which runs each user’s notebook server in a Docker container to further enhance reproducibility, is freely available for use in Agave’s Public Tenant.
You can get started with JupyterHub today at https://github.com/agaveplatform/jupyter-notebook.
Integrations
Several integrations exist out of the box to help you integrate Agave functinality into your favorite framework. If you’d like to see a integration into a framework not included here, let us know.
AngularJS
- oauth-ng: A custom multitenant fork of the popular oauth-ng module preconfigured to authenticate against the Agave Platform.
- Agave Filemanager: A fork of the angular-filemanager project customized to interact with the Agave Platform. Available as a standalone app, modal, and directive.
Elm
- Elm auth: A sample Elm application demonstrating native OAuth implicit flow authenication against the Agave Platform.
Wordpress
- wp-oauth: A custom fork of the WP-OAuth plugin configured with multitenant authentication against the Agave Platform. Account federation and user mapping are fully integrated to allow for seamless integration with existing installations.
Express
- Login Proxy API: A simple Node API for password login to an agave tenant